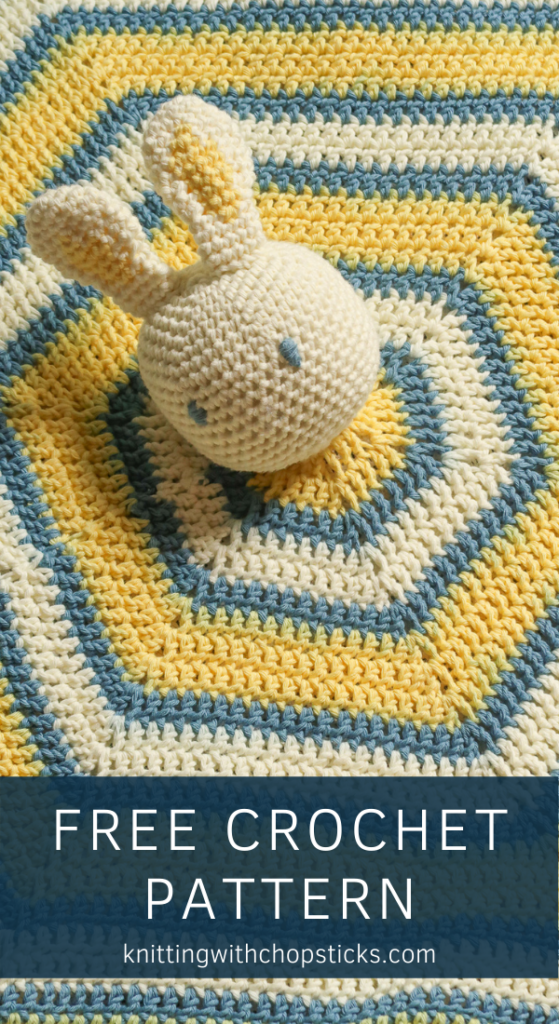
With its classic stripes and tight stitches, this crochet baby lovey pattern will stand the test of time (and toddler abuse). Read through my inspiration, where the name Boutchou comes from, and the perfect yarn I choose for this project. Or scroll on down for the free pattern.
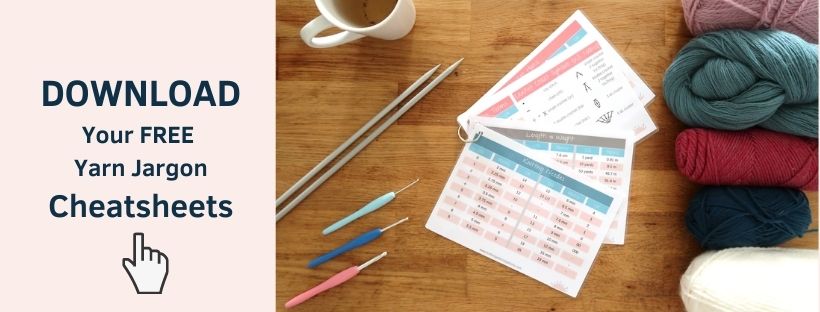
No time right now? Pin this adorable baby crochet sweater pattern for later!
*This post contains affiliate links (only for products I love, use and spend my own money on obviously). This means I earn some yarn money if you make a purchase through one of these links (of course at no extra cost for you!), which I promise to use to create more awesome patterns like this one. All opinions are my own. See my full disclosure here.
If you prefer to purchase the cheap ad-free PDF Pattern to get all the instructions and pictures in a nice PDF you can print and take notes on without relying on your phone or an internet connection, I’ve got you covered!
The Boutchou Lovey is available on Ravelry or in my Etsy Shop. Grab your copy before you forget.
Or grab the discounted Boutchou set here.
Why Boutchou?
Boutchou is a french expression coming from “Bout de Chou,” which means “piece of cabbage.” French lore dictates that babies originate from cabbages (now you know where the creator of the Cabbage Patch Doll got the idea!). The word “chou” also translates to “cute,” which made Boutchou the perfect nickname for our unborn baby while I was pregnant. Better than just calling him Baby for 9 months!
This crochet baby lovey pattern, along with the rest of the Boutchou Baby Set, were designed and created especially for our sweet little Boutchou baby.

The Boutchou Crochet Baby Pattern Set
The Boutchou lovey is part of the Boutchou crochet baby pattern set which includes a hat, booties, romper, sweater, and a matching baby blanket pattern.
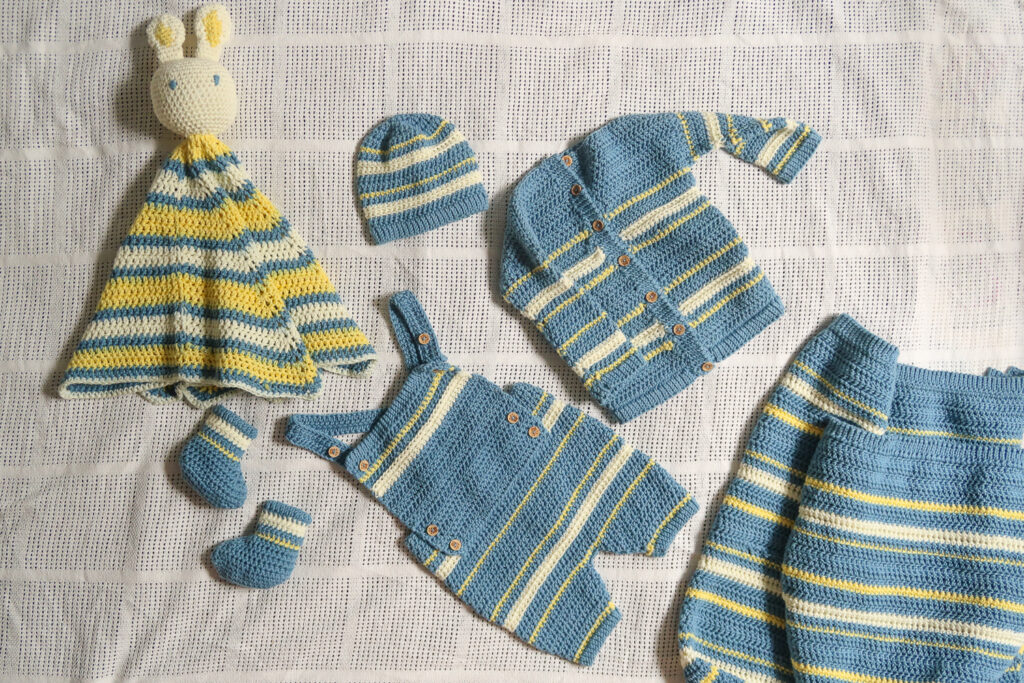
Read more about each of the patterns and find the free online version here or grab the discounted PDF pattern set here.
The Yarn
For this extra special personal project, I choose to use Paintbox Cotton Aran yarn. Since an entire set uses up a lot of yarn, I knew I would need something of great quality, yet still affordable.
This yarn has amazing stitch definition, which is exactly what I wanted for this project. The simple design and lightly textured stitches of the pattern are highlighted further by my choice in yarn. I picked a cotton yarn because we live in a tropical country, and I needed something that would be easy to wash. Machine washable is an absolute must when creating anything for a baby, or else parents will rarely use it, which would be a pity!
Added bonus for those of you who want to make your set in a different color, Paintbox Cotton Aran yarn is available in 50 different shades, so you’re sure to find something you like.
A big thanks to my friends at Lovecrafts.com for sponsoring the yarn for this project (btw, did you know they also have a great library of free crochet patterns?).

Before you Start your Crochet Baby Lovey
Materials
- 4 mm / US G – 6 hook.
- 5 mm / US H – 8 hook.
- Paintbox Cotton Aran (50g, 100% cotton, 85m / 93yds)
- 2 skeins in dolphin blue (referred to as blue).
- 2 skein in banana cream (referred to as white)
- 2 skein in daffodil yellow (referred to as yellow)
- Tapestry needle to weave in the ends.
Size
The crochet lovey blanket pattern is 70 cm / 27.5” point to point.
Gauge
The gauge is not critical for this pattern. As an indication, in dc with 5mm / US H – 8 hook, my gauge is 14.5 st by 8 rows for a 10 cm by 10 cm square (4” by 4”).
Abbreviations
This pattern uses US notations.
- st = stitch
- ch = chain
- sc = single crochet
- sc2tog = single crochet 2 stitches together
- dc = double crochet
- sl st = slip stitch
Notes
Work instructions between [ ] the indicated number of times or until the end of the row / round.
The final number of stitches is indicated at the end of the row / round between < >.
The turning ch 1, ch 2 don’t count as stitches throughout the pattern except if mentioned otherwise.
The pattern is written in crochet shorthand. For example:
- “sc 1” means to single crochet in the next stitch,
- “sc 2” means to single crochet in each of the next 2 stitches,
- and “2 sc” means to single crochet twice in the next st.
Special Stitches and Techniques
- The magic circle (aka magic ring) is used to start the hexagons and half hexagons. If you’re not familiar with this technique, have a look at my detailed tutorial (includes a video).
- The ears of the bunny head require some color work. If you’re not familiar with color work this tutorial should help you out. You can also make the ears completely white if you prefer.
Tips and Tricks
- To avoid having a ton of ends to weave in at the end, I crochet the first 6-8 stitches in a new color over the old color yarn so my ends get woven in while I keep crocheting.
The Actual Crochet Lovey Pattern
The Head
With white color yarn and your 4mm hook, sc 6 in a magic ring.
Work continuously in the round.
Tip: Use a stitch marker to help you keep track of the start/end of the round.
Round 1: 2 sc in each st around. < 12 st >
Round 2: [sc, 2 sc in the next st] around. < 18 st >
Round 3: [sc 2, 2 sc in the next st] around. < 24 st >
Round 4: [sc 3, 2 sc in the next st] around. < 30 st >
Round 5: [sc 4, 2 sc in the next st] around. < 36 st >
Round 6: [sc 5, 2 sc in the next st] around. < 42 st >
Round 7: [sc 6, 2 sc in the next st] around. < 48 st >

Round 8: [sc 6, sc2tog] around. < 42 st >
Round 9 – 16: Sc around.
Round 17: [sc 5, sc2tog] around. < 36 st >
Round 18: [sc 4, sc2tog] around. < 30 st >
Round 19: [sc 3, sc2tog] around. < 24 st >
Round 20: [sc 2, sc2tog] around. < 18 st >
Start stuffing the head while you keep working.
Round 21: [sc, sc2tog] around. < 12 st >
Round 22: Sc2tog around. < 6 st >
Fasten off and leave a long tail for sewing.

The Ears
Make 2
With your white color yarn and 4 mm / US G – 6 hook, sc 6 in a magic ring.
Note: All stitches are worked with white color yarn unless mentioned otherwise. Yellow stitches are notes with “in yellow” after their instruction; remember to switch back to white for the remainder of the stitches in each round.
Round 1: 2 sc in each st. < 12 st >
Round 2: [sc 5, 2 sc in the next st] twice. < 14 st >
Round 3: [sc 5, 2 sc in the next 2 st] twice. < 18 st >
Round 4: Sc 3, sc 1 in yellow, sc 3, sc2tog, sc 7, sc2tog. < 16 st >

Round 5: Sc 3, sc 2 in yellow, sc 11. < 16 st >
Round 6 – 7: Sc 2, sc 4 in yellow, sc 10. < 16 st >
Round 7: Sc 2, sc 4 in yellow, sc2tog, sc 6, sc2tog. < 14 st >
Round 8: Sc2tog, sc, sc 3 in yellow, sc, sc2tog, sc 5. < 12 st >
Round 9: Sc2tog, sc 3 in yellow, sc2tog, sc 5. < 10 st >
Round 10: Sc 2, sc 1 in yellow, sc 7.
Round 11 – 13: Sc around

Attach the ears at the top of the head between Rounds 2 and 5.

Embroider the eyes with a ply of the blue color yarn between Rounds 11 and 12. Leave 6 stitches between the eyes.
The Blanket
With your 5mm / US H – 8 hook and yellow color yarn:
Round 1: In a magic circle, ch 3 (counts as dc 1 + ch 1), [dc, ch 1] 5 times, join with a sl st in the 2nd ch. < 12 st >
Round 2: Ch 2, [(dc, ch 1, dc) in the ch-1 space, dc in next dc] around working final dc in same st as join, join with a sl st in the 2nd ch. < 24 st >

Round 3: Ch 2, [dc until ch-1 space, (dc, ch 1, dc) in the ch-1 space] around, dc until end of the round. Join with a sl st in the 2nd ch. < 36 st >
Round 4: With blue, repeat Round 3.
Round 5 – 6: With white, repeat Round 3.
Round 7: With blue, repeat Round 3.
Round 8 – 10: With yellow, repeat Round 3.
Repeat Rounds 4 to 10 once. Then repeat Rounds 4 to 9.
With blue, repeat Round 3.
Switch to white color yarn.
Final Round: Ch 1, [sc until ch-1 space, 3 sc in the ch-1 space] around, sc until end of the round. Join with a sl st in the ch.

Blocking and Finishing Touches
You’re done with the crocheting part. Make sure to weave in all the ends.
Carefully block your blanket to give it its best shape before attaching the bunny head in the center.
Don’t skip this step as it can make a huge difference. Read my detailed tutorial on why block, how-to, and all my tips and tricks if you need help.