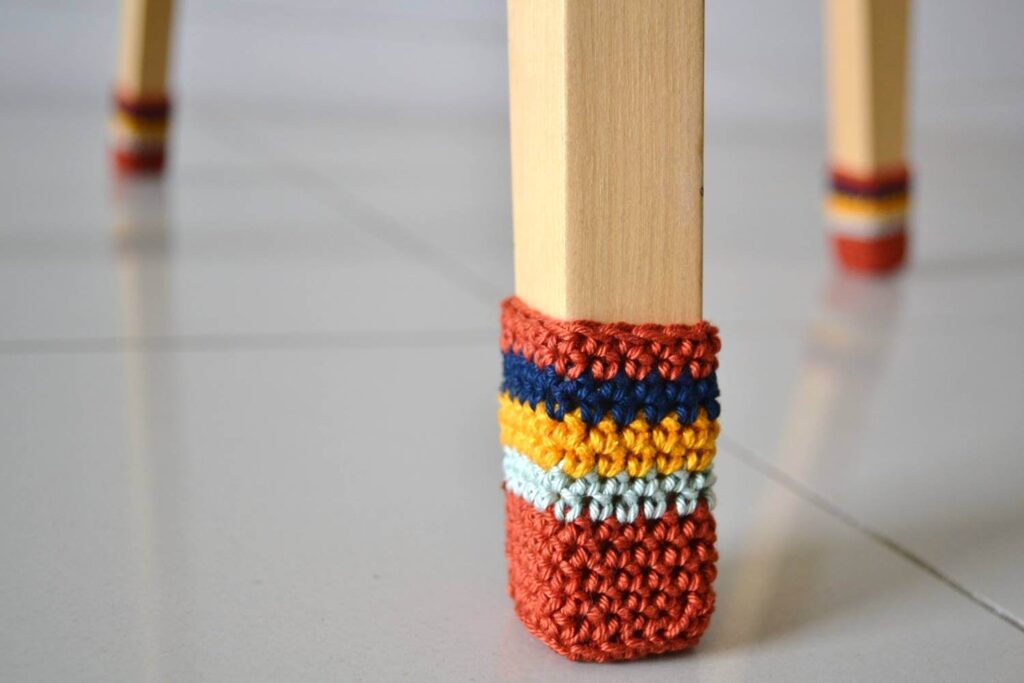
Crochet for home decor is one of my favorite types of crochet. I love to create everyday objects in crochet. Usually, they’re simple objects I use all the time and want to make a pretty version of such as my chair socks or placemats.
The candy potholder crochet free pattern is exactly that. I use those boring cheap cork potholders every day and wanted a more colorful, fun and decorative version.
This kitchen decor crochet pattern is very easy. Only single crochets combined with increases and decreases are used.
No time right now? Pin this DIY potholder project for later.

Scroll down for the free version but I recommend you purchase the ad-free PDF Pattern to get all the instructions and pictures in a nice PDF you can print and take notes on without relying on your phone or an internet connection, I’ve got you covered!
The candy crochet potholder free pattern is now available in my Etsy and Ravelry stores. Add it to your cart right now before you forget.

*This post contains affiliate links (only for products I love, use and spend my own money on obviously). This means I earn some yarn money if you make a purchase through one of these links (of course at no extra cost for you!), which I promise to use to create more awesome patterns like this one. All opinions are my own. See my full disclosure here.
Before you Start
Materials
- 2.5 mm / US 1 crochet hook. I love and use this simple cheap set of hooks.
- Fingering weight cotton yarn: I used this cotton bamboo blend, it’s available in so many colors. You need about 5m / 5.5 yard per ball for a total of 265m / 290 yards for the entire crochet trivet. I used 14 different colors. You can use as many or as few colors as you want (or have) for your trivet. It’s perfect to use up scrap yarn but be careful of the material you choose. Some synthetic yarns will not react well to heat. I don’t want your hot pads to melt as soon as you start using them.
- Tapestry needle to weave in the ends. I love this set as it has different eye sizes for different yarn thickness and it comes in a small tube which is very convenient so I don’t lose them.
- All-purpose superglue. I have used about 2 of these little tubes.
- Stuffing. I used this stuffing which I also use for toys. You can use scraps of yarn or other substitutes if you prefer.
Abbreviations
This pattern follows US notations.
- st = stitch
- sc = single crochet
- inc = increase = make 2 sc in the same stitch
- dec = decrease = sc 2 stitches together
Repeat instructions between ** the indicated number of times or until the end of the round.
Gauge is not important for this pattern but my gauge is 34 stitches by 40 rows for a 10cm by 10cm (4″ by 4″) square.

Size
The crochet trivet is 2cm (3/4″) high and about 20cm (3 3/4″) in diameter.
You can make it smaller or bigger by removing/adding more balls.
The Actual Crochet Potholder Free Pattern
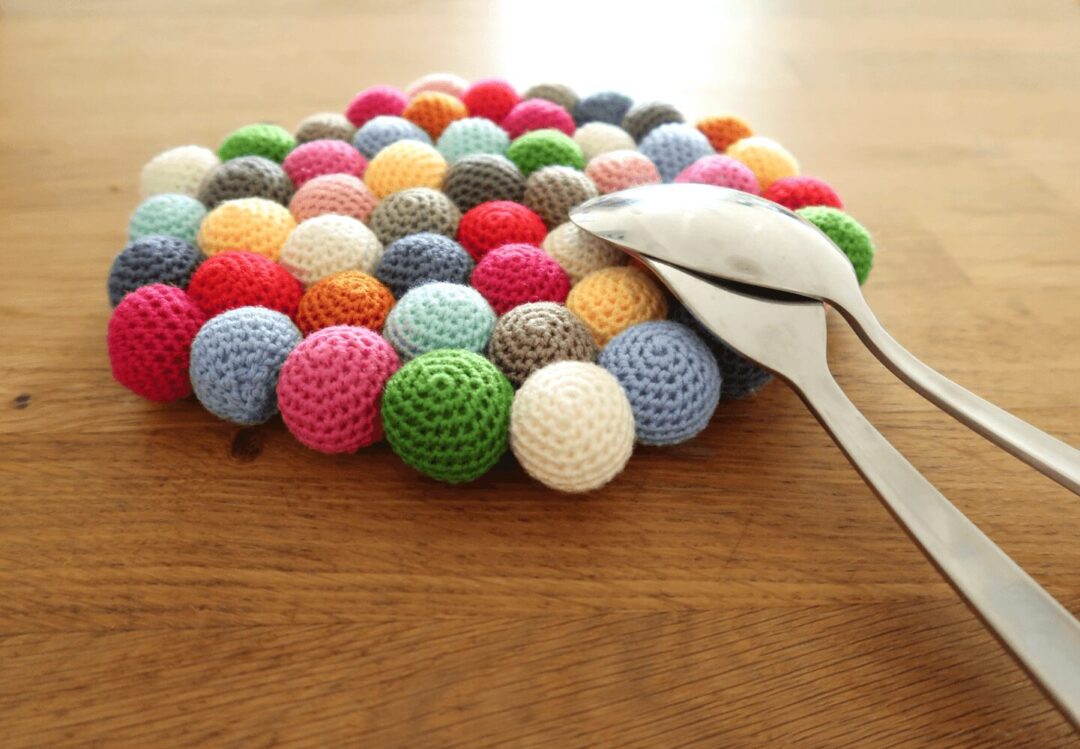
The crochet potholder is made out of 53 little crochet balls. Each ball is made separately and then glued together.
Round 1: Magic circle 6sc

Round 2: inc 6 times (12 st)

Round 3: * sc, inc * repeat 6 times (18 st)
Round 4: * 2sc, inc * repeat 6 times (24 st)

Round 5 – 8: sc around (24 st)

Round 9: * 2sc, dec * repeat 6 times (18 st)
Round 10: * sc, dec * repeat 6 times (12 st)
Stuff the ball tightly before making the last row.

Round 11: dec 6 times (6 st)
Close the hole and weave in the end.

Depending on how many colors you use, divide them equally amongst all balls. I made 4 of each color except the more greyish brownish colors because I wanted my hot pads to be very colorful. I made 5 white ones to lighten up the mix. I advise you to start with 3 of each color for example and then see the mix you have and which colors you want to add more of.

Once most of your balls are ready, start assembling them together.
The main reasons why I don’t want you to wait until you crocheted all of them are:
- Depending on how you arrange them you might want more of this or that color. This was you can adjust as you go.
- Depending on how you arrange them you might need a few more or a few less balls. I don’t want you to make too many and have to waste them.
To assemble the trivet, put some glue on one of the balls and press it in place. I advise you to hide the bottom part of the balls (where you weaved in the ends) as it is not the prettiest. You can either put all the balls with the magic circle up or do as I did and put some on the side to alternate.

Glue them together tightly and work your way around to form a roundish shape. I like the funny, not perfectly round shape this gives you but if you prefer to get a more perfect circle you can start by gluing the outer ring together in a nice circle and then fill in the inside of the circle. Make sure you put enough glue.

Now all is left to do is prepare a nice casserole and enjoy your new crochet hot pads!
If you liked this home decor crochet pattern you will also like the following colorful patterns for your home: