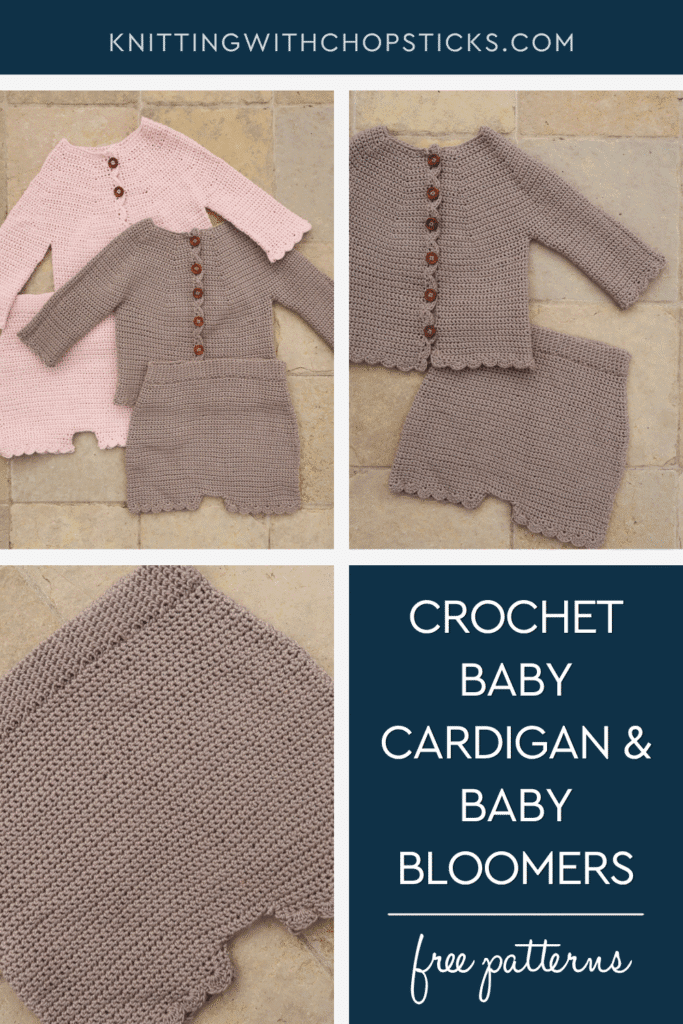
Alvina Baby Set: Matching Crochet Bloomer and Cardigan Set

A new baby crochet pattern set, the matching Alvina Baby Cardigan and Bloomer set, is now a free crochet pattern here on the blog. Read all about the free baby crochet cardigan and bloomers patterns, scroll down to view the full free pattern or purchase an ad free PDF from the links below.
No time right now? Pin this adorable crochet baby outfit patterns for later!
*This post contains affiliate links (only for products I love, use and spend my own money on obviously). This means I earn some yarn money if you make a purchase through one of these links (of course at no extra cost for you!), which I promise to use to create more awesome patterns like this one. All opinions are my own. See my full disclosure here.

This crochet baby bloomer and sweater set could not get any cuter. Unless of course, you put a baby in it!
Crochet baby clothes make perfect gifts, or a sweet soft touch for one of your own. You are in the exact right place, because these crochet baby patterns are easy, adorable, and practical.
Made with fine weight 2 yarn and an elastic waistband for a snug comfortable fit and easy ons and offs, this set is adorable and beginner friendly. A cute scallop edge along all the ends ads a touch of elegance to this simple set.
Crochet away for sizes 3-24 months!
The Yarn
The Alvina baby set features the soft and delicate Hobbii Friends Extra Fine Merino. It’s a fine weight 2 100% merino wool yarn. Soft and warm, it’s perfect for baby makes. I choose to work with a thinner yarn so the outfit wouldn’t be too bulky and remain cozy yet comfortable for your little ones.

Classic and Cute
For this design I wanted a simple classic baby set. I wanted something my mom could have made me wear when I was a baby but also something I would love to have my kiddos wear and hopefully something they’ll look forward to dressing their kids in.
The outfits I usually drool over in baby stores are cardigans and bloomer set. Practical, and so damn adorable!

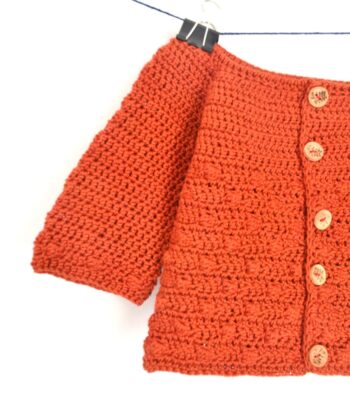
The small scallop edge you can find on most of the edges of the crochet cardigan and bloomer pattern gives it an extra dose of cuteness. The gaps in the scallop edge stitches also serve as buttonholes, practical and beautiful.
Downloadable Alvina Baby Cardigan and Bloomer Set Crochet Pattern

Grab the printable PDF of the Alvina baby crochet pattern set now in my shop, Etsy shop or on Ravelry.
More Baby Crochet Patterns you'll love

Before You Start Your Alvina Free Baby Cardigan Crochet Pattern

Materials
- 4 mm / US G – 6 hook
- Hobbii Friends Extra Fine Merino (fine weight (2), 50g, 100% Wool, 165 m / 1800 yds): 3 (3, 4, 5, 5) skeins in color Gray (119).
- Tapestry needle to weave in the ends.
- 9 stitch markers.
Sizes
The crochet baby sweater pattern is available in following sizes: 3 months, 6 months, 12 months, 18 months and 24 months. Sizes are written as 3 (6, 12, 18, 24) throughout the pattern. Pictures illustrate the 6 months size.
Below are the final cardigan dimensions for the different sizes.
- 3 months: bust 48.5 cm / 19”, length 27 cm / 10.5”
- 6 months: bust 50 cm / 19.5”, length 28.5 cm / 11.25”
- 12 months: bust 54.5 cm / 21.5”, length 31 cm / 12”
- 18 months: bust 56 cm / 22”, length 32.5 cm / 12.75”
- 24 months: bust 58 cm / 22.75” length 34 cm / 13.25”
Gauge
The gauge for this pattern, in sc, is 22 st by 28 rows for a 10 cm by 10 cm / 4” by 4” square.
Baby Cardigan Construction
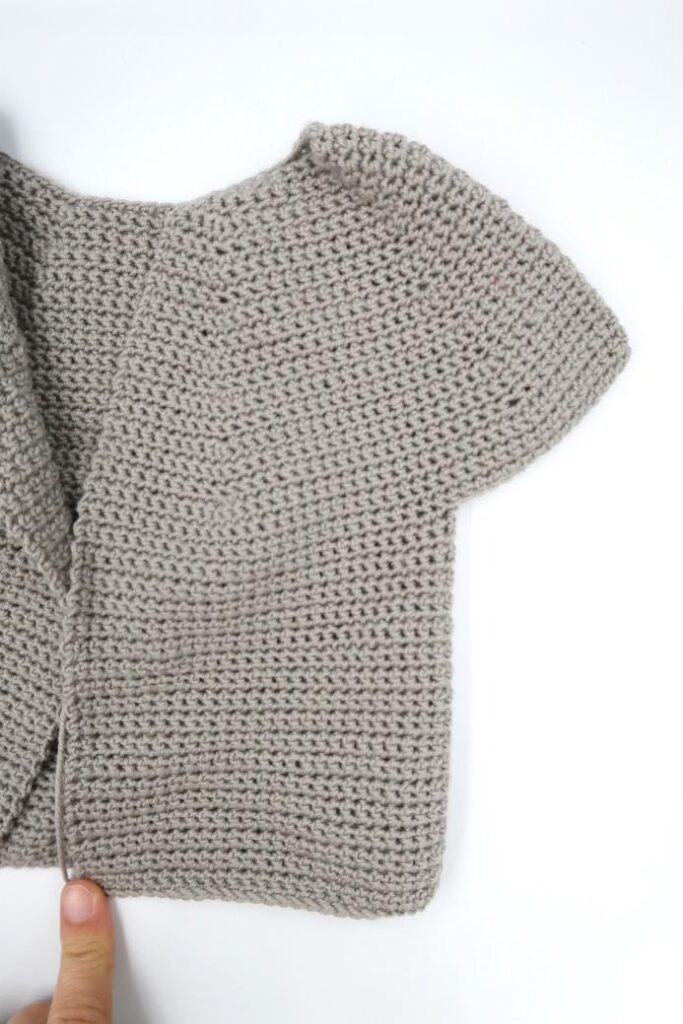
The baby cardigan is worked from the top down. The yoke is worked first, then joined under the arms to work the body, leaving the stitches for the sleeves on the sides. Finally, you’ll go back to join the yarn at the armholes and make the sleeves.
Before You Start Your Alvina Crochet Baby Bloomers Pattern Free

Materials
- 4 mm / US G – 6 hook.
- Hobbii Friends Extra Fine Merino (fine weight (2), 50g, 100% Wool, 165m/1800yds): 2 (2, 3, 3, 3) skeins.
- Tapestry needle to weave in the ends.
- Stitch marker.
Sizes
The baby bloomer crochet pattern is available in the following sizes: 3 months, 6 months, 12 months, 18 months and 24 months. Sizes are noted throughout the pattern in the following way: 3 (6, 12, 18, 24) months. The pictures illustrate the 6 months size.
Final garment measurements are*:
- 3 months: 40 cm / 16” waist circumference
- 6 months: 42 cm / 16.5” waist circumference
- 12 months: 46 cm / 18” waist circumference
- 18 months: 47 cm / 18.75” waist circumference
- 24 months: 49 cm / 19.5” waist circumference
Sick of all the yarn jargon and conversions?
US vs UK, abbreviations, imperial vs metric, yarn weights, etc?

*The waist band is elastic and designed to fit with a negative ease of 4 – 6 cm / 1.5 – 2.25”.
Gauge
The gauge for this pattern, in sc, is 21 st by 30 rows for a 4” by 4” / 10 cm by 10 cm square.
Special Stitches and Techniques
- Thermal stitch (find a detailed video tutorial here)
Baby Crochet Bloomer Construction
The baby bloomer is worked in the from the top down seamlessly in the round. The waist belt is worked first as a long strip in thermal stitch. Stitches are then picked up along the band edge and the bloomer is worked in the round from there onwards. Stitches are split for the legs which are then worked separately.
The Actual Alvina Free Baby Cardigan Crochet Pattern
Yoke
With your 4 mm / US G – 6 hook, chain 47 (54, 54, 61, 61) + 1
Row 1: Sc in 2nd ch from hook, sc across, turn.
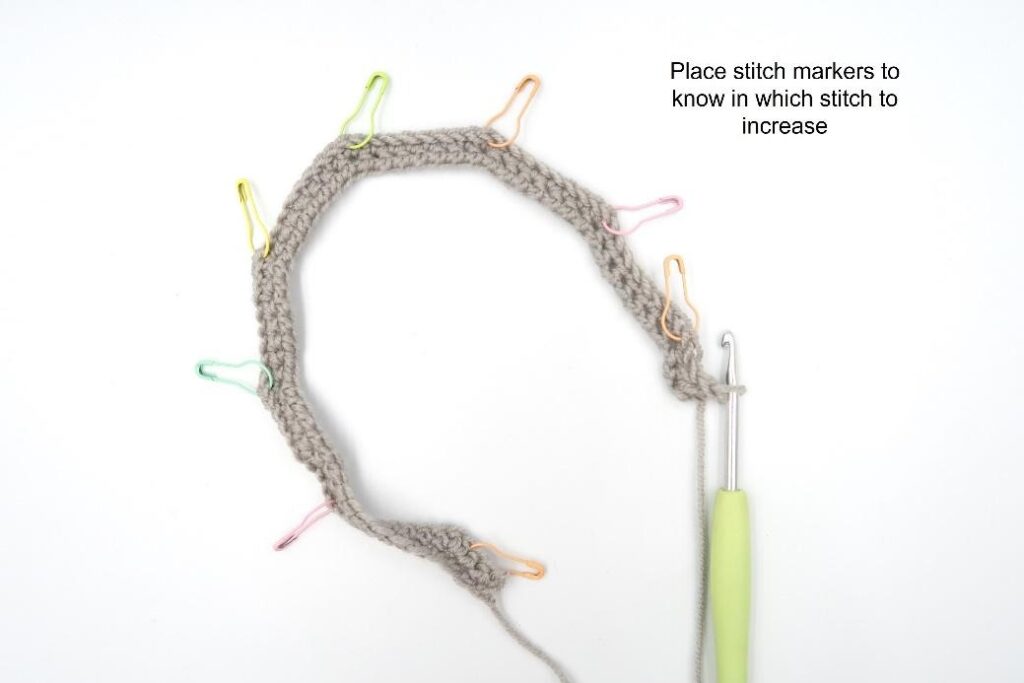
Row 2: Ch 1, sc 2, 3 sc (place marker in middle st), [sc 6 (6, 6, 6, 7), 3 sc (place marker in middle)] until last 2 st, sc 2, turn. <61 (70, 70, 79, 77) st>
Note: You now have 7 (8, 8, 9, 8) marked stitches.
Row 3 – 4 (sc rounds): Ch 1, sc across, turn.
Note: move markers down in corresponding st.
Row 5 (increase round): Ch 1, [sc until marker, 3 sc in marked st (move marker to middle st)] until last marker, sc until end of row, turn. <75 (86, 86, 97, 93) st>
Repeat [2 sc rounds followed by increase round] 1 (1, 1, 1, 2) times. <89 (102, 102, 115, 125 st>
Work [3 sc rounds followed by increase round] three times. <131 (150, 150, 169, 173) st>
Work [4 sc rounds followed by increase round] 3 (2, 3, 2, 3) times. <173 (182, 198, 205, 221) st>
Work 0 (5, 2, 8, 2) sc rounds. Total rows should be 35 (35, 37, 38, 40)
Separate for the Sleeves
Split for the arms:
- 3 months: Ch 1, sc 26, skip 33, sc 55, skip 33, sc 26, sl st to join.
- 6 months: Ch 1, sc 27, skip 36, sc 56, skip 36, sc 27, sl st to join.
- 12 months: Ch 1, sc 30, skip 39, sc 60, skip 39, sc 30, sl st to join.
- 18 months: Ch 1, sc 30, skip 41, sc 63, skip 41, sc 30, sl st to join.
- 24 months: Ch 1, sc 33, skip 44, sc 67, skip 44, sc 33, sl st to join.
Continue working with only the body stitches, leaving the sleeve stitches (skipped stitches) on the side. You will get back to them after finishing the body.
Body
Row 1: Ch 1, sc across, turn. <107 (110, 120, 123, 133) st>
Repeat Row 1 until you reach 12 (13, 14.5, 16, 16.5) cm / 4.75 (5, 5.75, 6.25, 6.5)” from sleeve separation.
Bind off.
Sleeve
Go back to the skipped sleeve stitches. Join yarn in armpit and work in rounds back and forth, joining with a sl st and turning your work after each round.
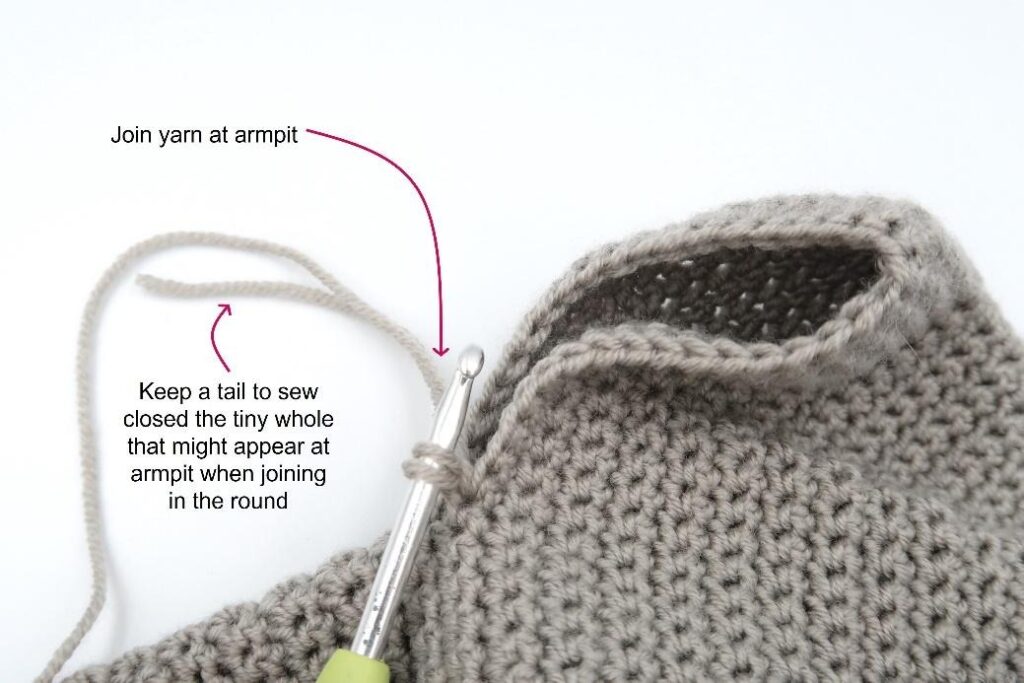
Round 1: Ch 1, sc across, join with a sl st in ch 1, turn. <33 (36, 39, 41, 44) st>
Note: Leave a tail when joining yarn to sew close the small gap that might appear at the armpit.
Repeat Row 1 another 5 times.
Repeat Row 1 until you reach 12 (13, 14.5, 16, 16.5) cm / 4.75 (5, 5.75, 6.25, 6.5)” from sleeve separation. Finish on a right-side row.
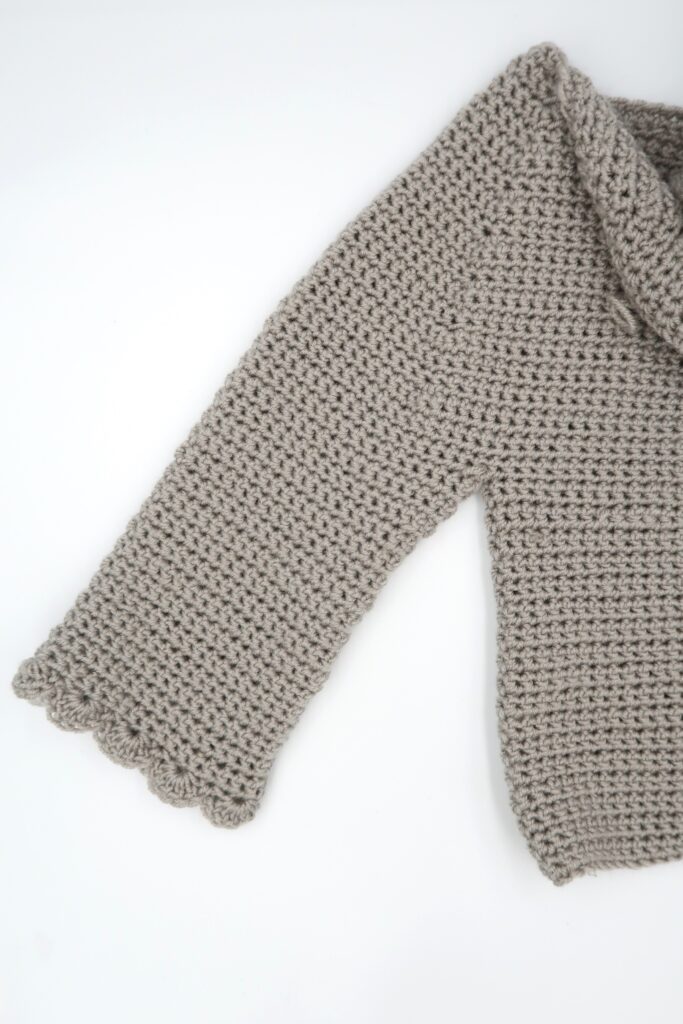
Scallop edge:
- 3 & 18 months: Ch 1, skip 2, [5 dc, skip 1, sc, skip 1] to last st, 5 dc, join with a sl st in the ch 1.
- 6 & 24 months: Ch 1, skip 1, [5 dc, skip 1, sc, skip 1] to last st, 5 dc, join with a sl st in the ch 1.
- 12 months: Ch 1, [5 dc, skip 1, sc, skip 1] to last st, 5 dc, join with a sl st in the ch 1.
<Total Scallop count 8 (9, 10, 10, 11)>
Repeat for the other sleeve.
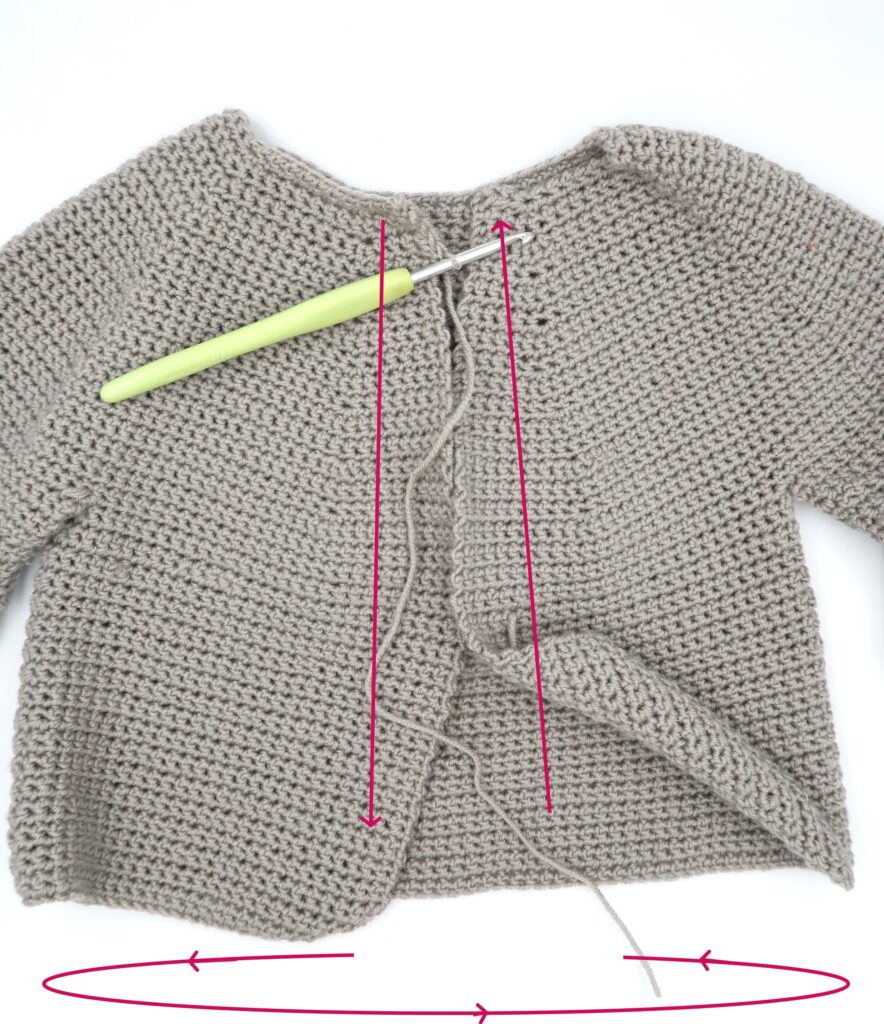
Bottom Edge and Button Band
The cardigan bottom scallop edge and button band is worked at the same time. The buttonholes are formed by skipping 3 stitches between 5 dc cluster scallop stitches.
Join yarn in the top left cardigan corner (at the neck).
You should be starting with a right-side row.
Working down along the cardi side, around the bottom and back up the other side; make a row of sc (approx. 2 sc per 3 rows). The exact number stitches is not important, but make sure you have a multiple of 4 stitches along the front flaps for the edge & button band to come out nicely.
Turn and work edge row on the WS.
Edge row:
- Ch 2, [5 dc, skip 3, 5 dc, skip 1, sc, skip 1] along the left front flap edge, finishing with 5 dc in the bottom corner stitch.
- [skip 1, sc, skip 1, 5 dc] across the bottom edge, skip 1
- Dc along the cardigan right front flap.
Fasten off and weave in the ends.
Right-handed crocheters
Join yarn in the top right corner (at the neck).
You should be starting with a right-side row.
Working down along the cardi side, around the bottom and back up the other side; make a row of sc (approx. 2 sc per 3 rows). The exact number stitches is not important, but make sure you have a multiple of 4 stitches along the front flaps for the edge & button band to come out nicely.
Edge row:
- Ch 2, dc along the cardigan right front flap
- 5 dc in the bottom edge first stitch, [skip 1, sc, skip 1, 5 dc] across the bottom edge
- [5 dc, skip 3, 5 dc, skip 1, sc, skip 1] along the left front flap edge, finishing with 5 dc in the top corner stitch.
Fasten off and weave in the ends.
Blocking
You’re done with the crocheting part. Make sure to weave in all the ends.
To make your cardigan even prettier, help even your stitches and make the scalloped edges come out even more, block your project.
Don’t skip this step as it can make a huge difference. Read my detailed tutorial on why block, how-to, and all my tips and tricks if you need help.
Finishing Touches
Sew the buttons onto the dc button band in front of the corresponding buttonholes.
The Actual Alvina Crochet Baby Bloomers Pattern Free
Waist Band
The bloomer waist band is worked in thermal stitch.
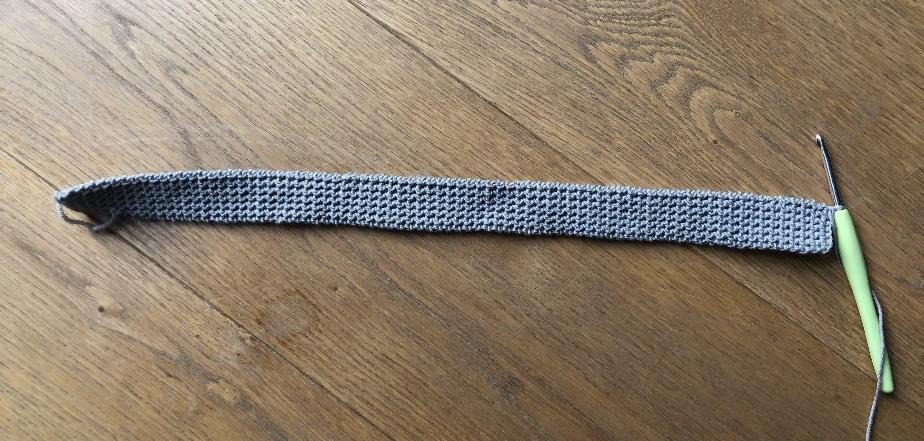
With your 4 mm / US G – 6 hook, chain 6 + 1.
Row 1: Sc BLO in second chain from hook, sc BLO across, turn. <6 sts>
Row 2: Ch 1, Insert hook under back loop of previous row and unused chain loop work single crochet to the end of the row, turn.
Row 3: Ch 1, again insert hook under both back loop of previous row and unused loop from row below to work single crochet across.
Repeat Row 3 until your strap is 40 (42, 46, 47, 49) cm / 16 (16.5, 18, 18.75, 19.5)” long.
Note: Make sure you measure your strap unstretched. The thermal stitch stretches quite a bit and will keep its shape over time which is why I choose to use it for the waist band.
Finish row: Ch 1, insert hook under both loops of previous row and unused loop from row below to work single crochet across.
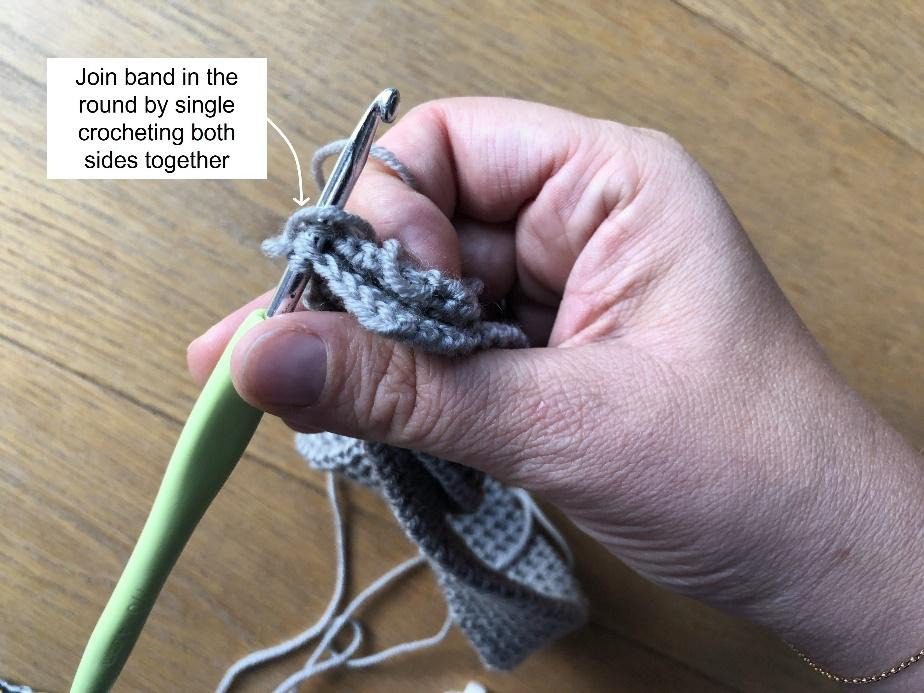
Join band in the round: sc last row to back loop of first row.
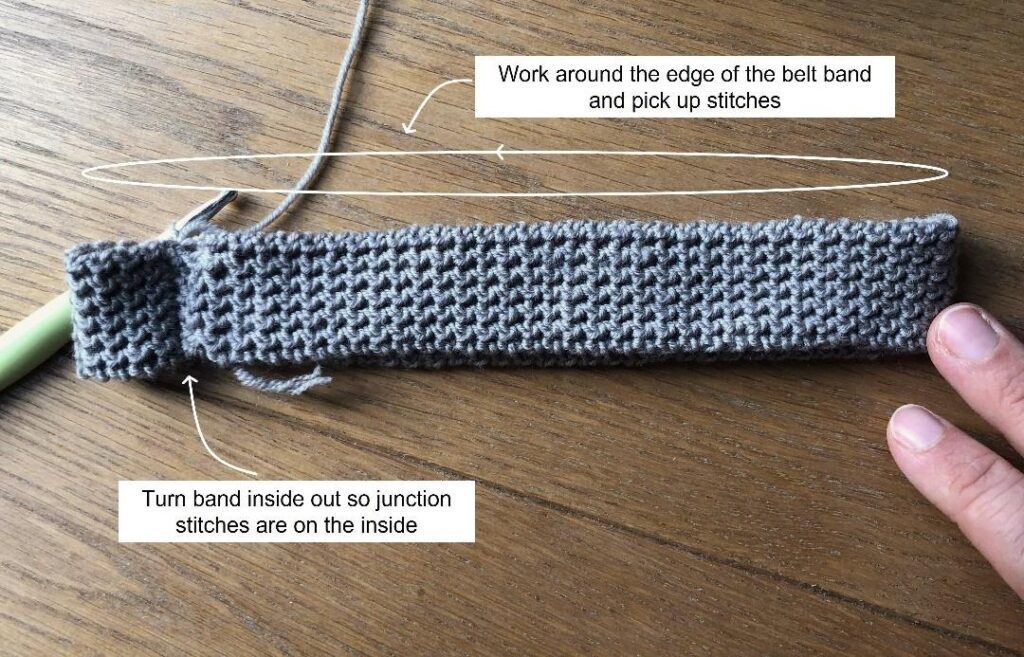
Turn band inside out so junction stitches face the inside of the bloomer.
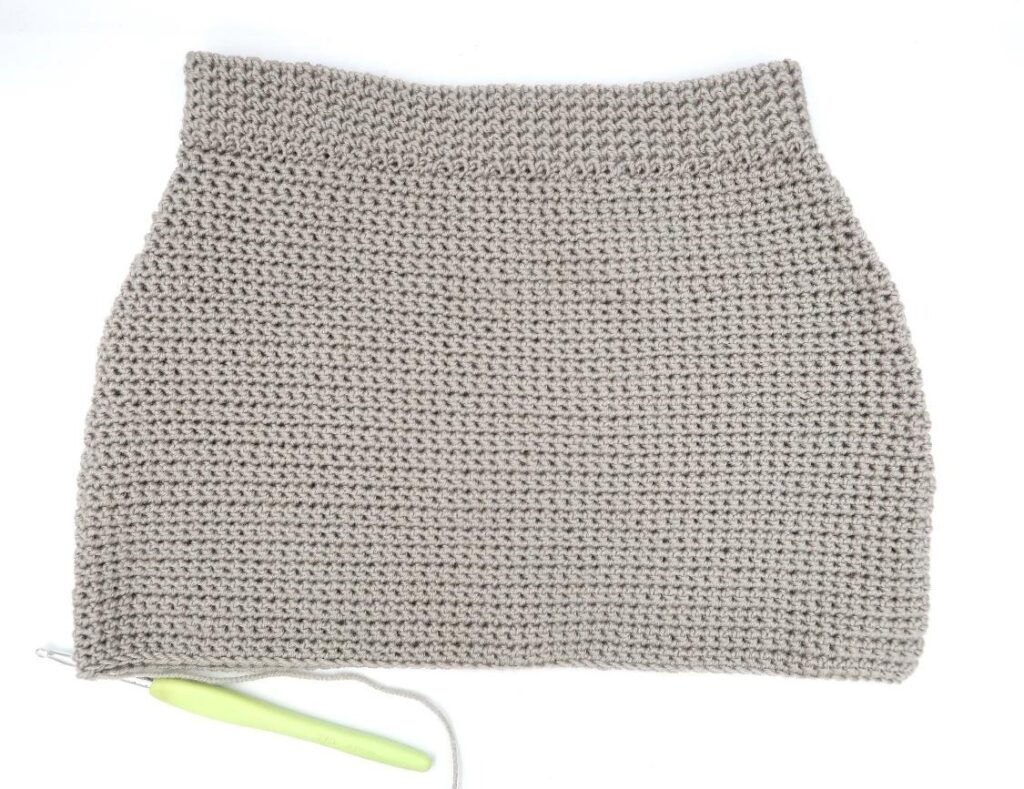
Diaper Cover
From now on working around the edge of the belt band in rounds joined with a sl st and turning your work after each round.
Round 1 – 3: Ch 1, sc 90 (94, 102, 106, 110) around, join with a sl st in ch 1, turn.
Round 2: Ch 1, sc 1, 2 sc, sc 43 (45, 49, 51, 53), 2 sc, sc 1, place marker between st, sc 1, 2 sc, sc 43 (45, 48, 50, 52), 2 sc, sc 1, join with a sl st in ch, turn. <94 (98, 106, 110, 114) st>
Round 3: Ch 1, sc around, turn.
Repeat Round 3
Increase Round: Ch 1, [sc, 2 sc, sc until 2 st before marker, 2 sc, sc] twice, join with a sl st in ch, turn. <98 (102, 110, 114, 118) st>
Repeat Round 3 twice
[Work an increase round followed by Round 3 twice] twice <106 (110, 118, 122, 126) st>
Repeat [Round 3 twice, increase round, Round 3 twice] three times <118 (122, 130, 134, 138) st>
Repeat Round 3 until total length is 19 (20, 21, 22, 23) cm / 7.5 (8, 8.25, 8.5, 9)”. Finish with a RS round.
Split for legs
To split for the legs, the middle 7 stitches of the front and back of the bloomer are single crocheted together. I recommend you count your stitches and place st markers before starting the round.
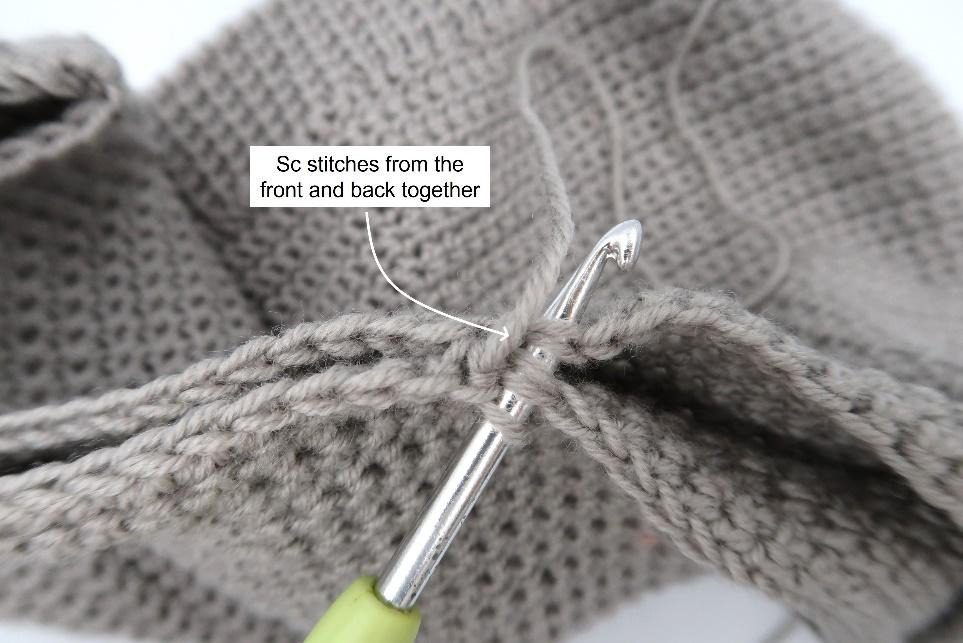
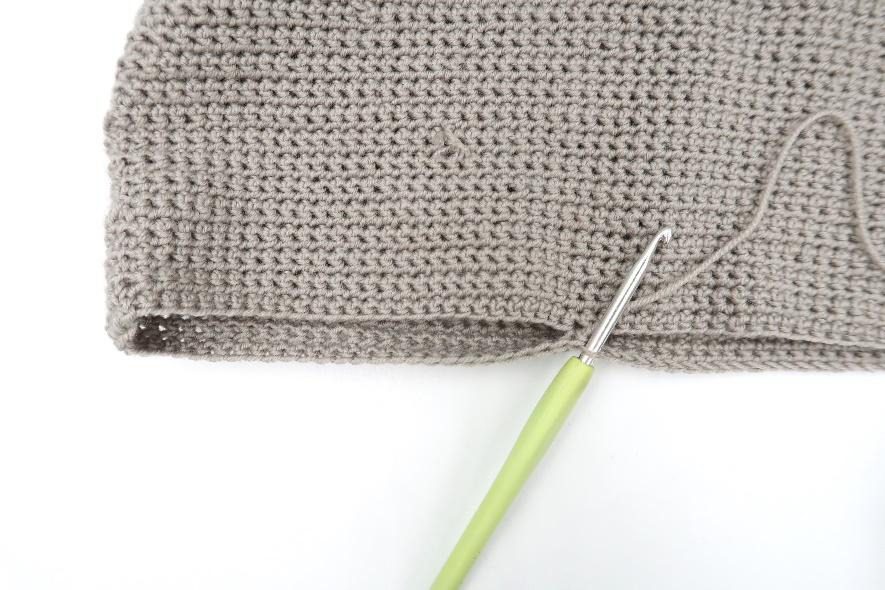

Turn project inside out and split for legs:
- 3 months: Ch 1, sc 26, sc together with the other side 7, sc 52, sl st along 7 joined st, sc 26, join with a sl st in ch 1, turn.
- 6 months: Ch 1, sc 27, sc together with the other side 7, sc 54, sl st along 7 joined st, sc 27, join with a sl st in ch 1, turn.
- 12 months: Ch 1, sc 29, sc together with the other side 7, sc 58, sl st along 7 joined st, sc 29, join with a sl st in ch 1, turn.
- 18 months: Ch 1, sc 30, sc together with the other side 7, sc 60, sl st along 7 joined st, sc 30, join with a sl st in ch 1, turn.
- 24 months: Ch 1, sc 32, sc together with the other side 7, sc 64, sl st along 7 joined st, sc 32, join with a sl st in ch 1, turn.
Turn your project back inside out.
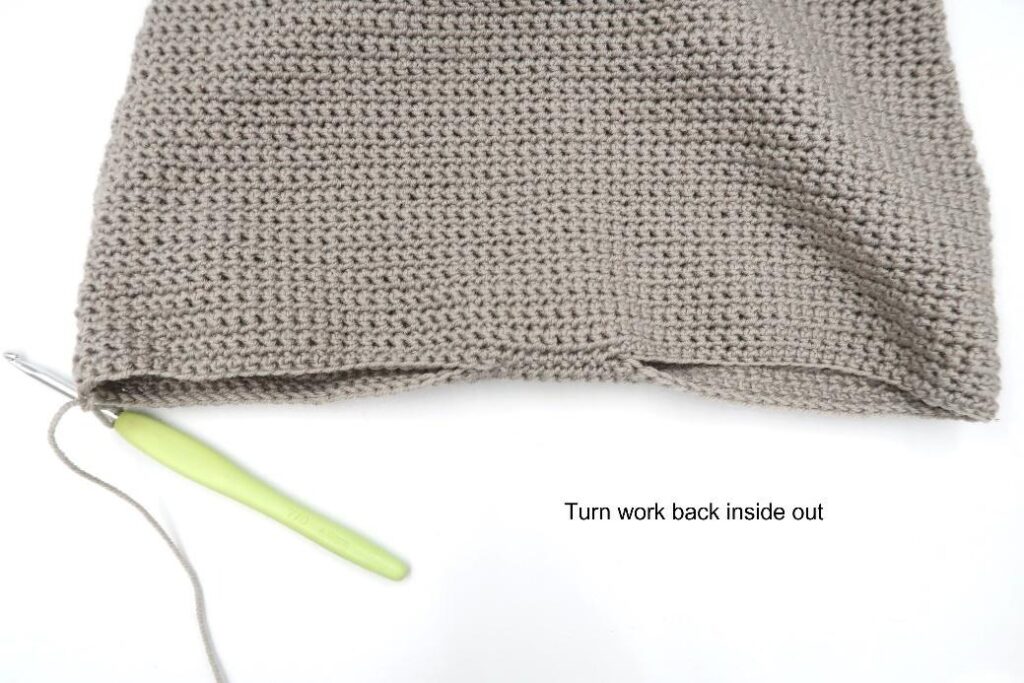
From now on work each leg separately.
Round 1: Ch 1, sc 23 (24, 26, 28, 30), sc2tog, sc 2, sc2tog, sc 23 (24, 26, 28, 30), join with a sl st in ch 1, turn. <50 (52, 56, 58, 62) st>
Round 2: Ch 1, sc around, join with a sl st in ch 1, turn.
Round 3: Ch 1, sc 22 (23, 25, 27, 29), sc2tog, sc 2, sc2tog, sc 22 (23, 25, 27, 29), join with a sl st in ch 1, turn. < 48 (50, 54, 56, 60) st>
Repeat Round 2 twice.
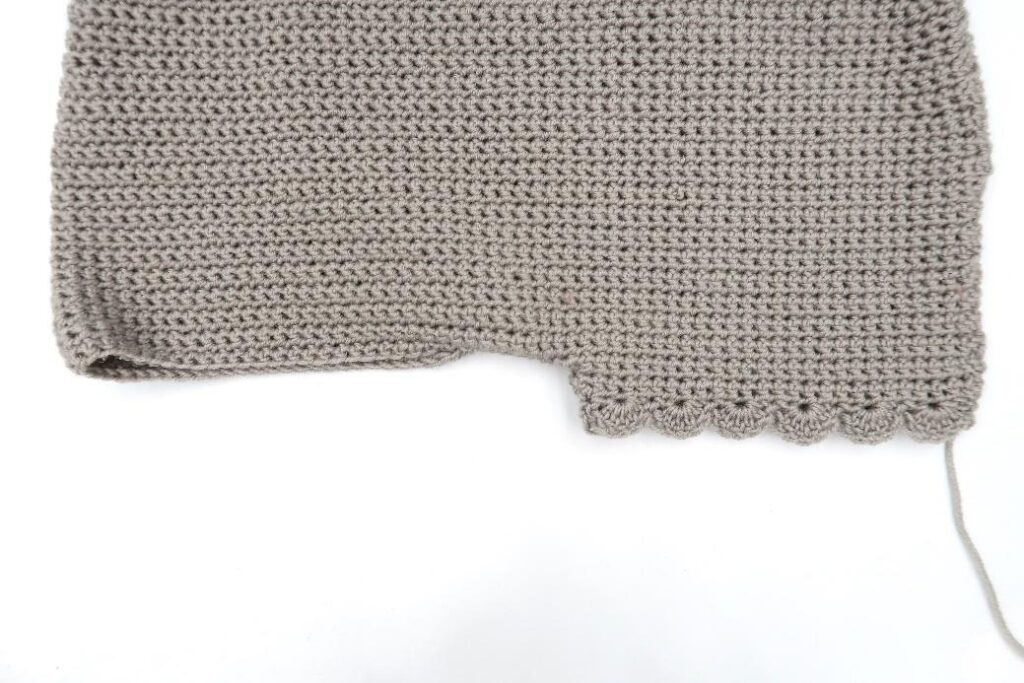
Scallop edge:
- 3 & 18 months: Ch 1, [skip 1, dc 5, skip 1, sc] around, join with a sl st in ch 1.
- 6 & 12 months: Ch 1, sc2tog, skip 1, [dc 5, skip 1, sc, skip 1] repeat until last 3 st, dc 5, skip 2, join with a sl st in ch 1.
- 24 months: Ch 1, skip 1, [dc 5, skip 1, sc, skip 1] repeat until last 3 st, dc 5, skip 1, sc, join with a sl st in ch 1.
Bind off and weave in the ends.
Join yarn at the hip of the other leg (middle of the stitches) and repeat from Round 1.
Blocking
You’re done with the crocheting part. Make sure to weave in all the ends.
To make your cardigan even prettier, help even your stitches and make the scalloped edges come out even more, block your project.
Don’t skip this step as it can make a huge difference. Read my detailed tutorial on why block, how-to, and all my tips and tricks if you need help.
Copyright 2023 of Knitting with Chopsticks.

 Sidekick Polo