Zigzag Sweater Crochet Pattern
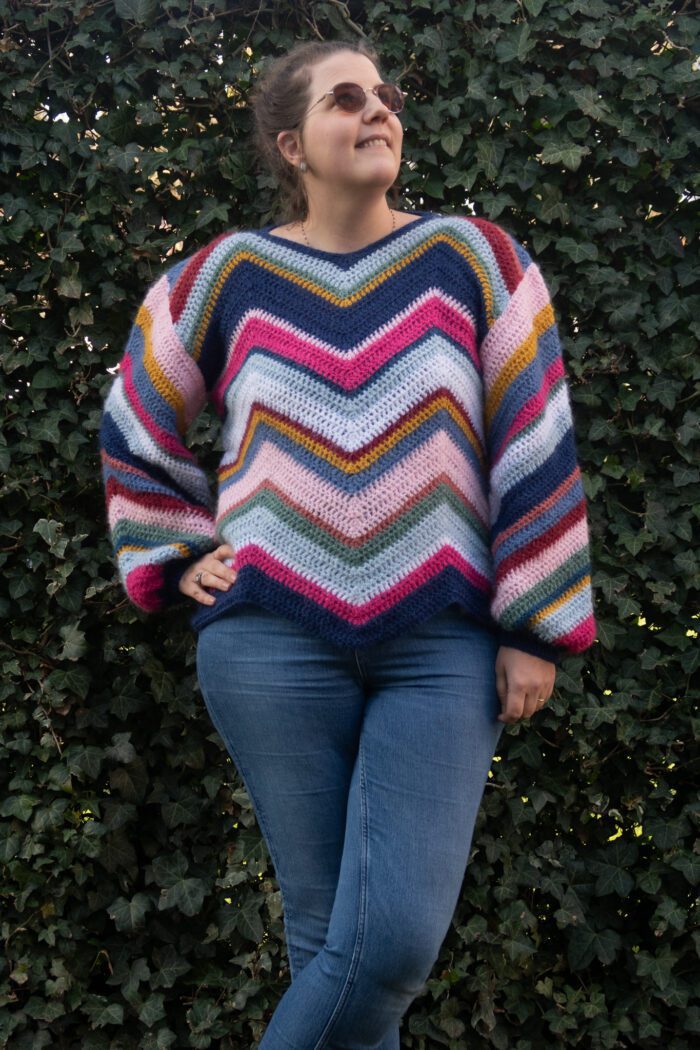
A new fun crochet pattern, the Zigzag Sweater, is now a free women’s sweater crochet pattern here on the blog. Read all about the chevron crochet sweater pattern construction and my tips for choosing your colors or scroll down for the full free crochet sweater pattern.
No time right now? Pin this fun women’s crochet sweater pattern for later!

*This post contains affiliate links (only for products I love, use and spend my own money on obviously). This means I earn some yarn money if you make a purchase through one of these links (of course at no extra cost for you!), which I promise to use to create more awesome patterns like this one. All opinions are my own. See my full disclosure here.

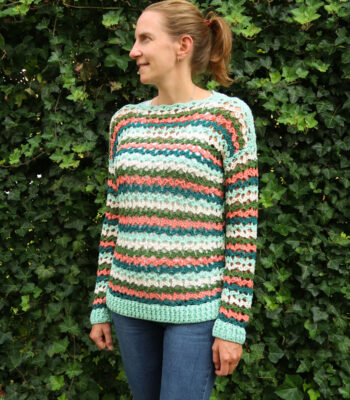
The Zigzag Sweater features a playful chevron pattern that adds a fun twist to your wardrobe. Worsted-weight mohair yarn ensures warmth without bulk, making it ideal for all seasons.
Available in sizes XS to 5XL, everyone can rock this stylish sweater with confidence. Whether you’re curling up with a cup of tea or stepping out for a stroll, the Zigzag Sweater will keep you looking fabulous and feeling cozy wherever you go.
Not only is the Zigzag Sweater a style statement, but it’s also a fantastic scrap-buster project. Embrace your stash and let your creativity shine as you mix and match colors to your heart’s content.
Get your hooks ready and let’s crochet our way to comfort and style!
Women’s Sweater Crochet Pattern Construction
The chevron crochet sweater pattern is worked in panels from the bottom up. The front and back panels are worked in a chevron pattern for which the outer top corners are then filled up. For the back panel the middle chevron dip is also filled while it serves as the V-neck in the front. The body panels are then sewed together at the shoulders and sides.
The sleeves are also worked from the bottom up. Started by making a triangle which is increased up to the desired sleeve width size. The sleeves are then worked up to desired length following the chevron pattern with one peak.
Sleeves are then sewed to the sweater body. The cuffs are then worked in the round. The sweater is then finished with a simple neckline, also worked in the round.

Stripes & Colors
Let your creativity run wild! The zigzag sweater is the perfect opportunity to go crazy on the colors which is why I haven’t indicated the exact stripe to follow in the pattern.
However, for your final result to look great I do have some tips to help you out:
- Pick a main color for your sweater, this is the color you’ll use to start both front and back panels, make the cuffs and neckline. Using the same colors for these parts brings your sweater together. You’ll need about double the quantity of yarn for this color as others. I used 2 skeins of the navy blue in total for my sweater while for other colors I used less than a skein.
- Use as many or as few colors as you want / have / feel like. For my sample I used a total of 11 colors.
- For a more harmonious look, use the same stripe pattern and color repeat for both body panels and for both sleeves (the body and sleeve pattern can totally be different though, I haven’t kept the same order or stripe width between body and sleeve).
- Have fun with the stripe widths. I’ve alternated between stripes of 1 row height up to 5 rows height.
- To get a beautiful blend of colors I recommend using at least one neutral color to balance out the other colors and make them pop. 2-3 light colors and 2-3 darker colors allow to alternate light and darker colors. To me, some variation of white is always a must in any very colorful project. Of course, it’s your project and your choice.

Downloadable Women’s Sweater Crochet Pattern
Grab the printable PDF of the Zigzag chevron crochet sweater pattern now in my shop, Etsy shop or on Ravelry.
More Child Sweater Patterns You'll Love
Before you Start
Materials
- 5 mm / US H – 8 hook.
- Mohair Delight Aran yarn (50% Mohair, 50% Acrylic, 150 m / 164 yd, 50g): 7 (8, 8, 9, 10) (10, 11, 12, 13) skeins.*
- Tapestry needle to weave in the ends.
*Total yarn quantity is given here since the number of colors and stripe pattern is for you to play around with. Refer to the Stripes & Color section below for my recommendations.
Size
The crochet sweater pattern is available in following sizes: XS, S, M, L, XL, 2XL, 3XL, 4XL, 5XL. Sizes are written as XS (S, M, L, XL) (2XL, 3XL, 4XL, 5XL) throughout the pattern. Pictures illustrate the L size.
The sweater is designed with 8 – 12 cm / 3 – 5” ease at the bust.
Below are the final sweater measurements for the different sizes.
- XS: bust 84 cm / 33”; length 59 cm / 23”
- S: bust 94 cm / 37”; length 60 cm / 24”
- M: bust 104 cm / 41”; length 61 cm / 24”
- L: bust 114 cm / 45”; length 63 cm / 25”
- XL: bust 125 cm / 49”; length 64 cm / 25”
- 2XL: bust 135 cm / 53”; length 65 cm / 25.5”
- 3XL: bust 145 cm / 57”; length 66.5 cm / 26”
- 4XL: bust 155 cm / 61”; length 68 cm / 27”
- 5XL: bust 166 cm / 65.5”; length 69 cm / 27”
Note: Length is measured from the lowest peak to the shoulders.
Gauge
Sick of all the yarn jargon and conversions?
US vs UK, abbreviations, imperial vs metric, yarn weights, etc?

The gauge for this pattern in a straight square of dc is 12 st by 8 rows for a 10 cm by 10 cm / 4” by 4”.
Abbreviations
This pattern uses US notations.
- st = stitch
- ch = chain
- sc = single crochet
- hdc = half double crochet
- dc = double crochet
- dc2tog = double crochet 2 together
- dc3tog = double crochet 3 together
- dc4tog = double crochet 4 together
- sc2tog = single crochet 2 together
Notes
Work instructions between [] the indicated number of times or until the end of the row / round.
The final number of stitches is indicated at the end of the row / round between < >.
The turning ch 1, ch 2 don’t count as stitches throughout the pattern except if mentioned otherwise.
The pattern is written in crochet shorthand. For example:
Tips and Tricks
- I recommend using an invisible seaming technique for attaching the panels. If you’re not familiar with invisible seams, this tutorial is very helpful.
- If you want to fit test your sweater. Make the front and back panels first, block then sew them and make the collar before testing your fit. The collar makes a big difference on how the sweater fits and sleeve length you need.
- Weaving in the ends: As nearly each row uses a different color, a lot of ends need to be woven in. If you’re like me, weaving in ends is not your favorite part of a crochet project.
- As the pattern is not too lacy, you can get away with crocheting the next row over the tail of the previous round.
- After you have crocheted a few stitches over the tail of the previous round, leave about 3-4cm / 1-2” of the tail and finish your round.
- Weave in the end of the tail in the opposite direction. With this method, you only have to do half of the weaving in process per tail.
- When I start a new row, I tag along the tail and make my starting chain with a double yarn. Then I’ll make the next 5-8 stitches working over the tail to weave it in as I go.
The Actual Zigzag Sweater Crochet Pattern
Back Panel
With your 5 mm / US H – 8 hook, chain 61 (69, 77, 85, 93) (99, 107, 113, 121) + 2
Row 1: Dc in 3nd ch from hook, dc across, turn. <61 (69, 77, 85, 93) (99, 107, 113, 121) st>
For Sizes XS to XL:
Row 2: Ch 2, dc2tog, dc 7 (11, 15, 19, 23) (X, X, X, X), 3dc, dc 19, dc3tog, dc 19, 3dc, dc 7 (11, 15, 19, 23) (X, X, X, X), dc2tog, turn.
For Sizes 2XL to 5XL:
Row 2: Ch 2, 2dc, dc X (X, X, X, X) (5, 9, 12, 16), [dc3tog, dc 19, 3dc, dc 19] twice, dc3tog, dc X (X, X, X, X) (5, 9, 12, 16), 2dc, turn.
All sizes
Repeat Row 2 another 35 (36, 37, 38, 39) (39, 40, 41, 42) times.
Filling in the shoulder top sides:
For Sizes XS to XL:
Row side 1: Ch 2, dc2tog, dc until 3 st before peak st, dc3tog, turn. <7 (11, 15, 19, 23) (X, X, X, X) st>
Row side 2: Ch 2, dc3tog, dc until last 2 st, dc2tog, turn. <4 (8, 12, 16, 20) (X, X, X, X) st>
Row side 3: Ch 2, dc2tog, dc until last 3 st, dc3tog, turn. <1 (5, 9, 13, 17) (X, X, X, X) st>
Repeat Row side 2 and 3 until 1 (2, 3, 1, 2) (X, X, X, X) st remain.
For sizes XS, L: Bind off.
For sizes S, XL: dc2tog and bind off.
For size M: dc3tog and bind off.
For Sizes 2XL to 5XL:
Row 1: Ch 2, 2dc, dc until 1 st before bottom st, dc3tog, dc until 3 st before peak st, dc3tog, turn. <X (X, X, X, X) (25, 29, 32, 36) st>
Row 2: Ch 2, dc3tog, dc until 1 st before bottom st, dc3tog, dc until last st, 2dc, turn. <X (X, X, X, X) (22, 26, 29, 33) st>
Repeat Row 2 until X (X, X, X, X) (1, 2, 2, 3) st remain.
For sizes 2XL, 4XL: dc2tog and bind off.
For sizes 5XL: dc3tog and bind off
For size 3XL: bind off
Repeat for the other shoulder, joining yarn at the outer edge.
Filling in the middle section:
For the middle section, join yarn at the st after the peak 3dc:
Row 1: Ch 2, dc3tog, dc until 1 st before bottom st, dc3tog, dc until 3 st before peak st, dc3tog, turn. <33 st>
Row 2: Ch 2, dc3tog, dc until 1 st before bottom st, dc3tog, dc until 3 st before end of row, dc3tog, turn. <27 st>
Repeat Row 2 until 3 st remain, dc3tog and bind off.
Front Panel
Repeat back panel except leave the middle section unfilled.
Sleeves

The sleeves are worked by first building a triangle up to the size’s sleeve width and then build the sleeve length in chevron pattern.
Starting Triangle
With your 5 mm / US H – 8 hook, ch 3 and dc 7 in first ch. <7 dc>
Work the following number of rows of the sleeve triangle below for your size and then move onto the sleeve body section: 13 (14, 15, 16, 17) (18, 19, 20, 20). <63 (67, 73, 77, 81) (85, 89, 95, 95) st>
Row 1: Ch 2, 2dc, dc 2, 3dc, dc 2, 2dc, turn. <11 dc>
Row 2: Ch 2, 2dc, dc until peak st, 3dc, dc until last st, 2dc, turn. <15 dc>
Row 3-4: Repeat Row 2. <23 st>
Row 5: Ch 2, 3dc, dc until peak st, 3dc, dc until last st, 3dc, turn. <29 st>
Row 6 – 9: Repeat Row 2. <45 st>
Row 10: Repeat Row 5. <51 st>
Row 11 – 20 see note above: Repeat Row 6 – 10. <95 st>
Sleeve Body
Row 1: Ch 2, dc2tog, dc until peak st, 3dc, dc until last 2 st, dc2tog, turn. <63 (67, 73, 77, 81) (85, 89, 95, 95) st>
Repeat Row 1 another 28 (26, 22, 23, 20) (18, 15, 14, 10) times.
Bind off and leave a long tail for sewing
Cuff
Sew sleeves together.
Row 1: Sc 60 around the edge, join with a sl st
Row 2: Ch 1, sc2tog around, join with the sl st, turn. <30 st>
Row 3: Ch 1, sc around, join with a sl st, turn.
Repeat Row 3 seven times.
Bind off and weave in the ends.
Blocking
Before assembling your sweater, block each panel.
Don’t skip this step as it can make a huge difference. Read my detailed tutorial on why block, how-to, and all my tips and tricks if you need help.
Assembly
Sew the front and back panels together. Make the shoulder seams first, then sew up the sides leaving 18.5 (19.5, 20.5, 22.5, 23.5) (24.5, 26, 27.5, 28.5) cm / 7.25 (7.75, 8, 9, 9.25) (9.75, 10.25, 11, 11.25)” unseamed for the armholes.
Finally attach the sleeves.
Neckline

The neckline is worked in turned rounds.
With your 5 mm / US H – 8 hook, join yarn in the junction between front and back panel on the shoulder (left shoulder for left-handed crocheters, right shoulder for right-handed crocheters).
Round 1: Sc around the neckline, making 32 st across the back, sc in each st in the front with sc3tog at the bottom of the V, turn. <69 st>
Round 2: Ch 1, sc across back, sc2tog at shoulder seam, sc until 1st before sc3tog below, sc3tog, sc until last 2 st, sc2tog, turn. <65 st>
Round 3: Ch 1, sc2tog, sc until 1 st before sc3tog below, sc3tog, sc until shoulder seam, sc2tog at shoulder seam, sc across back, turn. <61 st>
Round 4: Repeat Round 2. <57 st>
Bind off and weave in your ends.