Can You Use Cricut for Crochet? Here’s What to Know
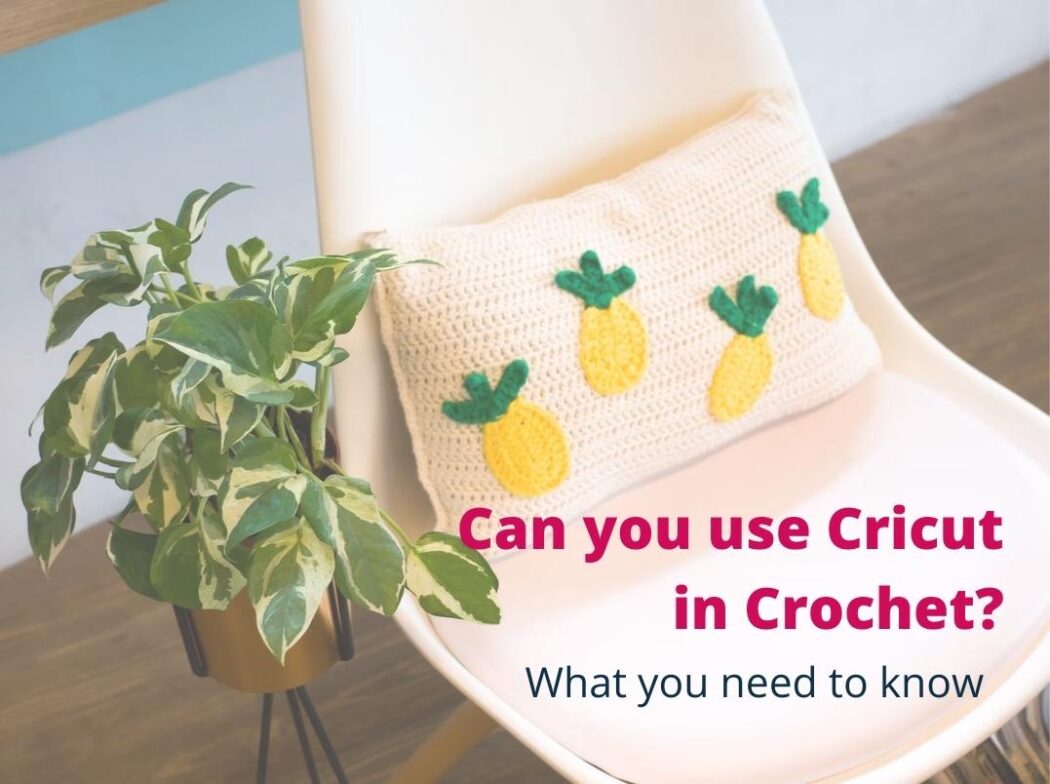
One of the great things about the Cricut is that it can be used with a variety of materials. When it comes to crochet, you can use the Cricut to cut out shapes from yarn, fleece, fabric, and even leather. This opens up a whole world of possibilities when it comes to embellishing your crochet projects or creating entirely new ones.
Of course, before you can start using the Cricut for crochet, you need to have the right machine. The Cricut Explore Air 2 is a good option for beginners, as it’s relatively affordable and easy to use. Once you have your machine set up, you’ll need to download the Cricut Design Space software, which is where you’ll create your designs.
Now, let’s talk about actually using the Cricut for crochet. One of the great things about this machine is that it can be used to cut out shapes from a variety of materials, including yarn, fleece, fabric, and even leather. This opens up a whole world of possibilities when it comes to embellishing your crochet projects or creating entirely new ones.
For example, you could use the Cricut to cut out shapes from yarn that you can then use as appliques on a crocheted blanket or scarf. Or, you could use it to cut out letters from fabric to spell out a child’s name on a crocheted toy. The possibilities are endless!
If you’re new to using the Cricut, don’t worry – we’ve got you covered. Below, we’ve put together a step-by-step guide on how to use the Cricut for crochet. Just follow these simple steps and you’ll be on your way to crafting unique crochet projects in no time.
1. Choose your materials
If you are using a Cricut to cut crochet shapes, you will need to use materials that the machine can handle. Crochet hook sizes and types of thread or yarn will be determined by the project you are working on. Get acquainted with the different types of fabrics and how they work with the Cricut before starting your project.
Cricut machines can cut a variety of materials, but not all materials are appropriate for all projects. For example, if you want to make a delicate crocheted doily, you would not want to use a heavy denim fabric. The same is true of yarns and threads; some are better suited for particular projects than others. Choose your materials based on the project you have in mind, and be sure to test them out on scrap fabric or yarn before starting your project.
2. Set up your machine
If you’re new to Cricut, the first thing you need to do is set up your machine. This includes choosing the right settings for your project, as well as loading the mat and fabric into the machine. You will also need to learn how to weld and unweld on a Cricut. These can be tough to accomplish if your machine is not set up accordingly, and you need to see the guide here to learn a few tricks to make welding and unwelding on a Cricut easier. Once you know how to adjust the settings for welding and unwelding, you can design text or images better.
When it comes to crochet, there are a few things to keep in mind. First, you’ll need to use the Cricut rotary blade, which is designed specifically for cutting fabric. You’ll also need to use a light grip mat, as the rotary blade can be quite sharp.
Once your machine is set up, you’re ready to start crocheting!
What to know when you use Cricut for crochet
Now that you know how to set up your machine, here are a few things to keep in mind when using Cricut for crochet.
First, always test your stitches on a scrap piece of fabric before starting your project. This will help you get a feel for how the Cricut works and ensure that your stitches are even and consistent.
Second, take your time when cutting the fabric. The rotary blade is very sharp, so it’s important to go slowly and be careful.
Finally, remember that Cricut can be a great tool for crocheting, but it’s not perfect. There may be times when your stitches are uneven or your cuts aren’t quite straight. Don’t get discouraged – with a little practice, you’ll get the hang of it!

3. Create your design
Once you have your machine set up, you’ll need to download the Cricut Design Space software. This is a free program that allows you to create your own designs or use pre-made ones.
If you’re new to using Cricut for crochet, you might want to start with a simple design. You can find plenty of free crochet patterns online that can be easily converted into a Cricut project.
Once you have your design ready, it’s time to load your yarn into the machine. The Cricut Maker has a built-in yarn cutter, so you don’t need to worry about having sharp scissors on hand. Just make sure that your yarn is fed through the guide holes in the back of the machine.
Now you’re ready to start crocheting! The Cricut will do all the work for you, so all you need to focus on is following your pattern. You can even use the machine to make small adjustments to your crochet project, like adding new colors or changing the size of your stitches.
Sick of all the yarn jargon and conversions?
US vs UK, abbreviations, imperial vs metric, yarn weights, etc?

When you’re finished crocheting, just unplug the machine and enjoy your new creation!
4. Cut out your shapes
As anyone who has ever worked with yarn knows, crocheting can be a bit of a pain when it comes to cutting out your shapes. With so many different thicknesses and colors of yarn available, it can be difficult to get consistent results. This is where Cricut comes in.
Cricut is a die-cutting machine that can cut through all sorts of materials, including cardstock, vinyl, and even fabric. And because it’s so precise, it can be a helpful tool for cutting out shapes for crochet projects.
But before you start using Cricut for crochet, there are a few things you should know. Here’s what to keep in mind when using Cricut for crochet projects.
The first thing to know is that Cricut can cut through a variety of materials, but not all of them are ideal for crochet projects. For example, Cricut can cut through fabric, but it’s not the best tool for cutting out intricate shapes like those used in crochet.
Instead, it’s best to stick with simple shapes like circles, squares, and triangles. These shapes will be much easier to work with when crocheting.
Another thing to keep in mind is that Cricut can be a bit finicky when it comes to cutting yarn. This is because the yarn is often made from different materials and can have different thicknesses.
To get the best results, it’s important to use the correct blade setting and pressure setting for your particular project. Experimenting with different settings will help you find the perfect combination for your project.
Finally, Cricut can be a great time-saver when it comes to crocheting projects. It can be used to cut out all of the shapes needed for a project in one go, which can save a lot of time compared to cutting them out by hand.
If you’re looking for a die-cutting machine that can make crocheting projects easier, Cricut is a great option. Just keep in mind these tips and you’ll be able to create beautiful crochet projects in no time.
5. Assemble your project
Now that you have all of your pieces cut out, it’s time to assemble your project! This is where a Cricut can really come in handy because you can use the “weeding” tool to remove any excess vinyl or paper that might be around your design. Once your project is assembled, you can add any finishing touches, like buttons or ribbon, before displaying it proudly for all to see!
Cricut machines are incredibly versatile crafting tools, and one of the many things they can do is cut fabric. That means that yes, you can use Cricut for crochet projects! If you’re new to crocheting with a Cricut machine, here are a few things to keep in mind.
First, when you’re choosing fabric for your project, stick to lighter-weight fabrics like cotton or linen. Heavier fabrics, like denim or canvas, can be too tough for the Cricut blade to cut through.
Second, because it can be tricky to keep fabric flat while you’re cutting it, it’s a good idea to use a piece of parchment paper or freezer paper underneath your fabric. This will help the fabric stay in place while you’re cutting.
Last, when you’re done cutting your fabric pieces out, be sure to “weed” them before you start sewing. Weeding is the process of removing the excess vinyl or paper around your design, and it’s important to do this with fabric projects so that your finished product looks neat and professional.
Now that you know a few things about using Cricut for crochet, why not give it a try? You might be surprised at how easy and fun it is!
6. General Guidelines When Using Cricut for Crochet
1. The Types of Materials You Can Cut: While Cricut machines are designed to cut a variety of materials, not all materials are ideal for crochet projects. Some materials, like paper and vinyl, can be too delicate and tear easily. Others, like leather and felt, can be too thick and difficult to work with. The best materials to use with a Cricut machine for crochet projects are lightweight fabrics like cotton or linen.
2. The Size of the Shapes You Can Cut: Cricut machines can cut shapes in a variety of sizes, but not all sizes will work well for crochet projects. The smaller the shape, the more delicate it will be and the more likely it is to tear. The larger the shape, the more difficult it will be to work with. For most crochet projects, shapes that are between 1/2 inch and 1 inch in size work best.
3. The Number of Shapes You Can Cut: Cricut machines can cut multiple shapes at once, but for crochet projects, it’s best to limit the number of shapes you cut to two or three. Any more than that and the shapes will be too small to work with easily.
4. The Design of the Shapes You Can Cut: When you’re choosing shapes to cut out with your Cricut machine, it’s important to consider the design of the shapes. Some shapes, like circles and squares, are easy to crochet around. Others, like triangles and diamonds, can be more challenging. It’s a good idea to practice crocheting around different shaped appliques before you start cutting them out so you know what to expect.
5. The Thread You Use: When you’re using a Cricut machine to cut shapes for a crochet project, it’s important to use a thread that is strong enough to hold the shapes in place. Embroidery thread or buttonhole twist thread works well for this purpose.
6. The Needle You Use: In order to sew the shapes you’ve cut out onto your crochet project, you’ll need to use a needle that is small enough to fit through the holes in the shapes. A needle size of 10 or 12 works well for this purpose.
7. The Type of Crochet Hook You Use: When you’re working with appliques that are cut out with a Cricut machine, it’s best to use a crochet hook that is smaller than the one you would normally use for your project. A size F (3.75 mm) or G (4 mm) hook works well for most appliques.
8. The Type of Crochet Stitch You Use: When you’re working with appliques, it’s best to use a crochet stitch that is tight enough to hold the shapes in place but not so tight that it distorts the shape of the applique. A single crochet stitch works well for most appliques.
9. The Type of Fabric You Use: When you’re working with appliques, it’s important to use a fabric that is lightweight and won’t add too much bulk to your project. Cotton or linen fabrics work well for this purpose.
10. The Type of Glue You Use: When you’re working with appliques, it’s important to use glue that is strong enough to hold the shapes in place but not so strong that it damages the fabric. Fabric glue or an adhesive spray works well for this purpose.

So there you have it – everything you need to know about using a Cricut for crochet. Just follow these simple steps and you’ll be on your way to crafting unique projects in no time. With these tips in mind, you’ll be able to successfully use a Cricut machine to add appliques to your crochet projects. Just remember to take your time and practice on some scrap fabric before you start working on your project so you get a feel for how the shapes will work with the stitch and thread you’re using.