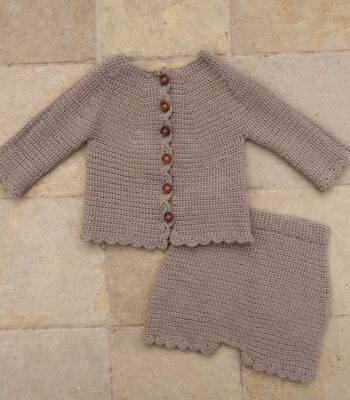
Frosty Alpine Crochet Child Sweater Pattern Free

A new full of texture crochet child sweater pattern – the Frosty Alpine – is now a free crochet pattern here on the blog.Read all about this chunky sweater crochet pattern inspiration, scroll down to view the full free pattern or purchase an ad free PDF from the links below.
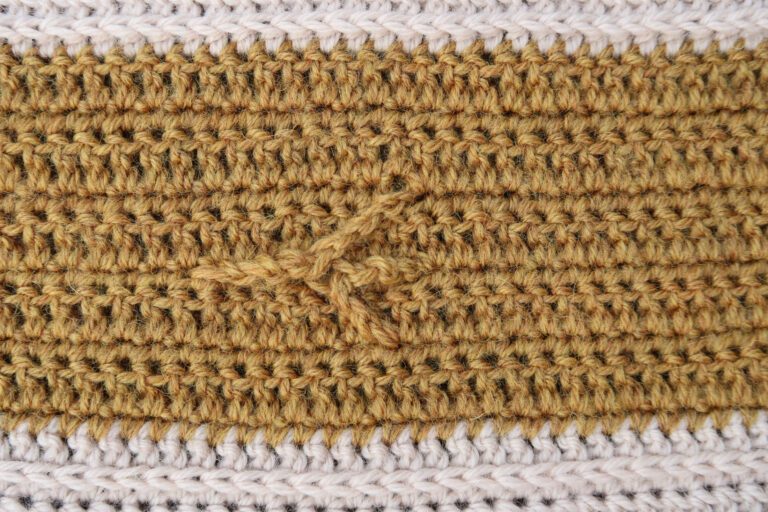
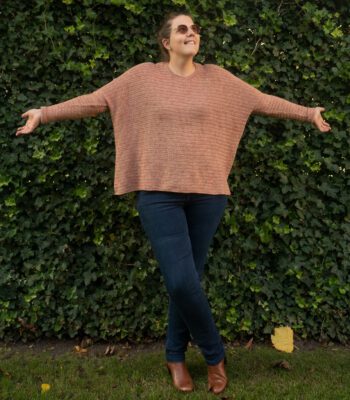
This crochet pattern for a baby and child sweater uses the alpine stitch, creating a warm, dense fabric that’s both comfortable and textured. The alpine stitch’s unique ridges and tight weave make this sweater perfect for cooler weather, adding both warmth and a sophisticated look to your little one’s wardrobe. It’s a pattern that showcases a beautiful texture without being too complex, making it ideal for crocheters looking to create a cozy and stylish piece with a bit of flair.
No time right now? Pin this crochet child sweater pattern free for later!

Designed as a top-down, seamless raglan, this sweater offers a comfortable fit and easy construction. The pattern includes a convenient button closure at the back, making it easy to slip on and off, especially for younger children. By avoiding seams, this sweater feels smooth and soft against the skin, without the bulk that sometimes comes with joining pieces. The worsted-weight yarn not only ensures warmth but also lends itself to a sturdy, long-lasting garment, perfect for everyday wear (and a quick make).
Available in sizes ranging from 3 months to 14 years, this classic, gender-neutral design works well for both boys and girls. With its simple lines and timeless style, the Frosty Alpine sweater is a versatile piece that can be paired with anything from jeans to dresses. It’s a crochet child sweater pattern free that allows crocheters of all skill levels to create a special handmade garment, one that will be treasured by kids and parents alike.

*This post contains affiliate links (only for products I love, use and spend my own money on obviously). This means I earn some yarn money if you make a purchase through one of these links (of course at no extra cost for you!), which I promise to use to create more awesome patterns like this one. All opinions are my own. See my full disclosure here.
Frosty Alpine Crochet Child Sweater Construction
The sweater is a top-down raglan worked in turned rounds which means that you will join your last stitch to that round’s turning chain with a slip stitch before turning your work and working the next round in the other direction. This allows to keep the same repeats for the Alpine stitch as you would if working flat and to keep your join straight.
The first few rows are worked without joining to leave an opening for the buttoned section. After joining in the round and continuing your increases until the end of the yoke, you’ll split for the sleeves. You will skip the stitches for the sleeves and continue working the body in alpine stitch. After finishing the body you’ll go back to the stitches you’ve skipped to crochet the sleeves, always in Alpine stitch and make the decreases to shape the sleeves to the cuffs.

Finally, you will add a small button band to the open section of the yoke so you can close the sweater in the back after putting it on (no need for buttonholes, the buttons can easily slip in between stitches).
Downloadable Frosty Alpine Crochet Child Sweater Pattern

Grab the printable PDF of the Frosty Alpine Sweater Knitting Pattern now in my shop, on Etsy shop or on Ravelry.
2025 Crochet Bestseller Pattern Collection

If this design caught your eye, you’re going to love the 2025 Crochet Bestseller Pattern Collection — a curated bundle of the year’s most-popular crochet patterns.
Inside are 10 crowd-favorites that crocheters kept returning to: modern blankets, easy garments, and texture-rich pieces that work up smoothly and look great in any yarn.
Every pattern is written to be approachable and confidence-boosting, ideal for crocheters who want fun, reliable projects they can finish and enjoy without stress.
Grab the 2025 Crochet Bestseller Pattern Collection here >>
More Crochet Patterns You'll Love
Before You Start Your Frosty Alpine Crochet Child Sweater Pattern Free
Materials
- 5 mm / US H – 8 hook
- Worsted weight yarn: Royal Zeeman yarn (100% acrylic, 100g/3.5oz, 241m/264yd): 2 (2, 2, 3, 3) (4, 4, 5, 6, 6, 7, 7) skeins in pink color
- 3 x 15 mm buttons
- Tapestry needle to weave in the ends.
Size
The baby/kid sweater crochet pattern is available in the following sizes: 3 months, 6 months, 12 months, 18 months, 24 months, 4 years, 6 years, 8 years, 10 years, 12 years and 14 years.
Sizes are noted throughout the pattern in the following way: 3 (6, 12, 18, 24) months (4, 6, 8, 10, 12, 14) years.
The pictures illustrate the 18 months and 4 years sizes.

Final garment measurements are:
- Bust circumference: 49 (51, 53, 56, 61) (67, 71, 76, 79, 83, 89, 90) cm / 19 (20.25, 20.75, 22, 24,25) (26.5, 28.25, 29.75, 31, 32.5, 34.75, 35.5)”.
- Upper arm circumference: 18 (20, 20, 21, 22) (23, 24, 26, 26, 27, 27, 28) cm / 7 (8, 8, 8.5, 8.75) (9, 9.5, 10, 10, 10.75, 10.75, 11) “.
- Total Length: 22 (25, 27, 30, 33) (38, 41, 47, 51, 54, 58, 59) cm / 8.5 (9.75, 10.5, 11.75, 13.25) (14.75, 16, 18.5, 20.25, 21.5, 22.75, 23)”.
Gauge
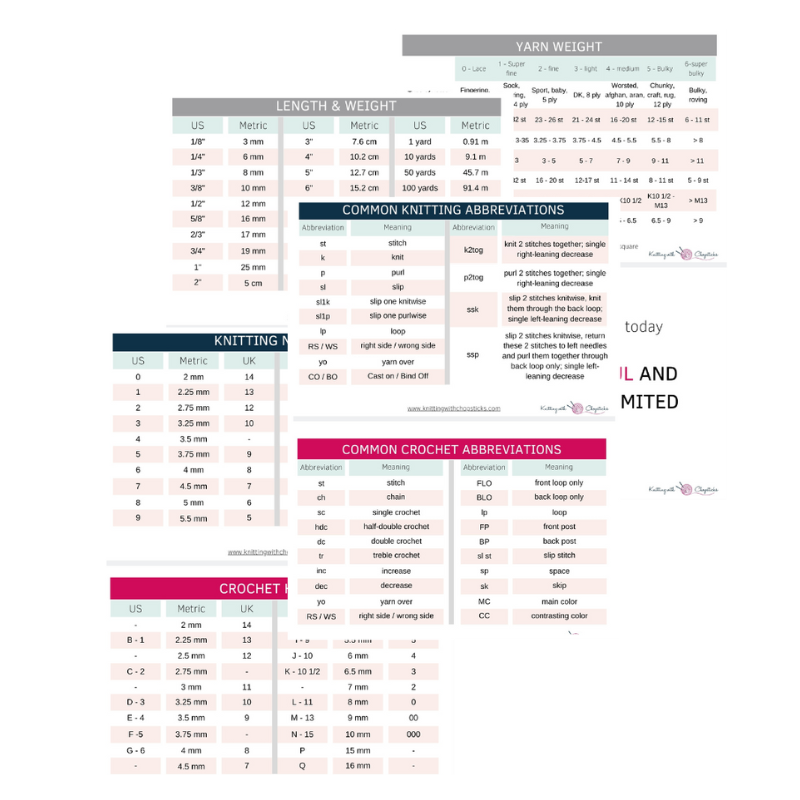
Sick of all the yarn jargon and conversions?
US vs UK, abbreviations, imperial vs metric, yarn weights, etc?

The gauge for this pattern is 14 st by 9 rows in alpine stitch pattern for a 10 cm by 10 cm square (4” by 4”).
The gauge is not crucial for this pattern.
Abbreviations
This pattern uses US notations.
- st = stitch
- ch = chain
- sc = single crochet
- dc = double crochet
- hdc = half double crochet
- fpdc = front post double crochet
- sl st = slip stitch
Yarn Jargon Cheatsheets
Whether you knit, crochet, or both, these are a necessity.
Notes
Work instructions between [] the indicated number of times or until the end of the row/round. Instructions between () are worked in the same stitch/space.
The final number of stitches is indicated at the end of the row/round between < >.
The turning ch 1, ch 2 don’t count as stitches throughout the pattern except if mentioned.
The pattern is written in crochet shorthand. For example:
- “sc 1” means to single crochet in the next stitch,
- “sc 2” means to single crochet in each of the next 2 stitches,
- and “2 sc” means to single crochet twice in the next st.
Special Stitches
- Front post double crochet (fpdc):
Yarn over, insert hook from front to back to front behind the double crochet post below (in this case the double crochet is 2 rows below), yarn over, and pull up a long loop (3 loops on hook).

Yarn over and pull through 2 loops (2 loops on hook), yarn over, and pull through the remaining loops.

Alpine stitch which is a 2 row repeat of sc and dc/fpdc rows/rounds. Find the full stitch video tutorial on my Youtube channel here or watch it below:
Tips and Tricks for the Alpine Stitch Pattern
- The stitch pattern is a repeat of sc rows and dc/fpdc rows.
- The fpdc are worked in the dc right below it, 2 rows down.
- If the stitch 2 rows below is a dc, then fpdc in it. If it’s a fpdc, then dc in it.
- Because the fpdc stitches are worked in the dc 2 rows down, there will be an unused stitch left behind the fpdc. Ignore this stitch when working the next stitch.
- Find the full stitch video tutorial on my Youtube channel here.
- When increasing or decreasing (always done on sc rows) make sure you do a dc of fpdc over the increased/decreased stitch so that the next stitch works with the repeat.
Sweater Construction
The sweater is a top-down raglan worked in turned rounds which means that you will join your last stitch to that round’s turning chain with a slip stitch before turning your work and working the next round in the other direction. This allows to keep the same repeats for the Alpine stitch as you would if working flat and to keep your join straight.
The first few rows are worked without joining to leave an opening for the buttoned section. After joining in the round and continuing your increases until the end of the yoke, you’ll split for the sleeves. You will skip the stitches for the sleeves and continue working the body in alpine stitch. After finishing the body you’ll go back to the stitches you’ve skipped to crochet the sleeves, always in Alpine stitch and make the decreases to shape the sleeves to the cuffs.

Finally, you will add a small button band to the open section of the yoke so you can close the sweater in the back after putting it on.
The Actual Frosty Alpine Crochet Child Sweater Pattern
The Yoke
With your 5 mm / US H-8 hook, chain 38 (40, 42, 42, 44) (46, 48, 50, 54, 56, 56, 60)
Add stitch markers to mark where you’ll make the yoke increases as follows:
- 3 months: 7 st, marker, 4 st, marker, 13 st, marker, 4 st, marker, 6 st.
- 6 months: 7 st, marker, 5 st, marker, 13 st, marker, 5 st, marker, 6 st.
- 12 months: 7 st, marker, 5 st, marker, 14 st, marker, 5 st, marker, 7 st.
- 18 months: 7 st, marker, 5 st, marker, 14 st, marker, 5 st, marker, 7 st.
- 24 months: 8 st, marker, 4 st, marker, 16 st, marker, 4 st, marker, 8 st.
- 4 years: 9 st, marker, 3 st, marker, 18 st, marker, 3 st, marker, 9 st.
- 6 years: 10 st, marker, 3 st, marker, 19 st, marker, 3 st, marker, 9 st.
- 8 years: 10 st, marker, 3 st, marker, 20 st, marker, 3 st, marker, 10 st.
- 10 years: 11 st, marker, 4 st, marker, 24 st, marker, 4 st, marker, 11 st.
- 12 years: 12 st, marker, 3 st, marker, 23 st, marker, 3 st, marker, 11 st.
- 14 years: 13 st, marker, 3 st, marker, 25 st, marker, 3 st, marker, 12 st.
- 16 years: 13 st, marker, 3 st, marker, 26 st, marker, 3 st, marker, 13 st.
Row 1: Ch 1, [sc until marked st, 3 sc in marked st] around, sc until end of row, turn. <46 (48, 50, 50, 52) (54, 56, 58, 62, 64, 64, 68) st>
Note: Always move marker to the middle stitch when increasing
Row 2: Ch 2, [dc until marked st, 3 dc in marked st] around, dc until end of row, turn. <54 (56, 58, 58, 60) (62, 64, 66, 70, 72, 72, 76) st>
Row 3: Ch 1, [sc until marked st, 3 sc in marked st] around, sc until end of row, turn. <62 (64, 66, 66, 68) (70, 72, 74, 78, 80, 80, 84) st>
From now on until the end of the sweater you’ll work in alpine stitch. Always make sure to keep the stitch pattern continuous.
Row 4 (=Increase Row): Ch 2, [alpine stitch until marked st, (dc, ch 1, dc) in marked st] around, alpine stitch until end of round, turn. <70 (72, 74, 74, 76) (78, 80, 82, 86, 88, 88, 92) st>
Row 5: Ch 1, sc across, turn.
Row 6 – 11: Repeat Row 4 – 5 three times. <94 (96, 98, 98, 100) (102, 104, 106, 110, 112, 112, 116) st>
Join in the round with a sl st.
Repeat Row 4 – 5 another 2 (3, 3, 4, 5) (6, 7, 8, 8, 9, 10, 10) times working in the round joining with a sl st at the end of every round and turning your work. <110 (120, 122, 130, 140) (150, 160, 170, 174, 184, 192, 196) st>
Repeat Row 4 once more in the same manner. <118 (128, 130, 138, 148) (158, 168, 178, 182, 192, 200, 204) st>
Split for sleeves
- 3 months: Ch 1, sc 17, skip 25, sc 34, skip 25, sc until end of round, sl st in ch, turn. <68 st>
- 6 months: Ch 1, sc 18, skip 28, sc 36, skip 28, sc until end of round, sl st in ch, turn. <72 st>
- 12 months: Ch 1, sc 19, skip 28, sc 37, skip 28, sc until end of round, sl st in ch, turn. <74 st>
- 18 months: Ch 1, sc 20, skip 30, sc 39, skip 30, sc until end of round, sl st in ch, turn. <78 st>
- 24 months: Ch 1, sc 22, skip 31, sc 43, skip 31, sc until end of round, sl st in ch, turn. <86 st>
- 4 years: Ch 1, sc 24, skip 32, sc 47, skip 32, sc until end of round, sl st in ch, turn. <94 st>
- 6 years: Ch 1, sc 25, skip 34, sc 50, skip 34, sc until end of round, sl st in ch, turn. <100 st>
- 8 years: Ch 1, sc 27, skip 36, sc 53, skip 36, sc until end of round, sl st in ch, turn. <106 st>
- 10 years: Ch 1, sc 28, skip 36, sc 55, skip 36, sc until end of round, sl st in ch, turn. <110 st>
- 12 years: Ch 1, sc 29, skip 38, sc 58, skip 38, sc until end of round, sl st in ch, turn. <116 st>
- 14 years: Ch 1, sc 31, skip 38, sc 62, skip 38, sc until end of round, sl st in ch, turn. <124 st>
- 16 years: Ch 1, sc 32, skip 39, sc 63, skip 39, sc until end of round, sl st in ch, turn. <126 st>
Work in Alpine stitch pattern until length from armhole is 11 (13, 15, 17, 19) (22, 24, 29, 33, 35, 37, 38) cm / 4.25 (5.25, 6, 6.75, 7.5) (8.5, 9.5, 11.5, 13, 13.75, 14.5, 15)”
Sleeves
Repeat for each sleeve.

Join yarn at the armhole and work in alpine stitch pattern in the round. Start with an sc round on the wrong side. You should have 25 (28, 28, 30, 31) (32, 34, 36, 36, 38, 38, 39) st.
Work Alpine stitch pattern until you reach 14 (11, 14, 15, 16) (18, 21, 23, 26, 26, 28, 30) cm / 5.25 (4.25, 5.5, 6, 6.25) (6.75, 8, 8.75, 10, 10.25, 11, 11.75) “, finish on an dc/fpdc row.
Decrease Row: Ch 1, sc2tog, sc until last 2 st, sc2tog. <23 (26, 26, 28, 29) (30, 32, 34, 34, 36, 36, 37) st.
[Keep working in alpine st pattern for 3 rounds followed by a decrease round] 1 (2, 2, 2, 2) (3, 3, 3, 3, 4, 4, 4) times. <21 (22, 22, 24, 25) (24, 26, 28, 28, 28, 28, 29) st>
Bind off and weave in the ends.
Button band
Row 1: Join yarn and sc 10 along the right edge. <10 st>
Row 2: Ch 1, sc, ch 1, skip 1, [sc 2, ch 1, skip 1] twice, sc 2, turn.Row 3: Ch 1, sc 10, turn.

Blocking
You’re done with the crocheting part, make sure to weave in all the ends.
To make your sweater even prettier, soften your fabric and flatten your edged block your project. Don’t skip this step as it can make a huge difference. Read my detailed tutorial on why block, how-to, and all my tips and tricks if you need help.
No time right now? Pin this crochet child sweater pattern free for later!