Aria Hoodie
A new hooded cardigan crochet pattern, the Aria Hoodie, is now a free crochet cardigan pattern here on the blog. Read all about the yarn and inspiration or, scroll down to view the full free pattern or purchase an ad free PDF from the links below.
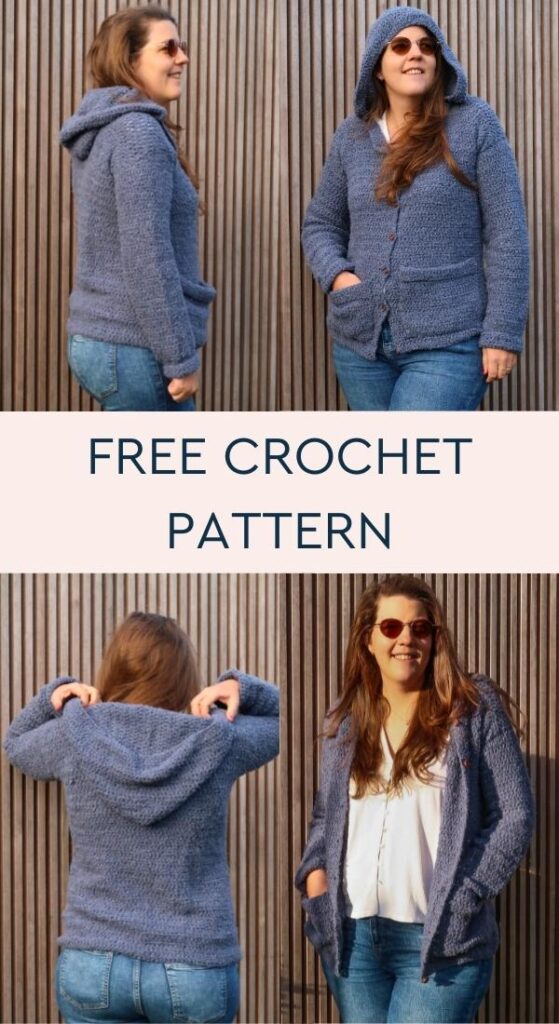
No time right now? Pin this free hooded cardigan crochet pattern for later!
*This post contains affiliate links (only for products I love, use and spend my own money on obviously). This means I earn some yarn money if you make a purchase through one of these links (of course at no extra cost for you!), which I promise to use to create more awesome patterns like this one. All opinions are my own. See my full disclosure here.
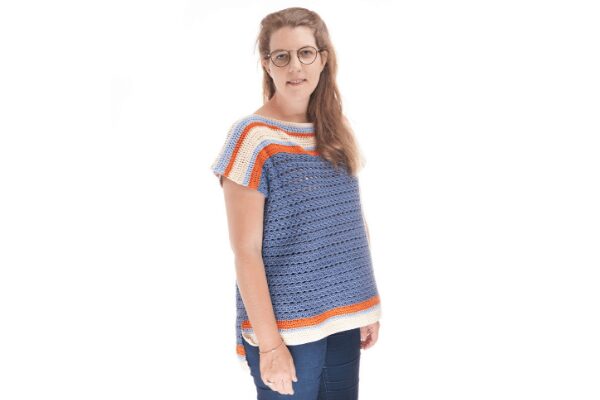
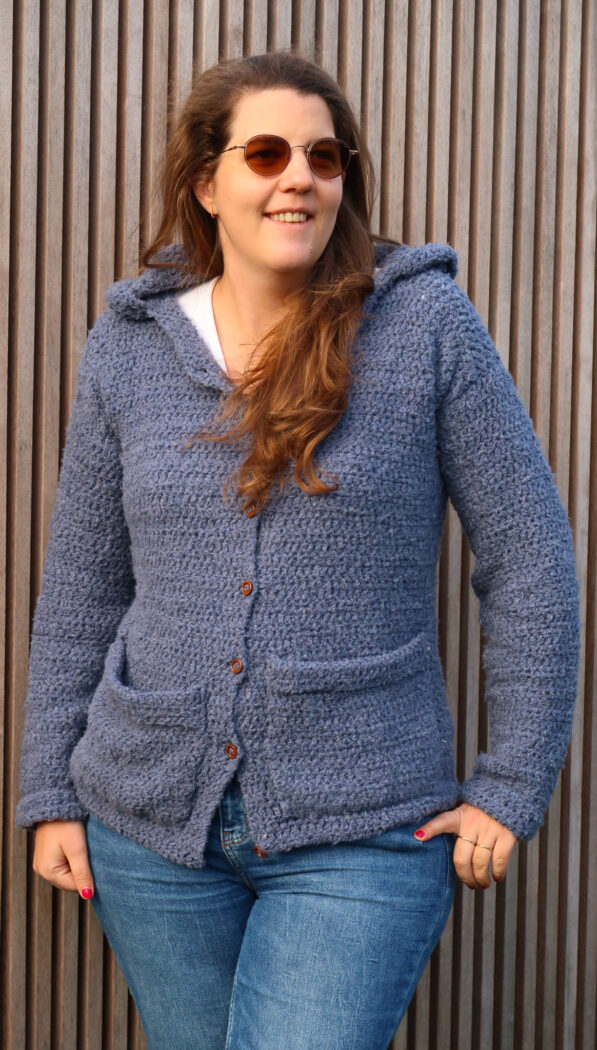
A sweater with a hood? Yes, please!
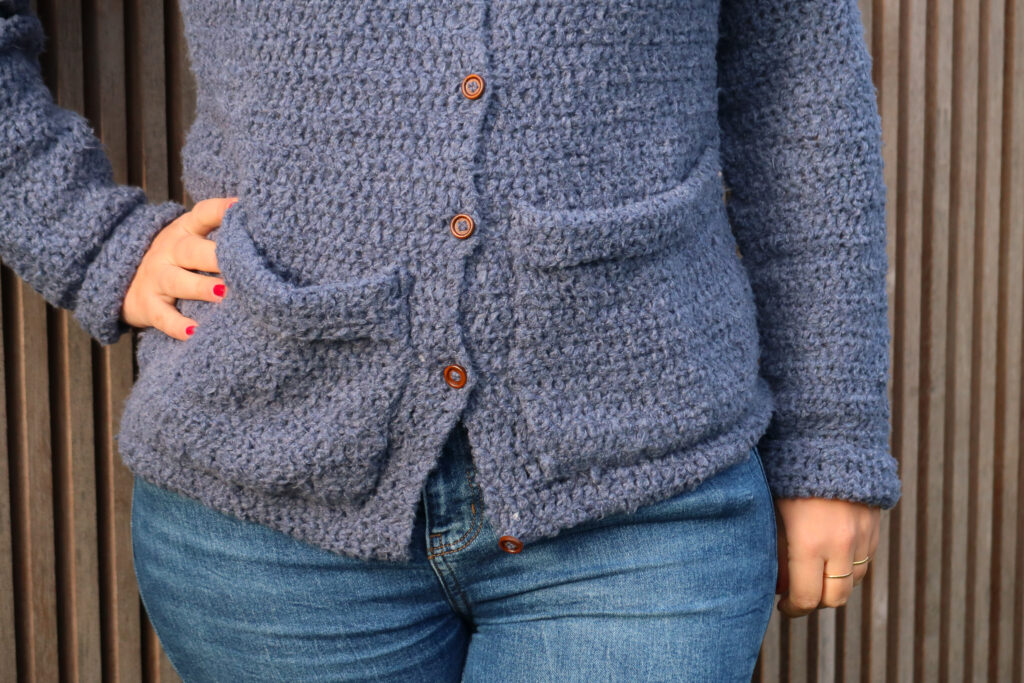
This beginner-friendly crochet pattern is worked in panels and reaches ultimate levels of cozy! And the best part? It has pockets!! Get your yarn and hook and make yours with this detailed pattern.
Pluma Fluffy Yarn
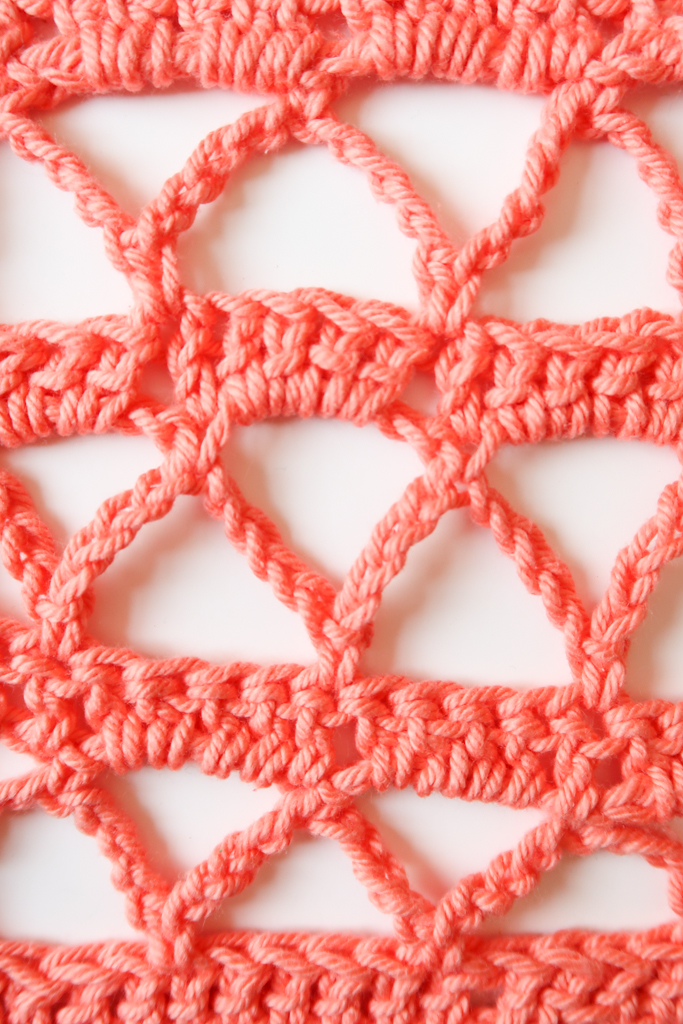
The Katia Yarn Pluma yarn is a fluffy super soft cotton blend yarn. Thanks to its down effect you don’t need any fancy stitches to get a super cozy sweater that looks storebought. It gives the Aria hoodie all its texture and fluffiness, while all you need to do are double crochet stitches.
No need to worry, unlike faux fur yarns, it’s actually easy to see the stitches while you work on your project!
If you’re choosing to work with another yarn, I recommend using a fluffy yarn with loads of texture rather than a classic worsted weight yarn to get the same look and feel. However, the pattern will work nicely with any worsted weight yarn (check your gauge!).

Downloadable PDF Hooded Cardigan Crochet Pattern

Why I Recommend You Purchase the PDF Pattern
If you’ve never used PDF patterns before, you are missing out on so much convenience!
- You don’t need to take screenshots of the pattern
- You don’t need to have your computer, phone or tablet around to work on your project.
- You don’t need to panic if your husband accidentally closed the page
- You can take notes, highlight your size and write down where you are.
- When your best friend begs you to make her the same sweater, you have the pattern ready.
- It’s a great way to support the blog so I can continue to bring you knitting tutorials.
Grab the printable PDF of the Eleanor long cardigan knitting pattern is now in my shop, on Etsy shop or on Ravelry:
Before you Start your Hooded Cardigan Crochet Pattern
Materials
- 5 mm / US H – 8 hook.
- KatiaYarns Pluma (worsted weight (4), 50 g / 1 oz 3/4, 85% cotton, 15% polyamide, 150 m / 164 yd) in colorway Jeans (81):
- XS / S : 8 skeins
- M: 9 skeins
- L: 10 skeins
- XL / 2XL: 11 skeins
- 3XL / 4 XL: 12 skeins
- 5XL: 13 skeins
- Tapestry needle to weave in the ends.
- 7 x 15 mm buttons
Size
The crochet cardigan pattern is available in the following sizes: XS, S, M, L, XL, 2XL, 3XL, 4XL, 5XL size. Sizes are written as XS (S, M, L, XL, 2XL, 3XL, 4XL, 5XL) throughout the pattern. Pictures illustrate the Medium size.
The cardigan is designed with a close fit, 2” to 4” / 5 – 10 cm ease at the bust.
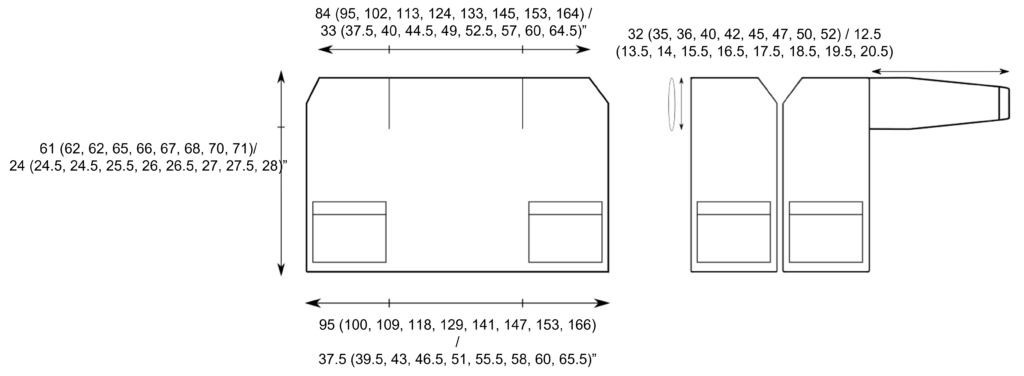
Below are the final sweater dimensions for the different sizes.
- XS: bust 84 cm / 33”, hip 95 cm / 37.5”, length 61 cm / 24”, upper arm 32 cm / 12.5”
- S: bust 95 cm / 37.5”, hip 100 cm / 39.5”, length 62 cm / 24.5”, upper arm 35 cm / 13.5”
- M: bust 102 cm / 40”, hip 109 cm / 43”, length 62 cm / 24.5”, upper arm 36 cm / 14”
- L: bust 113 cm / 44.5”, hip 118 cm / 46.5”, length 65 cm / 25.5”, upper arm 40 cm / 15.5”
- XL: bust 124 cm / 49”, hip 129 cm / 51”, length 66 cm / 26”, upper arm 42 cm / 16.5”
- 2XL: bust 133 cm / 52.5”, hip 141 cm / 55.5”, length 67 cm / 26.5”, upper arm 45 cm / 17.5”
- 3XL: bust 145 cm / 57”, hip 147 cm / 58”, length 68 cm / 27”, upper arm 47 cm / 18.5”
- 4XL: bust 153 cm / 60”, hip 153 cm / 60”, length 70 cm / 27.5”, upper arm 50 cm / 19.5”
- 5XL: bust 164 cm / 64.5”, hip 166 cm / 65.5”, length 71 cm / 28”, upper arm 52 cm / 20.5”
Gauge
The gauge for this pattern, in dc, is 11 st by 8 rows for a 10 cm by 10 cm / 4” by 4” square.
Yarn Jargon Cheatsheets
Whether you knit, crochet, or both, these are a necessity.
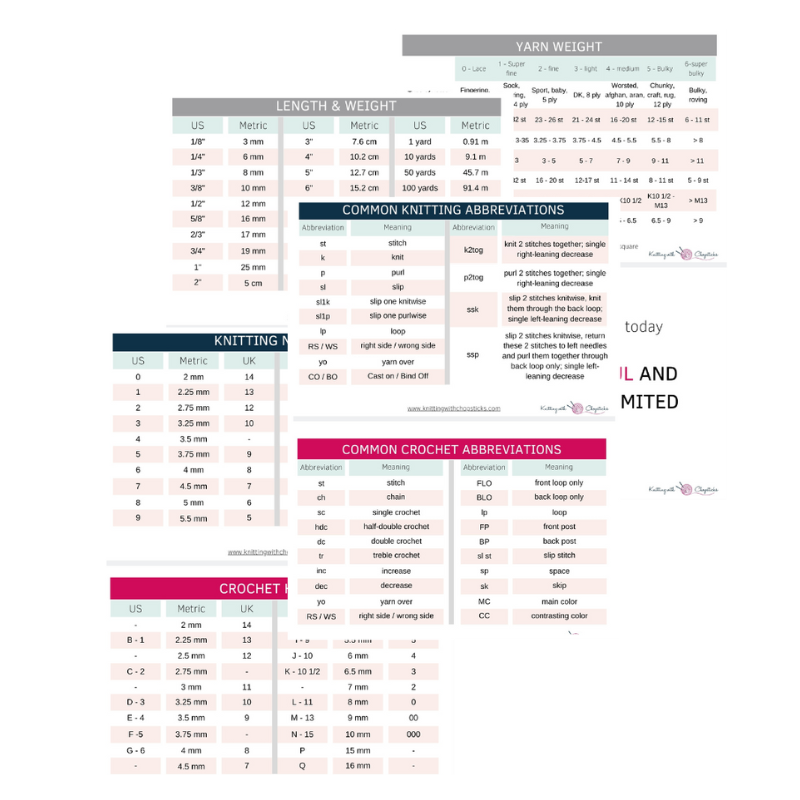
Abbreviations
This pattern uses US notations.
- st = stitch
- ch = chain
- dc = double crochet
- dc2tog = double crochet 2 stitches together
Notes
Work instructions between [] the indicated number of times or until the end of the row / round.
Sick of all the yarn jargon and conversions?
US vs UK, abbreviations, imperial vs metric, yarn weights, etc?

The final number of stitches is indicated at the end of the row / round between < >.
The turning ch 1, ch 2 don’t count as stitches throughout the pattern except if mentioned otherwise.
The pattern is written in crochet shorthand. For example:
Construction
The cardigan is worked from the bottom up in one big panel (combining back and front) which is sewed at the top to form the armholes. The sleeves are worked separately and sewed to the body. Finally, the hood and pockets are worked separately and sewed to the cardigan.
The Actual Hooded Cardigan Crochet Pattern
Cardigan Body
With your 5 mm / US H-8 hook, ch 104 (110, 120, 130, 142, 155, 162, 168, 182) st + 2.
Row 1: Dc in 3rd st from hook, dc across. <104 (110, 120, 130, 142, 155, 162, 168, 182) st>
Row 2: Ch 2, dc across.
Repeat Row 2 until you reach 44 cm / 17.25”.
Now you need to split your work in 3 sections: both front panels and the back panel. This way you create the armholes.
Divide your stitches as follows:
- XS: 29 st, 46 st, 29 st
- S: 29 st, 52 st, 29 st
- M: 32 st, 56 st, 32 st
- L: 34 st, 62 st, 34 st
- XL: 37 st, 68 st, 37 st
- 2XL: 41 st, 73 st, 41 st
- 3XL: 41 st, 80 st, 41 st
- 4XL: 42 st, 84 st, 42 st
- 5XL: 46 st, 90 st, 46 st
Work each part separately.

First section
Row 1: Ch 2, dc 29 (29, 32, 34, 37, 41, 41, 42, 46), turn.
Row 2: Ch 2, dc across, turn.
Repeat Row 2 five times.
Row 3: Ch 2, dc2tog, dc until end of row, turn. <28 (28, 31, 33, 36, 40, 40, 41, 45) st>
Row 4: Ch 2, dc until last 2 st, dc2tog, turn. <27 (27, 30, 32, 35, 39, 39, 40, 44) st>
Repeat Row 3 and 4 another 2 (2, 2, 3, 4, 4, 5, 5, 6) times. <23 (23, 26, 26, 27, 31, 29, 30, 32) st>
Repeat Row 3 another 0 (1, 1, 1, 0, 1, 0, 1, 0) time(s). <23 (22, 25, 25, 27, 30, 29, 29, 32) st>
Middle section (back panel)
Row 1: Ch 2, dc 46 (52, 56, 62, 68, 73, 80, 84, 90), turn.
Row 2: Ch 2, dc across, turn.
Repeat Row 2 another 11 (12, 12, 14, 15, 16, 17, 18, 19) times.
Final section
Row 1: Ch 2, dc across, turn.
Repeat Row 1 six times.
Row 2: Ch 2, dc until last 2 st, dc2tog, turn. <28 (28, 31, 33, 36, 40, 40, 41, 45) st>
Row 3: Ch 2, dc2tog, dc until end of row, turn. <27 (27, 30, 32, 35, 39, 39, 40, 44) st>
Repeat Row 2 and 3 another 2 (2, 2, 3, 4, 4, 5, 5, 6) times. <23 (23, 26, 26, 27, 31, 29, 30, 32) st>
Repeat Row 2 another 0 (1, 1, 1, 0, 1, 0, 1, 0) time(s). <23 (22, 25, 25, 27, 30, 29, 29, 32) st>
Sleeve
Ch 35 (38, 40, 44, 46, 49, 52, 55, 57) + 2.
Row 1: Dc in 3rd ch from hook, dc across, turn. <35 (38, 40, 44, 46, 49, 52, 55, 57) st>
Row 2: Ch 2, dc across, turn.
Repeat Row 2 until you reach 25 cm / 9.75”.
Decrease Row: Ch 2, dc2tog, dc until last 2 st, dc2tog, turn. <33 (36, 38, 42, 44, 47, 50, 53, 55) st>
Repeat Row 2 three times.
Work [Decrease Row followed by 3 (3, 3, 3, 2, 2, 2, 1, 1) repeats of Row 2] 4 (5, 5, 5, 7, 7, 7, 10, 10) times. <25 (26, 28, 32, 30, 33, 36, 33, 35) st>
Final row: [dc2tog, dc 3 (3, 5, 4, 4, 4, 4, 4, 5)] around, dc 0 (1, 0, 2, 0, 3, 0, 3, 0). <20 (21, 24, 27, 25, 28, 30, 28, 29) st>
Make 2.
Ch 25 + 2
Row 1: Dc in 3rd ch from hook, dc across, turn. <25 st>
Row 2: dc across, turn.
Repeat Row 2 another 16 times.
Hood
Ch 80 + 2.
Row 1: Dc in 3rd ch from hook, dc across, turn. <80 st>
Row 2: Ch 2, dc across, turn.
Repeat Row 2 another 18 times.
Row 3: Ch 2, dc 30, dc2tog 10 times, dc 30. <70 st>
Row 4 – 5: Repeat Row 2
Row 6: dc 19, dc2tog 16 times, dc 19. <54 st>
Assembly
Fold the cardigan body at the armholes.
Sew up the front and back panels at the shoulders leaving 8 cm / 3” unseamed.
Fold the sleeve lengthwise and match the fold with the shoulder seam. Then seam sleeve to armhole, then seam down underside of sleeve to wrist. Fold over the last 3 rows of the sleeves.
Fold over the top 3 rows of the pocket then attach the pockets 5 stitches from the edge and 3 rows from the bottom on each side. Don’t sew the fold.
Then attach the hood. To do so, fold it in half and sew the last rows together to form the hood.
Then close the cardigan and sew the side edge of the hood to the cardigan neck edges / front flaps (the 8 cm/3” you left unseamed and back panel).
Finally, sew the buttons. Spread them evenly along the cardigan front. There are no buttonholes, just slip the buttons between 2 stitches.
Blocking
You’re done with the crocheting part. Make sure to weave in all the ends.
To make your cardigan even prettier, help even your stitches and make the textures come out even more, block your project.
Don’t skip this step as it can make a huge difference. Read my detailed tutorial on why block, how-to, and all my tips and tricks if you need help.
Sparkling Snowfall Blog Hop
As part of Ms Shank’s Sparkling Snowfall Blog hop, download your free copy PDF of the Aria Hoodie pattern below on 20 December only!