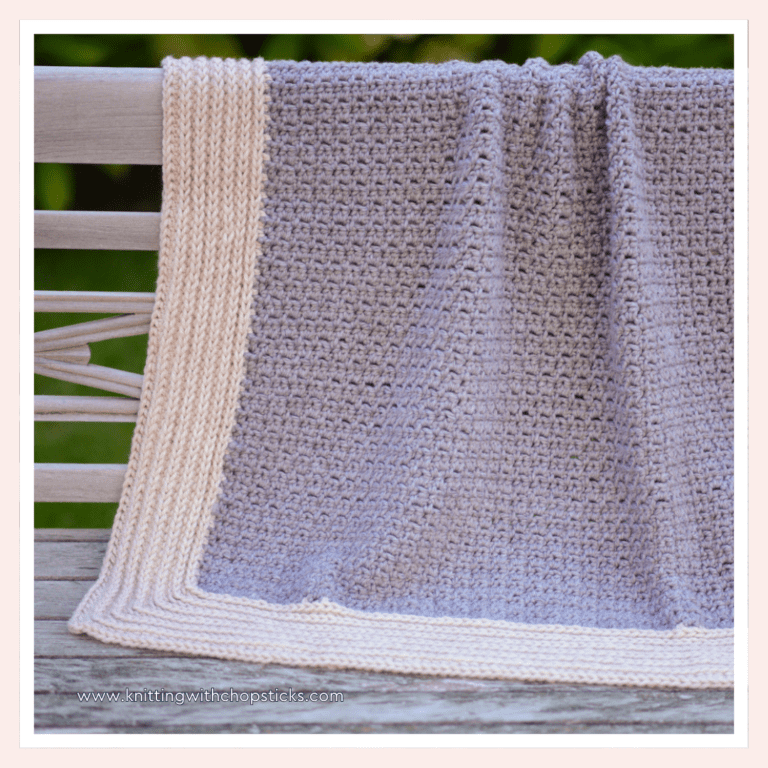
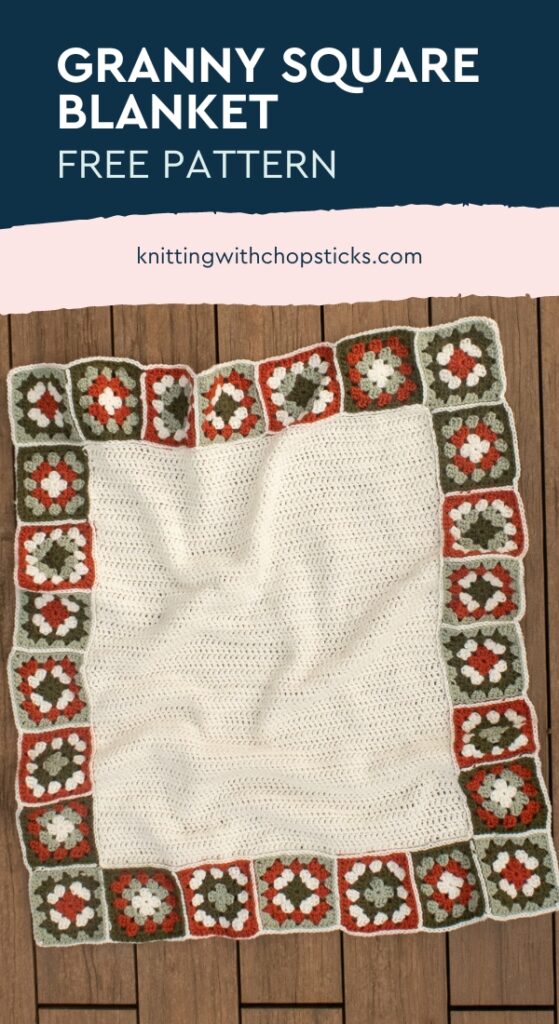
Granny Square Border Blanket
A new crochet blanket border pattern, the Granny Square Border Blanket, is now a free granny square blanket border pattern here on the blog. Read all about how to use this border on any blanket and the crochet edge pattern collection it is a part of or scroll down for the complete free crochet granny square blanket pattern.
No time right now? Pin this free crochet blanket granny squares edging for later!
*This post contains affiliate links (only for products I love, use and spend my own money on obviously). This means I earn some yarn money if you make a purchase through one of these links (of course at no extra cost for you!), which I promise to use to create more awesome patterns like this one. All opinions are my own. See my full disclosure here.

The Inspiration for the Granny Square Blanket Border
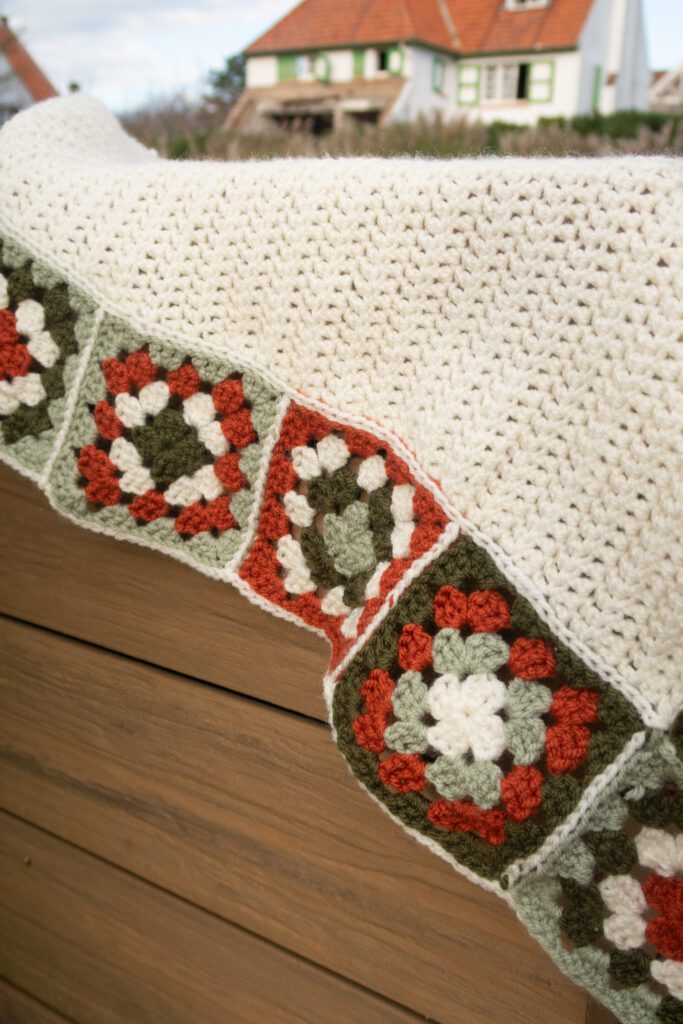
Get ready to cozy up with my latest release – the Granny Square Border Blanket! The idea is to take a simple design for the base of your blanket and then dress it up with a trendy granny square crochet border.
As part of our Classics on the Edge collection, this pattern is a timeless addition that brings a touch of tradition with a modern twist to your crochet projects. It is the ultimate in a series of four classic crochet borders.
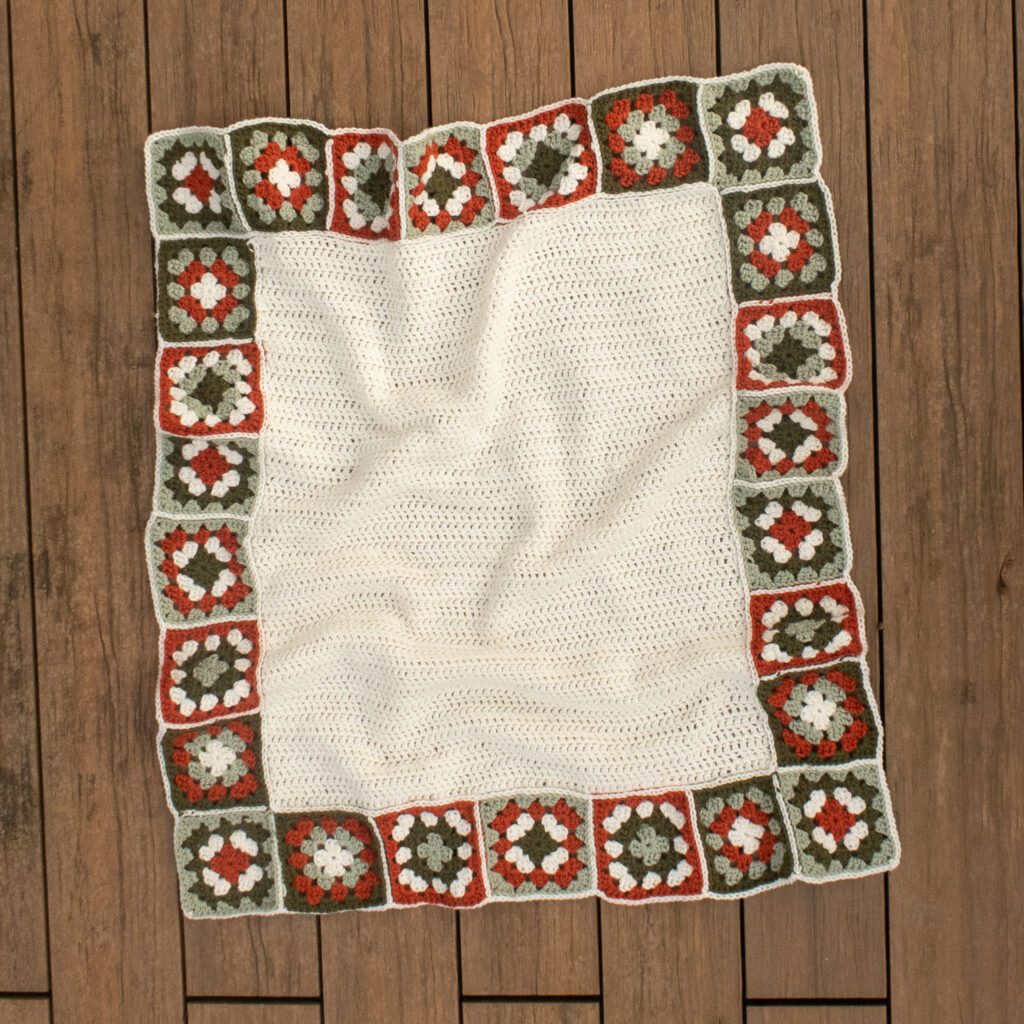
If you’re a fan of classic designs with a contemporary edge, you’re in for a treat. The Granny Square Border Blanket combines a classic solid neutral color for the blanket center with the charm of a granny squares border, resulting in a versatile piece that’s perfect for any home decor style.
Accessible and Versatile Crochet Blanket Project
In this blog post, we’re diving into the details of this beloved pattern. Whether you’re a seasoned crocheter or just starting out on your yarn-filled journey, this pattern is designed to be accessible for beginners and enjoyable for crafters of all skill levels.
Choose any of our 10 sizes from baby to king to suit your needs.
So, grab your crochet hook and your favorite worsted weight yarn, and let’s embark on a journey of creativity and craftsmanship with the Granny Square Border Blanket.
Choosing Your Colors for the Granny Square Edging
For the granny squares to come out nicely you will need 4 coordinating colors. Using these 4 colors, I made 4 different color combinations for the granny squares for the sample pictured here. This harmonious blend helps arrange the squares when assembling the crochet blanket border.
My tip: don’t use your main color for the final granny square round to ensure the seams pop out as intended.
I also recommend one of the colors for the granny squares to be the same as the central piece of the blanket for the border to work well with the centerpiece and not seem disconnected. In my baby size sample, it is the off-white color.

The Granny Square Blanket Construction
The crochet blanket centerpiece is worked flat in the main color, row by row, using simple stitches. Then each granny square is worked in the round, changing color for each round.
The granny squares are assembled together and to the blanket centerpiece using slip stitches. No seaming necessary!
Get ready to add a touch of ‘tradition meets modernity’ elegance to your home decor with this exquisite granny square border blanket pattern. Happy crocheting!

Downloadable Granny Square Border Blanket Pattern

Grab the printable PDF of the Granny Square Border Blanket pattern now in my shop, Etsy shop or on Ravelry.
Classics on the Edge Collection
This blanket pattern is part of the Classics on the Edge Collection. It is a set of 4 easy crochet blanket patterns where classic crochet blanket constructions / types are revisited by featuring them on a wide blanket border with a sober blanket center.
All crochet blanket border patterns come in several sizes (from baby to king size) with instructions on how to adjust the crochet border instructions for any blanket project.
Sick of all the yarn jargon and conversions?
US vs UK, abbreviations, imperial vs metric, yarn weights, etc?

The 4 patterns in the collection are:
- The Waffle Border Blanket: find the free crochet pattern here
- The Polka Dots Edge Blanket: find the free crochet pattern here
- The Gingham Edge Blanket: find the free crochet pattern here
- The Granny Square Border Blanket: find the free crochet pattern here
You can also grab the entire collection ebook here.

More Crochet Blanket Patterns You'll Love
Before you Start your Crochet Granny Square Blanket
Materials
- 5 mm / US H – 8 hook
- 6 mm / US J – 10 hook
- Worsted weight yarn: Royal Zeeman yarn (100% acrylic, 100g/3.5oz, 241m/264yd):
- 2 (3, 5, 4, 5, 6, 11, 18, 19, 22) (skeins in off-white (MC)
- 1 (2, 2, 2, 2, 2, 3, 4, 4, 4) skeins in each of the 3 contrasting colors for the border: Sage (A), Orange (B), Olive green (C)
- Tapestry needle to weave in the ends.
You can easily substitute with any worsted weight yarn you want.
Gauge
The gauge for this pattern is 12.5 st by 9 rows of dc stitches for a 10 cm by 10 cm square (4” by 4”).
Size
The blanket crochet pattern is available in 10 sizes, noted baby (receiving, toddler, crib-small, crib-regular, throw, twin, double, queen, king) throughout the pattern. Pictures illustrate the baby size.
The table below shows the different sizes.
| Blanket sizes | Inches | Inches | Centimeters | Centimeters | Granny squares |
| Width | Length | Width | Length | # squares | |
| Stroller / Baby | 30 | 35 | 77 | 88 | 26 |
| Receiving | 39 | 39 | 99 | 99 | 32 |
| Toddler | 43 | 52 | 110 | 132 | 40 |
| Crib – Small | 35 | 52 | 88 | 132 | 36 |
| Crib – Regular | 43 | 61 | 110 | 154 | 44 |
| Throw | 52 | 61 | 132 | 154 | 48 |
| Twin | 65 | 91 | 165 | 231 | 68 |
| Double | 91 | 108 | 231 | 275 | 88 |
| Queen | 95 | 108 | 242 | 275 | 90 |
| King | 108 | 108 | 275 | 275 | 96 |
You can easily adapt the size to your desired project size, instructions are given in the pattern below.
How to Use the Granny Square Crochet Edging on Another Blanket
Of course, you could use this granny square edging pattern on any blanket of yours. In order to do so, you need each side of your blanket to be a multiple of 11cm / 4.25” as the squares are 11cm / 4.25” each.
You could also adjust the border width by adding / removing rounds in your granny squares. You will then have to measure your square’s size and adapt the center blanket part accordingly.

Abbreviations
This pattern uses US notations.
- st = stitch
- ch = chain
- sc = single crochet
- dc = double crochet
Notes
Work instructions between [] the indicated number of times or until the end of the row/round. Instructions between () are worked in the same stitch/space.
The final number of stitches is indicated at the end of the row/round between < >.
The turning ch 1, ch 2 don’t count as stitches throughout the pattern except if mentioned.
The pattern is written in crochet shorthand. For example:
- “dc 1” means to double crochet in the next stitch,
- “dc 2” means to double crochet in each of the next 2 stitches,
- and “2 dc” means to double crochet twice in the next st.
Techniques, Tips and Tricks
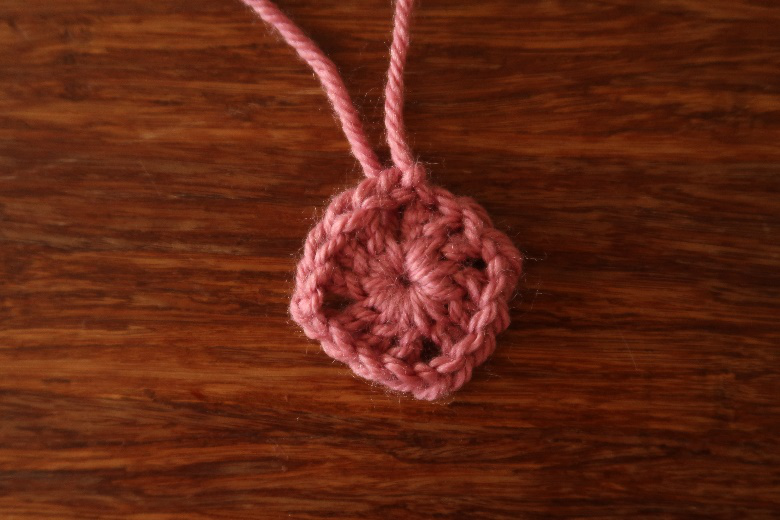
- Magic ring, aka magic circle. If you’re not familiar with this technique, this detailed photo and video tutorial should help you.
- Weaving in the ends: As each round uses a different color, a lot of ends need to be woven in. If you’re like me, weaving in ends is not your favorite part of a crochet project.
- As the pattern is not too lacy, you can get away with crocheting the next round over the tail of the previous round.
- After you have crocheted a few stitches over the tail of the previous round, leave about 3-4cm / 1-2” of the tail and finish your round.
- Weave in the end of the tail in the opposite direction. With this method, you only have to do half of the weaving in process per tail.
- When you start a new round, don’t start where you finished the previous one. Start somewhere different at random. Having all your ends in the same section of the square will make an extra layer, which you want to avoid. You don’t want to see where you started your round in your finished square, this trick makes them nearly invisible.
- When I start a new round, I tag along the tail and crochet with a double yarn for a couple of stitches. It’s not perfect but I find as these are at random around your square, they are not too visible and it makes you save a lot of weaving in ends time. If you don’t like it, you can leave your tail and weave it in afterwards like you would normally do.
- To assemble the granny squares, I used this technique, doing slip stitches through the back loop only from the front.
The Actual Granny Square Blanket Crochet Pattern
Blanket Body
With your 5 mm / US H – 8 hook and MC yarn, ch 69 (96, 110, 83, 110, 138, 179, 261, 275, 316) + 2.
Row 1: Dc in 3rd ch from hook, dc across. <69 (96, 110, 83, 110, 138, 179, 261, 275, 316) st>
Row 2: Ch 2, dc across, turn.
Repeat Row 2 until you reach 66 (77, 110, 110, 132, 132, 209, 253, 253, 253) cm / 26 (30.25, 43.25, 43.25, 52, 52, 82.25, 99.5, 99.5, 99.5)”.
Fasten off.
Granny Square Border
Make 26 (32, 40, 36, 44, 48, 68, 88, 90, 96) granny squares in different color combinations
Color Combinations
To add some repetitiveness and regularity as well as ensure a harmonious blend I recommend making 3 to 5 different color combinations. I made 4 different combinations for the sample pictured here. This also helps arrange the squares when assembling the blanket.
Don’t use your MC for the final granny square round to ensure the seams pop out as intended.
Each round is worked in a different color, listed from the center (round 1) to the final round (round 4).
- Type 1: MC, A, B, C
- Type 2: A, C, MC, B
- Type 3: C, MC, B, A
- Type 4: B, MC, C, A
Granny Square Instructions
The granny squares are worked in the round, changing colors after each round but not turning your work.
Round 1: With your 5 mm / US H – 8 hook, in a magic circle, ch2, 2dc, ch 2, [3 dc, ch 2] three times in circle. Finish with a sl st in the first dc. <12 dc, 4 ch-2 spaces>
Round 2: Join yarn in a ch-2 space, (ch 3, 2 dc, ch 2, 3 dc) in ch-2 space, [ch 1, skip 3 dc, (3 dc, ch 2, 3 dc) in ch-2 space] around, ch 1 and join with a sl st in the 3rd ch. <24 dc, 4 ch-1 spaces, 4 ch-2 spaces>
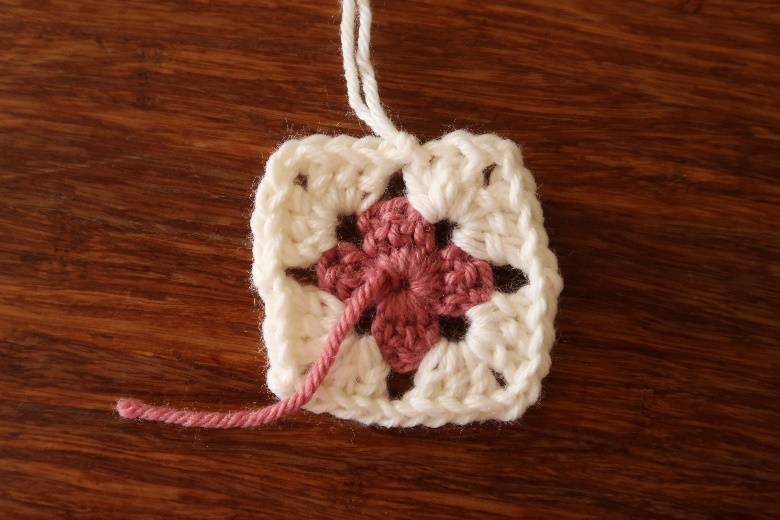
Round 3: Join yarn in a ch-2 space, (ch 3, 2 dc, ch 2, 3 dc) in ch-2 space, [ch 1, skip 3 dc, 3 dc in ch-1 space, ch 1, skip 3 dc, (3 dc, ch 2, 3 dc) in ch-2 space] around, ch 1, skip 3 dc, 3 dc in ch-1 space, ch 1, skip 3 dc, join with a sl st in the 3rd ch. <36 dc, 8 ch-1 spaces, 4 ch-2 spaces>
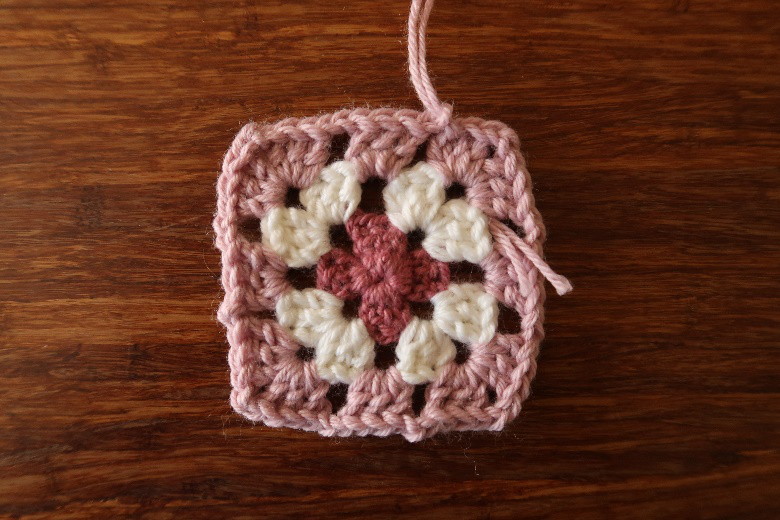
Round 4: Join yarn in corner ch-space, (ch 3, 2 dc, ch 2, 3 dc) in corner space, * [ch 1, sk 3 dc, 3 dc in ch-1 space] to next ch-2 space, (3 dc, ch 2, 3 dc) in ch-2 space; rep from * around, [ch 1, sk 3 dc, 3 dc in ch-1 space] across final side, sl st to third ch to join. <48 dc, 12 ch-1 spaces, 4 ch-2 spaces>

Bind off and weave in the ends.
Blocking
You’re done with the crocheting part, make sure to weave in all the ends.
To make your blanket even prettier and help straighten your edges and open up the granny stitch sections block your pieces separately before assembly.
Don’t skip this step as it can make a huge difference. Read my detailed tutorial on why block, how-to, and all my tips and tricks if you need help.
Assembly
To assemble the granny squares together, you will slip stitch them together through the back loop only from the front side with your 6 mm / US J -10 hook and MC yarn.

Start by laying all your granny squares around your center piece in the order you like. I like to have symmetry around the corners as you can see on the image below, using the same granny square type for all 4 corners.

Start by slip stitching the squares to the center piece, all through the back only from the front (arrow number 1). In the corner ch-2 spaces I made a sc instead as slip stitches through chain stitches can be fidgety.
Then you will make all the small seams between squares in a similar manner (lines number 2).
Finally, slip stitch through the back loop only around the outer blanket edge for a polished finish (arrow number 3).