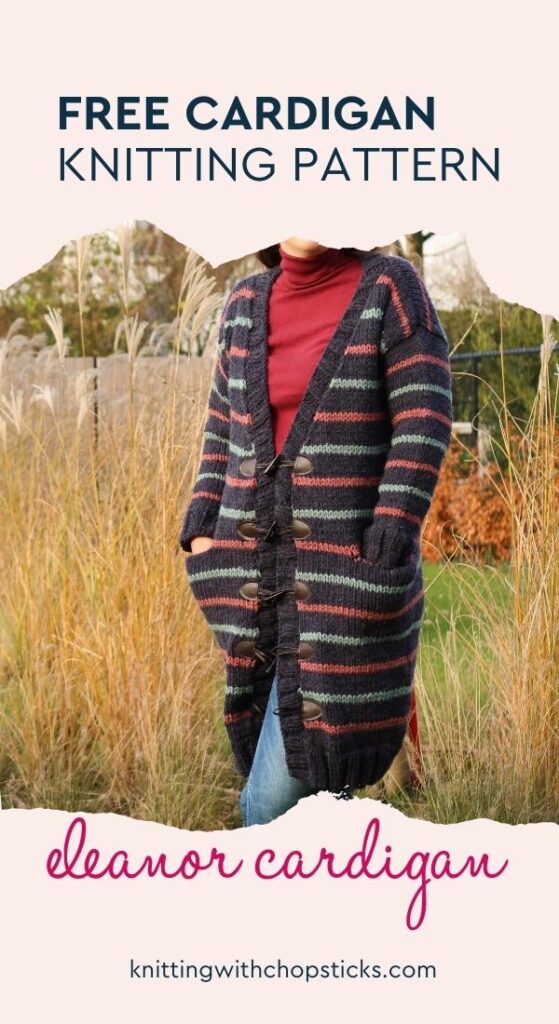
Eleanor Long Cardigan Knitting Pattern

A new long cardigan knitting pattern, the Eleanor Cardigan, is now a free knitting pattern on the blog! Read all about the inspiration and yarn or scroll down for the free long knit cardigan pattern.
No time right now? Pin this free long cardigan knitting pattern for later!
*This post contains affiliate links (only for products I love, use and spend my own money on obviously). This means I earn some yarn money if you make a purchase through one of these links (of course at no extra cost for you!), which I promise to use to create more awesome patterns like this one. All opinions are my own. See my full disclosure here.
A Coatigan
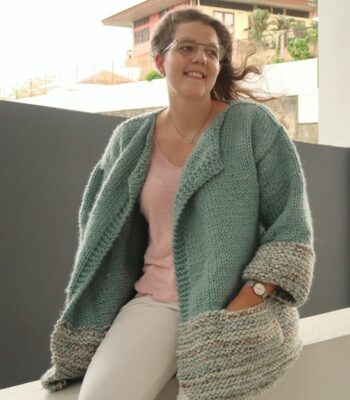
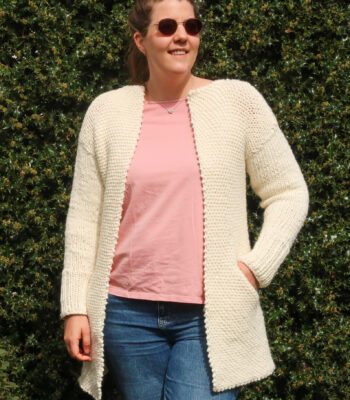
There is always that weird time between seasons where you never know if you should wear a coat or if a sweater is fine. The Eleanor Cardigan is a great solution! It’s a bit heavier than a normal cardigan, but not quite a coat. It’s a coatigan. Try this easy pattern and have everyone asking you where you got this piece!
The Yarn
The Eleanor long knit cardigan pattern features Lionbrand’s new Hue + Me yarn. It’s a lovely acrylic (80%) and wool (20%) blend that comes in 24 gorgeous and trendy colors. It is very similar to their famous Wool-Ease yarn but in chunky weight 5 instead of worsted weight 4.
The color palette has been designed such that whatever color combination you choose will work well together. You can’t go wrong!
For this striped cardigan I recommend picking either:
- a dark color for the main color with lighter contrasting colors for the stripes
- a light color for the main color with dark contrasting colors for the stripes

Downloadable PDF Long Knit Cardigan Pattern

Why I Recommend You Purchase the PDF Pattern
If you’ve never used PDF patterns before, you are missing out on so much convenience!
- You don’t need to take screenshots of the pattern
- You don’t need to have your computer, phone or tablet around to work on your project.
- You don’t need to panic if your husband accidentally closed the page
- You can take notes, highlight your size and write down where you are.
- When your best friend begs you to make her the same sweater, you have the pattern ready.
- It’s a great way to support the blog so I can continue to bring you knitting tutorials.
Grab the printable PDF of the Eleanor long cardigan knitting pattern is now in my shop, on Etsy shop or on Ravelry:
Wear It Proud: Beginner Garments You’ll Actually Love
If you’re ready to wear what you knit and actually love how it fits and feels, the Wear It Proud: Knitting Collection is for you.
The pattern you’re looking at is part of this special collection, along with 9 other beginner-friendly garment patterns (sizes XS–5XL) that guide you step by step from your first cast-on to your finished sweater, cardigan, or top.
Each design is simple, wearable, and confidence-building, perfect for knitters who want to move beyond accessories and start making clothes that fit their life and their style.
Grab the Wear It Proud: Knitting Collection here >>
Before you Start your Long Cardigan Knitting Pattern
Materials
- 10 mm / US 15 circular knitting needles (or double pointed needles)
- LionBrand hue + me (Bulky weight 5, 80% acrylic, 20% wool, 125m/137yd, 125g/4.4oz):
- Peacoat (MC): 4 (4, 5, 5, 5, 6, 6, 6, 7) skeins
- Love Song (Color A): 2 skeins
- Agave (Color B): 1 skein
- Tapestry needle to weave in the ends
- Optional: Sew on toggle buttons
Size
The sweater knitting pattern is available in the following sizes: XS to 5XL. Sizes are noted throughout the pattern in the following way: XS (S, M, L, XL, 2XL, 3XL, 4XL, 5XL). The pictures illustrate the L size.
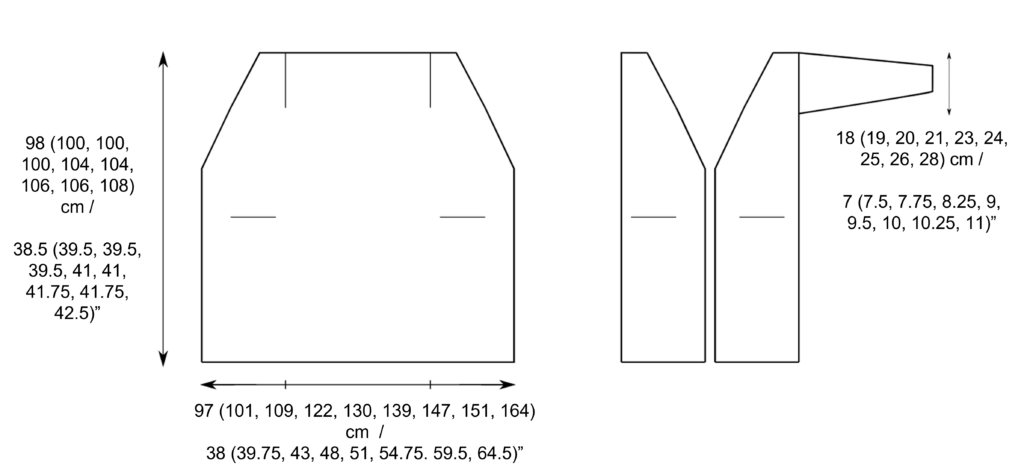
Final garment measurements are:
- XS: 97 cm / 38” hip, 18 cm / 7” armhole depth, 98 cm / 38.5” length.
- S: 101 cm / 39.75” hip, 19 cm / 7.5” armhole depth, 100 cm / 39.5” length.
- M: 109 cm / 43” hip, 20 cm / 7.75” armhole depth, 100 cm / 39.5” length.
- L: 122 cm / 48” hip, 21 cm / 8.25” armhole depth, 100 cm / 39.5” length.
- XL: 130 cm / 51” hip, 23 cm / 9” armhole depth, 104 cm / 41” length.
- 2XL: 139 cm / 54.75” hip, 24 cm / 9.5” armhole depth, 104 cm / 41” length.
- 3XL: 147 cm / 57.75” hip, 25 cm / 10” armhole depth, 106 cm / 41.75” length.
- 4XL: 151 cm / 59.5” hip, 26 cm / 10.25” armhole depth, 106 cm / 41.75” length.
- 5XL: 164 cm / 64.5” hip, 28 cm / 11” armhole depth, 108 cm / 42.5” length.
The cardigan is designed with a normal fit, 5-10 cm / 2-4” ease at the hips.
Gauge
The gauge for this pattern, in stockinette stitch, is 9.5 st by 14 rows for a 10 cm by 10 cm square (4” by 4”).
Abbreviations & Instructions
- st = stitch
- k = knit
- p = purl
- k2tog = knit 2 stitches together, single right-leaning decrease
- ssk = slip 2 stitches knitwise, knit these 2 stitches together through back loops; single left-leaning decrease.
- ssp = slip 2 stitches knitwise, return these 2 stitches to left needle and purl them together through back loops; single left-leaning decrease
- RS = Right side
- WS = Wrong side
Repeat instructions between [] the indicated number of times or until the end of the round/row.
Sick of all the yarn jargon and conversions?
US vs UK, abbreviations, imperial vs metric, yarn weights, etc?

The final number of stitches is indicated at the end of the round/row between < >.
Special Stitches and Techniques
- Stockinette stitch:
- Flat: knit on the right side, purl on the wrong side.
- In the round: knit all rounds.
- Sleeves are worked in the round. You can choose to either work with very short needles and cables, use the magic loop technique or double pointed needles. If you’re not familiar with the magic loop technique, this tutorial will help you.
Construction
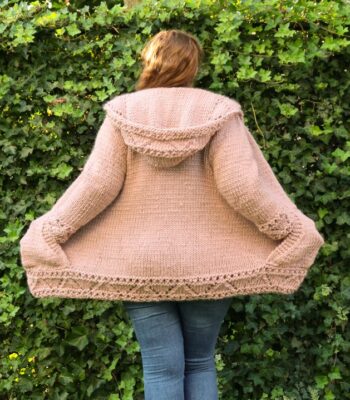
The cardigan is worked from the bottom up in one big panel (combining back and front). The pockets are made while working the main panel which is sewed at the top to form the armholes. The stitches for the sleeves are picked up at the armholes and worked in the round from shoulder to cuff. Finally, stitches for the front border and collar are picked up and knit in rows.

The Actual Cardigan Knitting Pattern
Body Panel
With your 10 mm / US 15 needles and MC yarn, cast on 92 (96, 104, 116, 124, 132, 140, 144, 156) st.
[K2, p2] across for 10 rows.
Stripe pattern
Knit 6 rows in stockinette st.
Switch to color B
Knit 2 rows in stockinette st
Switch to MC
Knit 6 rows in stockinette st
Switch to color A
Knit 2 rows in stockinette st
Switch to MC
Repeat stripe pattern twice
Knit 6 rows in stockinette st.
Switch to color B.
Pockets
Note: The pockets are worked at the same time as the cardigan. On the next row you will knit some stitches up to the pocket position then knit the 14 pocket stitches in rows back and forth to form the pocket. Once the desired length is achieved, you need to go back to the stitches you left on hold (the rest of the original row) and knit these up to the next pocket. Repeat the process for the second pocket.
Knit 12 st.
Work the next 14 st separately in rows back and forth in stockinette st for 35 cm (starting and ending with a knit row).
Re-join with the other stitches and knit until last 26 st
Work the next 14 st separately in rows back and forth in stockinette st for 35 cm (starting and ending with a knit row).
Re-join with the last 12 st and knit until end of row.
Purl 1 row.
Switch to color A.
Knit 6 rows in stockinette st.
Switch to color C.
Knit 2 rows in stockinette st.
Switch to color A.
Repeat stripe pattern until total cardigan length is 60 cm / 23.5”.
Continue working in stripe pattern and work the appropriate decrease row (below) every 3rd row 9 times <74 (78, 86, 98, 106, 114, 122, 126, 138) st>:
- RS Decrease row (knitwise): K1, ssk, knit until last 3 st, k2tog, k1.
- WS decrease row (purlwise): P1, p2tog, p until last 3 st, ssp, k1.
Now you need to split your work in 3 sections: both front panels and the back panel. This way you create the armholes.
Divide your stitches as follows:
- XS: 17 st, 40 st, 17 st
- S: 17 st, 44 st, 17 st
- M: 19 st, 48 st, 19 st
- L: 23 st, 52 st, 23 st
- XL: 26 st, 54 st, 26 st
- 2XL: 27 st, 60 st, 27 st
- 3XL: 28 st, 66 st, 28 st
- 4XL: 28 st, 70 st, 28 st
- 5XL: 31 st, 76 st, 31 st
Work each part separately.
Section 1
Working with only the first 17 (17, 19, 23, 26, 27, 28, 28, 31) st, continue in stripe pattern with one of the following decreases every 3rd row 8 (9, 9, 9, 11, 11, 12, 12, 13) times <9 (8, 10, 14, 15, 16, 16, 16, 18):
- RS decrease row (knitwise): K1, ssk, knit until end of row.
- WS decrease row (purlwise): P1, p2tog, purl until end of row.
Cast off and leave a long tail for sewing.
Section 2
Join yarn to next available st from the end of the cardigan body section.
Work the next 40 (44, 48, 52, 54, 60, 66, 70, 76) st for 24 (27, 27, 27, 33, 33, 36, 36, 39) rows in stripe pattern.
Cast off and leave a long tail for sewing.
Section 3
Join yarn to next available st from the end of the cardigan body section.
Continue in stripe pattern with one of the following decreases every 3rd row 8 (9, 9, 9, 11, 11, 12, 12, 13) times <9 (8, 10, 14, 15, 16, 16, 16, 18):
- Decrease row (knitwise): K1, knit until last 3 st, k2tog, k1.
- Decrease row (purlwise): P1, purl until last 3 st, ssp, p1.
Cast off and leave a long tail for sewing.
Assembly
Fold the cardigan body at the armholes.
Sew up the front and back panels at the shoulders.
Sleeves
Repeat for both sleeves.
With MC, pick up 34 (36, 38, 40, 44, 46, 48, 50, 54) st around the armhole. Join in the round.
Work in stripe pattern for 14 (10, 10, 10, 8, 6, 6, 2, 2) cm / 5.5 (4, 4, 4, 3, 2.25, 2.25, 0.75, 0.75)”.
Decrease Round: k1, ssk, knit until last 3 st of the round, k2tog, k1.
Work 6 rounds in stripe pattern
[Work decrease round followed by 6 rounds in pattern] 5 (6, 6, 6, 7, 7, 7, 8, 8) times. <22 (22, 24, 26, 28, 30, 30, 32, 36) st>
Work 0 (0, 1, 1, 1, 2, 3, 3, 3) more decrease round(s). <22 (22, 22, 24, 26, 26, 24, 26, 30) st>
Switch to MC (if that wasn’t the color in use)
[K2, p2] around for 10 rounds.
Cast off and weave in the ends.
Collar
Pick up approximately 228 st for the collar: 100 st along the side + one in each st from the back panel + 100 down the other side.
The exact number doesn’t matter but make sure you end up with a multiple of 2.
[K2, p2] for 6 rows.
Cast off and weave in the ends.
Finishing Touches
Attach the toggle buttons.
To do so, cut a small piece of fabric in the shape of the toggle button leather piece (make it a little bigger). You will place these on the inside of the cardigan to make the seaming of the toggle buttons easier. You can use a sewing machine or do it by hand.
Spread the toggle buttons evenly along the straight portion of the cardigan edge (before any decreases). Refer to the picture below for reference.

Blocking
You’re done with the knitting part. Make sure to weave in all the ends.
To make your cardigan even prettier, help even your stitches and make the textures come out even more, block your project.
Don’t skip this step as it can make a huge difference. Read my detailed tutorial on why block, how-to, and all my tips and tricks if you need help.