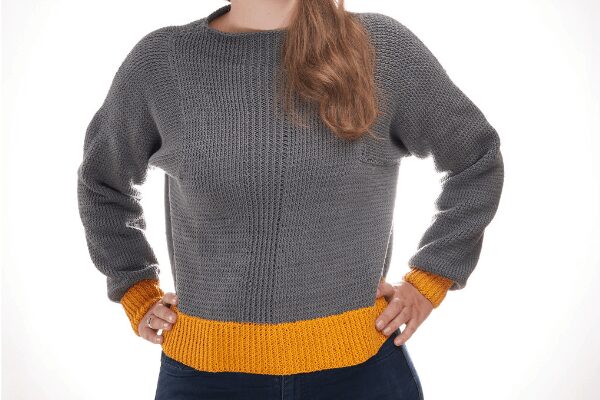
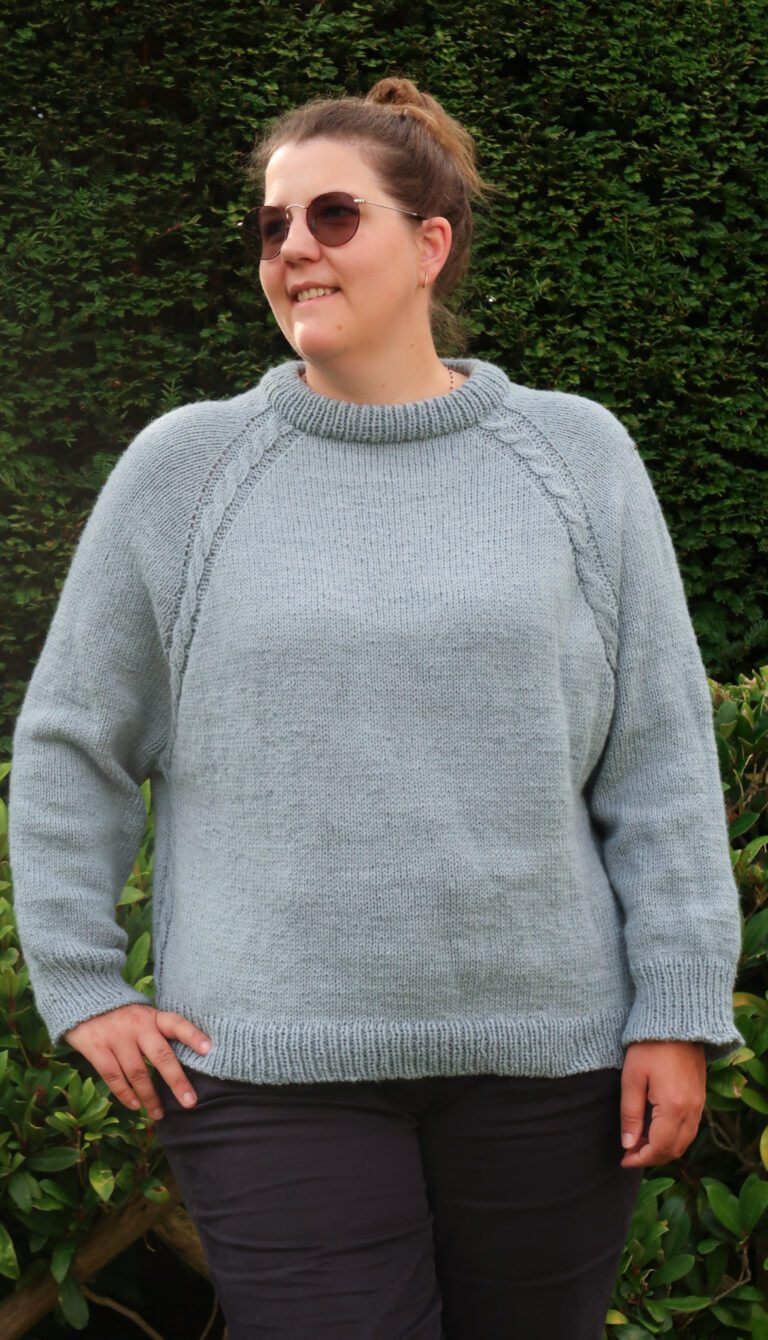
Sunshine Cropped Sweater
Who doesn’t need a ray of sunshine on gloomy days? This easy sunshine cropped sweater knitting pattern is that ray of sunshine.
You don’t have time to make it now? Pin this cropped sweater knitting pattern for later.

Made with Lion Brand 24/7 cotton yarn, it is a perfect sweater for those cold summer evenings. I absolutely love the goldenrod color and am very happy with how it turned out mixed with the charcoal. This crop knit sweater is super comfy. It looks great with high waisted shorts or a pair of jeans and just makes me want to dance.
It’s worked in 4 pieces (front, back, and each sleeve) and then sewed together. Only the knit and purl stitches are used as well as simple decreases and increases. You don’t need to be an expert to make this easy cropped sweater knitting pattern.

Scroll down for the free version but I recommend you purchase the ad-free PDF Pattern to get all the instructions and pictures in a nice PDF you can print and take notes on without relying on your phone or an internet connection, I’ve got you covered!
The Sunshine Cropped Sweater knitting pattern is now available in my shop, on Ravelry here and on Etsy here.

*This post contains affiliate links (only for products I love, use and spend my own money on obviously). This means I earn some yarn money if you make a purchase through one of these links (of course at no extra cost for you!), which I promise to use to create more awesome patterns like this one. All opinions are my own. See my full disclosure here.
Quick links for direct access to the different parts of the pattern:
Before you start
1. Materials
- 3.5 / US 4 and 4mm / US 6 knitting needles. If you don’t have these sizes yet, this convenient set has all common sizes.
- Lion Brand 24/7 cotton yarn in goldenrod and charcoal colors. You need one skein goldenrod and 6 skeins charcoal color for this cropped sweater knitting pattern.
- Tapestry needle for sewing in the ends.
2. Abbreviations
- k = knit
- p = purl
- k2tog = knit 2 stitches together (decrease)
- k
2st in the next st = knit 2 stitches in the same stitch (increase).
Repeat the stitches or rows between * * the indicated number of times.
My gauge in stockinette stitch with 4mm needles is 21 stitches by 29 rows for a 10cm by 10cm square.
3. Finished Size
As for most of my patterns, there is not much sizing involved. This is an oversized cropped sweater knitting pattern: loose and comfy.
However, if you want to adjust the size I will show you where and how in the pattern. Look out for the italic text.
Below sketch shows the main dimensions.

4. Tips and Tricks
- Once you finish one piece of the sweater start blocking it straight away so you don’t end up with 4 parts to block, no room on your blocking mat and a few days lost waiting for each part to dry. Refer to the blocking section below for detailed advice on this step.
- The ribbed sections (the yellow parts and the middle of the front section) are created by alternating knit and purl stitches. On the opposite side of the piece, work the stitches as they are. If the stitch on the previous row looks knitted, knit the stitch, if the stitch on the previous row looks purled, purl it. I refer to this with *k1, p1* throughout the pattern.
- The sides of each piece will curl up as it is knitted in stockinette stitch. Don’t worry, this is completely normal and will
disapear once you block your pieces.
Sunshine Crop Sweater Pattern
1. Front Panel cropped sweater knitting pattern
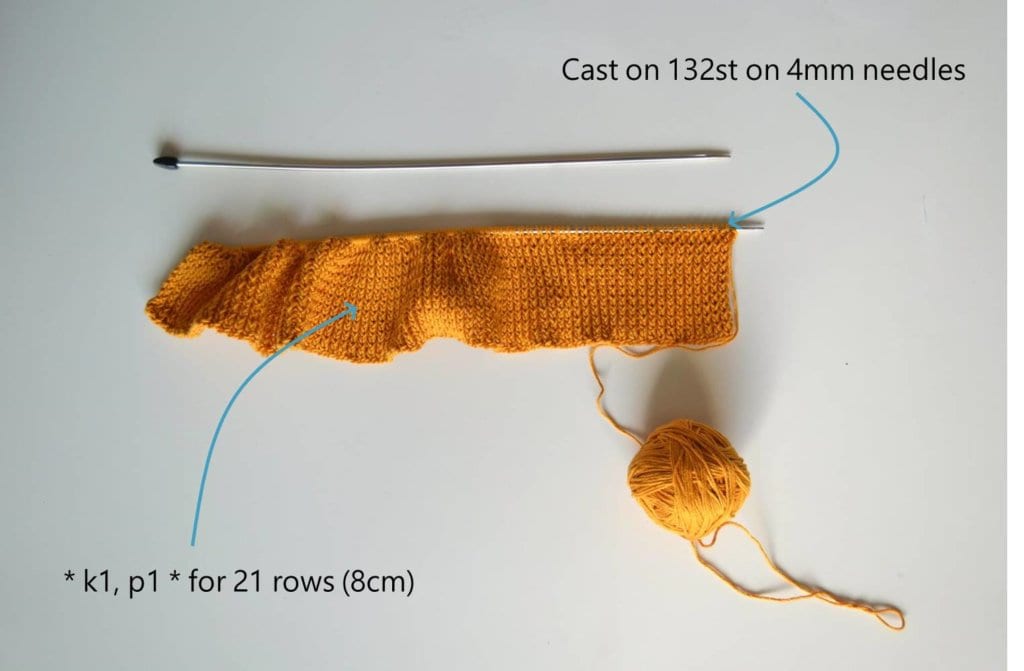
On 4mm / US 6 needles cast on 132st with goldenrod yarn.
If you want a wider sweater, you can add a multiple of 6 stitches. Adjust the number of decreases in row 1 below accordingly.
* k1, p1 * repeat
Repeat for 21 rows (8cm) creating a ribbed section.

Switch to charcoal yarn. Keep using the 4mm / US 6 needles.
Sick of all the yarn jargon and conversions?
US vs UK, abbreviations, imperial vs metric, yarn weights, etc?

Row 1: * k4, k2tog * 10 times, * k1, p1 * 6 times, * k2tog, k4 * 10 times (112st)
Row 2: P50, * k1, p1 * 6 times, p50
Row 3: K50, *p1, k1 * 6 times, k50

Repeat rows 2 and 3 until total length is 29cm.
If you want to adjust the length of the sweater this is where you can add the desired number of cm.

Starting on the right side, cast off 30st at the beginning of the next 2 rows:
Row 4: Cast off 30 st, k20 , *p1, k1* 6 times, k50
Row 5: Cast off 30 st, p20 , *k1, p1* 6 times, p20
Shaping for the sleeves

Row 6: k20 , *p1, k1* 6 times, k20
Row 7: p20 , *k1, p1* 6 times, p20
Repeat row 6 and 7 until you reach 22 cm from the cast off stitches.
For the next 10 rows, cast off 2 st at the beginning of the row as detailed below:

Row 8: cast off 2st, k18, *k1, p1* 5 times, k20
Row 9: cast off 2st, p18, *k1, p1* 5 times, p18
Row 10: cast off 2st, k16, *k1, p1* 5 times, k18
Row 11: cast off 2st, p16, *k1, p1* 5 times, p16
Row 12: cast off 2st, k14, *k1, p1* 5 times, k16
Row 13: cast off 2st, p14, *k1, p1* 5 times, p14
Row 14: cast off 2st, k12, *k1, p1* 5 times, k14
Row 15: cast off 2st, p12, *k1, p1* 5 times, p12
Cast off the remaining 36 stitches and leave a long tail for sewing.
2. Back Panel of the cropped sweater knitting pattern
On 4mm / US 6 needles cast on 132st with goldenrod yarn.
* k1, p1 * repeat.
Repeat for 21 rows (8cm) creating a ribbed section.
If you are making a wider sweater, add the same multiple of 6 stitches here as you did for the front panel.
Switch to charcoal yarn. Keep working with the 4mm / US 6 needles.
Knit in stockinette stitch until you reach 50 cm. The back panel will be larger than the front panel. Don’t panic, it’s on purpose. This is what makes this sweater so comfortable without looking too oversized.
If you have chosen to make a longer sweater add the same number of cm here as you have added for the front panel.

Starting on the right side, cast off 40st at the beginning of the next 2 rows.
Row 1: cast off 40st, k92
Row 2: cast off 40, p52

For the next 10 rows, cast off 2 st at the beginning of the row as detailed below:
Row 3: cast off 2st, k50
Row 4: cast off 2st, p48
Row 5: cast off 2st, k46
Row 6: cast off 2st, p44
Row 7: cast off 2st, k42
Row 8: cast off 2st, p40
Row 9: cast off 2st, k38
Row 10: cast off 2st, p36
Cast off the remaining 36 stitches and leave a long tail for sewing.
3. The Sleeves : Left Sleeve
On 3.5mm / US 4 needles, in goldenrod yarn, cast on 42st.

* k1, p1 * repeat for 21 rows (8 cm)
Switch to 4mm / US 6 needles and charcoal yarn. Start making increases.
Row 1: *k6, k 2st in the next st* repeat 6 times
Row 2: purl the 48st
Row 3: *k5, k 2st in the next st * repeat 8 times
Row 4: purl the 56st

Row 5-10: knit 6 rows in stockinette stitch.
Row 11: k1, increase 1, k up to one before last st, increase 1, k1.
Row 12: purl
Row 13 – 60 : Repeat *rows 5 to 12* 5 times (68st)

Row 61 – 96: Repeat *rows 7 to 12* 7 times
Row 97 – 112: Repeat *rows 9 to 12* 4 times
Row 113: knit the 92st
Row 114: purl the 92st
The total length is now 52 cm.

Row 115: Cast off 46st at the beginning of the row, knit the remaining 46st.

Continue in stockinette stitch for 16cm.
Cast off and bind off.
4. The Sleeves : Right Sleeve
The right sleeve is nearly identical to the left sleeve, the only difference is that the square part coming into the front panel is on the other side of the sleeve (refer to the sketch above).
Repeat the left sleeve until row 114.
Row 115: knit all 92 st.
Row 116: cast off the first 46 st. Purl the remaining 46 st.
Continue in stockinette stitch for 16 cm.
Cast off and bind off.
Blocking and Sewing your Cropped Sweater
1. Blocking
Pieces worked in stockinette stitch always curls up so blocking is really crucial for this project. In addition, cotton yarn is very easy to block and the results are amazing so it would be a pity to skip this important step. Read my detailed tutorial on why block, how-to, and all my tips and tricks if you need help.
First, block each part of the sweater before sewing the parts together. Soak each part in some cold water then remove as much water as possible, without wringing it. Instead, roll it between 2 clean towels to remove the water.
Let it dry until it is a 100% dry. This might take some time but it is worth waiting.
2. Sewing
Now comes the tricky part, we need to sew the different pieces together.
The sleeves have a strange shape so it can be confusing to know which part needs to be sewed where. Below sketch should clarify.

Placing both panels inside out, tart by sewing the front and back panel together from the rib section up.
Add the sleeves, starting from the cuff up. Be careful when attaching the sleeve to the panels, the seam should be on the bottom side of the sleeve (as they usually are). Now close the top of the shoulders. don’t sew all the way to the end, but leave the last 2 decreases on each side unsown otherwise you will not be able to pass your head.

Carefully weave in all the ends. If your seems are a bit bulky, block the completed sweater again. This will flatten your seems.
Now try it on! Congratulations, you’re done.
If you have enjoyed this pattern, share it with other yarn addicts.


Is it practical to make a much narrower, simpler version of the cropped golden rod and grey Sunshine Crop Sweater as I am petite(36″ chest) please? 132 stitches sounds a lot for me and possibly children-teenagers interested in this versatile pattern, please? A short sleeved version instead of long sleeves would suit me and others my build. I will also convert the cms into inches, as at my age I still think in feet and inches. I will come back to this and add to my list of “must dos”, most of which are quite small or very quick-to-do items now. Many thanks. Carol (UK RESIDENT) The smallest item one can practise on is a teddy bear’s jumper. It would be nice to myself something as most of what I knit for charity (not profit) . Have a nice day.
Hi Carol,
Thank you for your comment.
I’m in the processes of updating my patterns : adding sizes and all info in EU / US / UK such as dimensions and needle sizes. I’m from Europe so I think in centimers but I realise if ypu’re used to inches it’s a burdensome exercise to convert all the time. I will put the Sunshine Crop Sweater on the top of my list!
omitted sorry “make for myself-friends” last line but one.