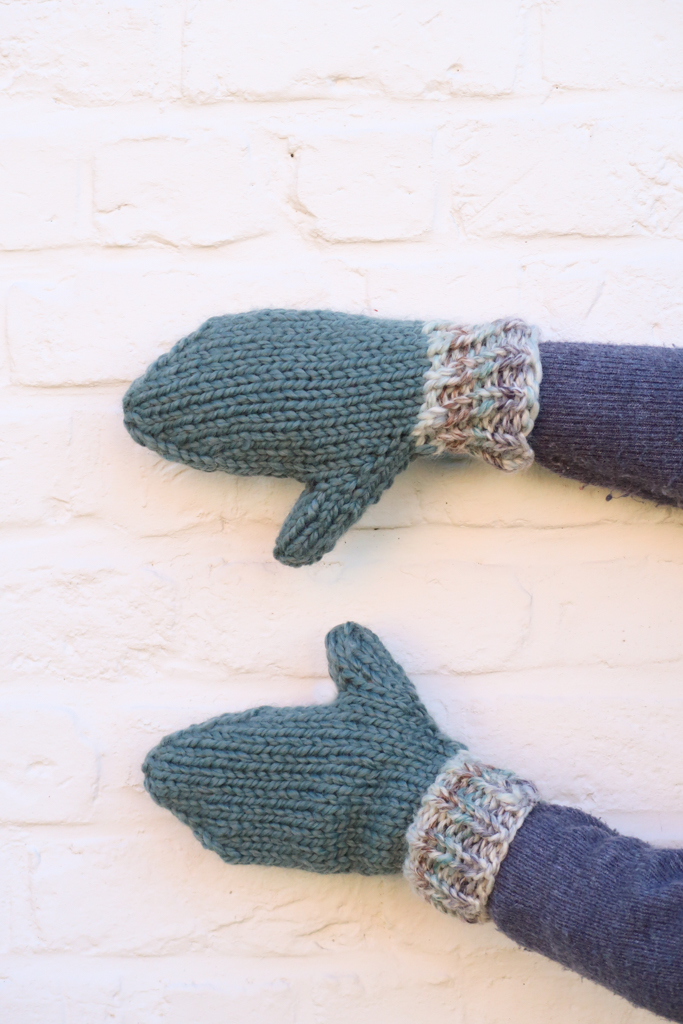
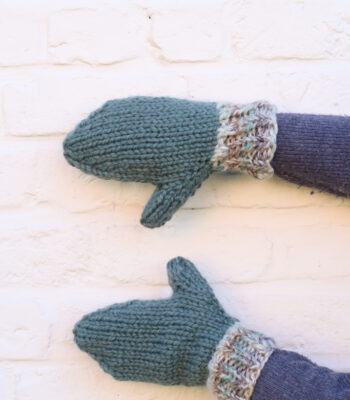
Twisted Mittens Knitting Pattern

A new easy mitten knitting pattern for beginners – the Twisted Mittens– is now a free knitting pattern for mittens here on the blog.
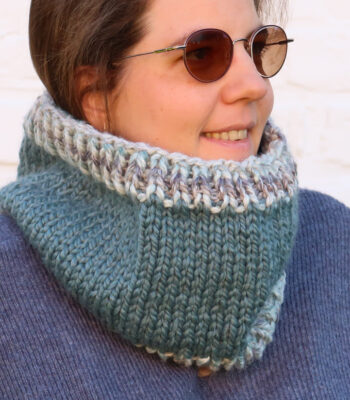
These elegant mittens perfectly complement the Twisted Cowl, making for a coordinated winter set that’s both stylish and practical. Designed with a sophisticated knotted cuff, they add a touch of refinement to any cold-weather outfit. The pattern uses worsted weight yarn, which provides warmth and durability, ensuring your hands stay cozy even in the chilliest months.
No time right now? Pin this free knitting pattern for mittens for later!

While most of the project is seamless, a bit of sewing is required to finish this free knitting pattern for mittens, ensuring a neat and polished look. The end result is a pair of elegant, cozy mittens that not only keep your hands warm but also elevate your winter wardrobe. Plus, with the pattern available for free, it’s an accessible and rewarding addition to your knitting repertoire.

*This post contains affiliate links (only for products I love, use and spend my own money on obviously). This means I earn some yarn money if you make a purchase through one of these links (of course at no extra cost for you!), which I promise to use to create more awesome patterns like this one. All opinions are my own. See my full disclosure here.
Easy Knit Mittens Pattern Construction
The mittens are worked in 2 pieces sewed together. First, you’ll work the cuff which is worked in the round knitting a long tube which is then sewed together to form the knot. You can choose to either work with very short needles and cables or use the magic loop technique.
Then you’ll work up the hand of your mittens in the round. After finishing both the palm and going back to the stitches left on the side for the thumb to finish it, you’ll sew the hand to the cuff to finish off your mittens.
Both right-hand and left-hand mitten follow the same knitting instructions, it is only when assembling the hand and palm that you’ll differentiate both hands.
Downloadable Twisted Mittens Knit Pattern

Grab the printable PDF of the Twisted Mittens Knitting Pattern now in my shop, on Etsy or on Ravelry.

Grab the printable PDF of the Twisted Knit Set now in my shop or on Etsy:
More Free Knitting Patterns You'll Love

Before You Start Your Free Knitting Pattern for Mittens
Materials
- 5 mm / US 8 circular knitting needles
I used these short circular needles for most of the mittens but you can use the magic loop method or double pointed needles if you prefer.
- Worsted weight yarn
- Tapestry needle to sew and weave in the ends.
- 3 stitch markers
Size
The mittens are designed for a women’s medium sizes hand but can easily be adjusted.
For length adjustments the pattern will tell you when to try on and how to adjust.
For width adjustments, add extra stitches to your hand cast on. The cuff section doesn’t need to be adjusted as it is stretchy.
Gauge
The gauge for this pattern, in stockinette stitch on 5 mm / US 8 needles, is 20 st by 22 rows for a 10 cm by 10 cm square (4” by 4”).
Abbreviations
- st = stitch
- k = knit
- M1R = make one right; single right-leaning knit increase
- M1L = make one left; single left-leaning knit increase
- k2tog = knit 2 stitches together
ssk = slip 2 stitches knitwise, knit these 2 stitches together through back loops; single left-leaning decrease
Special Stitches and Techniques
- Stockinette stitch in the round: knit all rounds.
- M1R: Insert your left needle from back to front, under the bar between the stitches (thus lifting it onto the left needle). Knit this bar through the front loop (this twists it into a nice little tight loop).
- M1L: Insert the left needle from front to back, under the bar between the stitches (thus lifting it onto the left needle). Knit this bar through the back loop (this twists it into a nice little tight loop).
If you are not familiar with this increase technique, I find this video tutorial very helpful.
- Kitchener stitch:
- Preparation: Put your tapestry needle through the first stitch on the front needle as if to purl (don’t drop the stitch). Next, pull the yarn through the first stitch on the back needle as if to knit (don’t drop the stitch).
- Repeat:
- Put your needle through the first stitch on the front needle knitwise and slip the stitch off the needle.
- Insert tapestry needle through the next stitch on your front needle purlwise (don’t drop the stitch).
- Insert your tapestry needle through the first stitch on the back needle purlwise and slip the stitch off the needle.
- Insert tapestry needle through the next stitch on your back needle knitwise (don’t drop the stitch).
- Work step 1 to 4 until only 1 stitch is left on each needle
- Finish:
- Put your needle through the first stitch on the front needle knitwise and slip the stitch off the needle.
- Insert your tapestry needle through the first stitch on the back needle purlwise and slip the stitch off the needle.
If you’re new to the Kitchener stitch, this detailed video tutorial is very helpful.
Construction
Sick of all the yarn jargon and conversions?
US vs UK, abbreviations, imperial vs metric, yarn weights, etc?

The mittens are worked in 2 pieces sewed together. First, you’ll work the cuff which is worked in the round knitting a long tube which is then sewed together to form the knot. You can choose to either work with very short needles and cables or use the magic loop technique.
Then you’ll work up the hand of your mittens in the round. After finishing both the palm and going back to the stitches left on the side for the thumb to finish it, you’ll sew the hand to the cuff to finish off your mittens.
Both right-hand and left-hand mitten follow the same knitting instructions, it is only when assembling the hand and palm that you’ll differentiate both hands.
The Actual Twisted Mittens Free Knitting Pattern
Cuff
Make 2.
With your 5 mm / US 8 needles and cast on 34 st and join in the round.
Knit in stockinette for 23 cm / 9”.
Cast off and leave a long tail for sewing.

Hand
Make 2.
Cast on 34 st and join in the round.
Knit 2 rounds in stockinette.
Thumb Shaping
Round 1: K1, place marker, M1L, k2, M1R, place marker, knit until end of round. <36 st>
Round 2: Knit 1 round.
Round 3 (Increase round): Knit until marker, M1L, knit until next marker, M1R, knit until end of round. <38 st
Round 4: Knit around.

Round 5 – 8: Repeat Round 3 – 4 twice. <42 st>
Round 9: Repeat Increase round 3. <44 st>
Round 10 – 12: Knit around.
Round 13 – 16: Repeat Round 9 – 12. <46 st>
Round 17 – 19: Knit around.
Split for Thumb
On the next round, set aside the stitches for the thumb (you’ll get back to them later): K3, set aside next 10 st, knit until end of round. <36 st>


Knit in the round for 7 cm / 2.75” or up to the top of your pinkie finger.

Knit 3 stitches and move beginning of round marker to here. Add another marker at the middle of the round (18 stitches).

Round 1 (Decrease round): [K1, ssk, knit until 3 st before marker, k2tog, k1] twice. <32 st>
Round 2 – 4: Knit around.
Round 5 – 12: Repeat Round 1 – 4 twice. <24 st>
Note: if you’re working with mini circulars, you are going to have to switch to magic loop around the last decrease
Round 13: Repeat decrease round 1. <20 st>
Round 14: Knit around
Round 15 – 18: Repeat Round 13 – 14 twice. <12 st>
Close the mitten using the Kitchener stitch.
Thumb
Go back to the stitches you left on the side for the thumb.
Join yarn and pick up 2 extra stitches in the gap on each side (adding 4 sts total). <14 st>
Note: Leave a long tail when joining yarn, you can use it to close off any remaining gap.

Knit in the round for 5 cm / 2” or until you reach the top of your thumb.

Decrease round: [K1, ssk, knit until 3 st before marker, k2tog, k1] twice. <10 st>
Knit 1 round.
Close the top of the thumb using the Kitchener stitch.
Assembly
Fold the cuff tube in half and to join both open ends together.
Fold each end in half and interlock them as shown in the picture below sandwiching both sides into each other.

Sew through all layers. Don’t worry if your seam is messy, you won’t see any of it once you twist it over.

Secure your end and weave in any ends.

Turn it inside out for the twisted knot to come out.

Attach the hand part to the finished cuff by sewing it to the inside of the cuff, about 1-2 cm / 0.25-0.75” on the inside of the cuff.
Make sure the twist is aligned with the middle of the hand section. Attach one mitten with the thumb to the left, the other one with the thumb to the right to make a pair.

Blocking
You’re done with the knitting part, make sure to weave in all the ends.
To make your mittens even prettier, soften your fabric and even out your tension block your project. Don’t skip this step as it can make a huge difference. Read my detailed tutorial on why block, how-to, and all my tips and tricks if you need help.