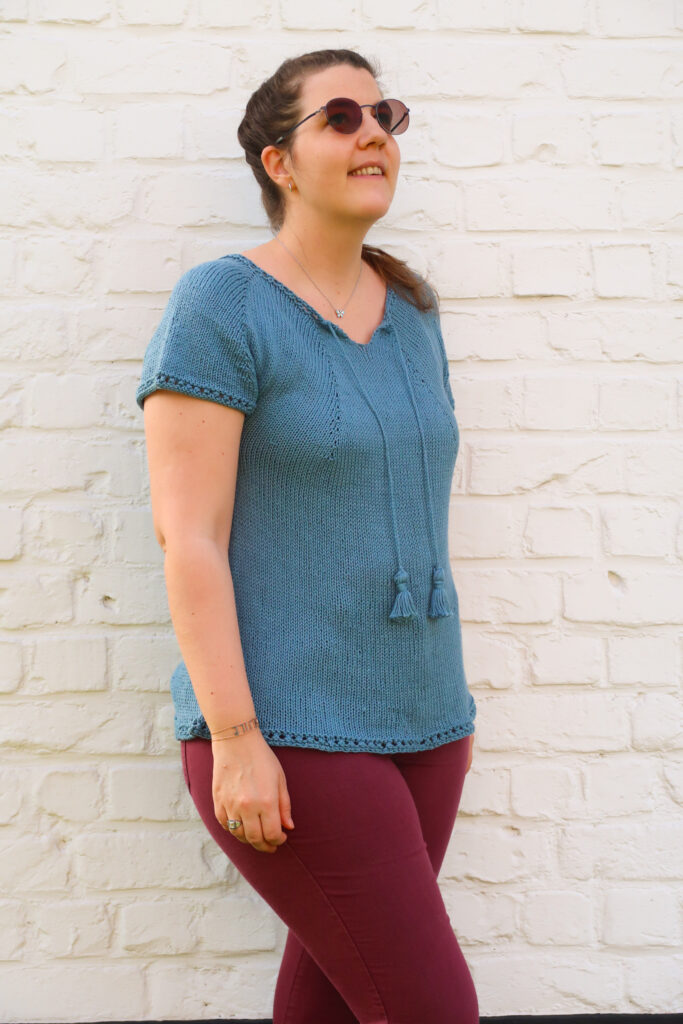
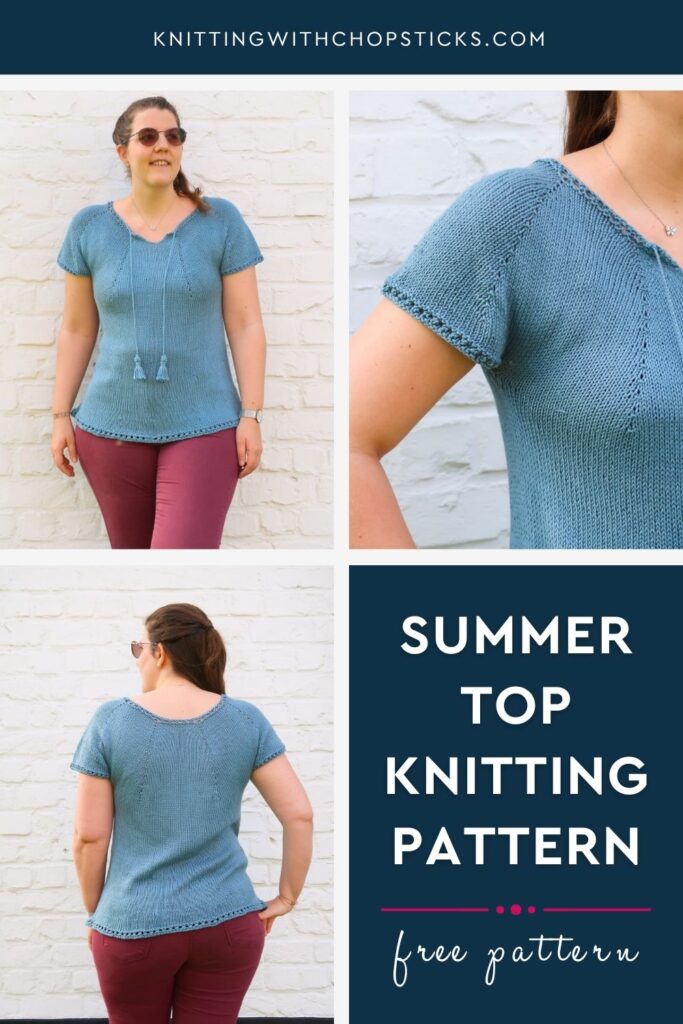
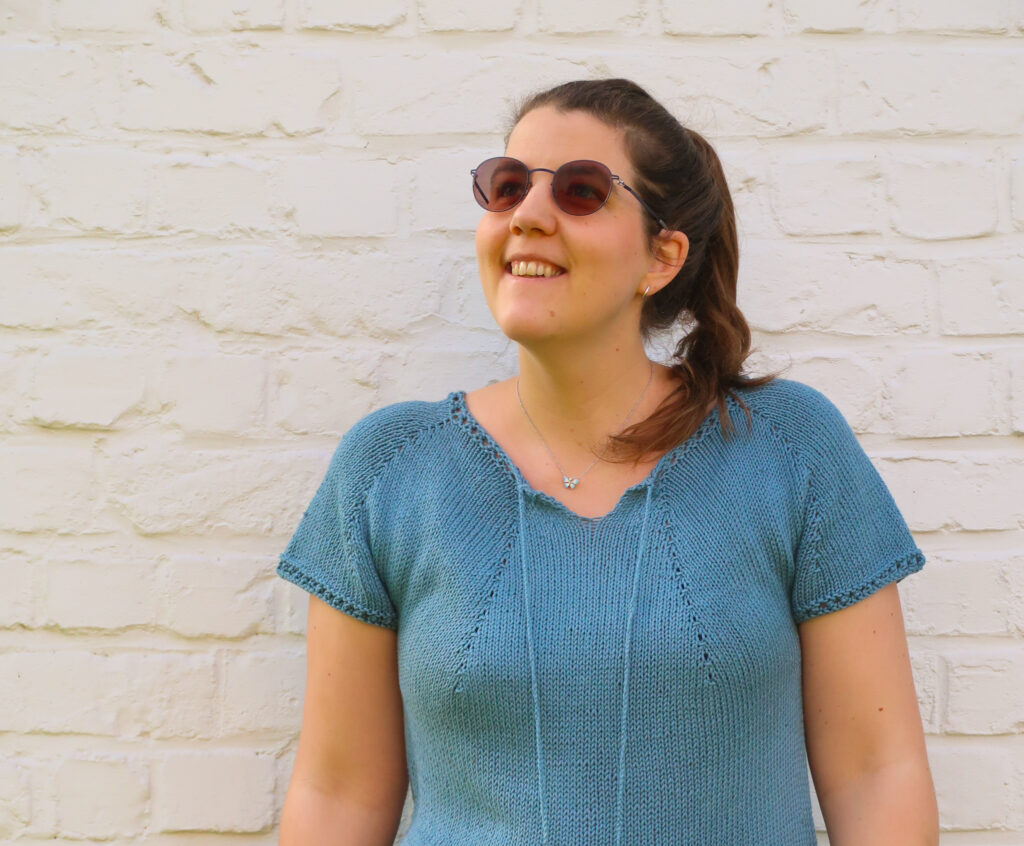
Juliet Summer Top Knitting Pattern

A new easy summer top knitting patter – the Juliet top – is now a free knitting blanket pattern here on the blog. Read all about my inspiration, the easy construction and perfect yarn I chose, scroll down to view the full free pattern or purchase an ad free PDF from the links below.
No time right now? Pin this cute summer top knitting pattern for later!
*This post contains affiliate links (only for products I love, use and spend my own money on obviously). This means I earn some yarn money if you make a purchase through one of these links (of course at no extra cost for you!), which I promise to use to create more awesome patterns like this one. All opinions are my own. See my full disclosure here.
Knitting Garments you Know you’ll Love
A lot of my designs are inspired by my favorite garments in my own wardrobe. I like making things I know I like to wear already. The Juliet summer top knitting pattern is one of these!
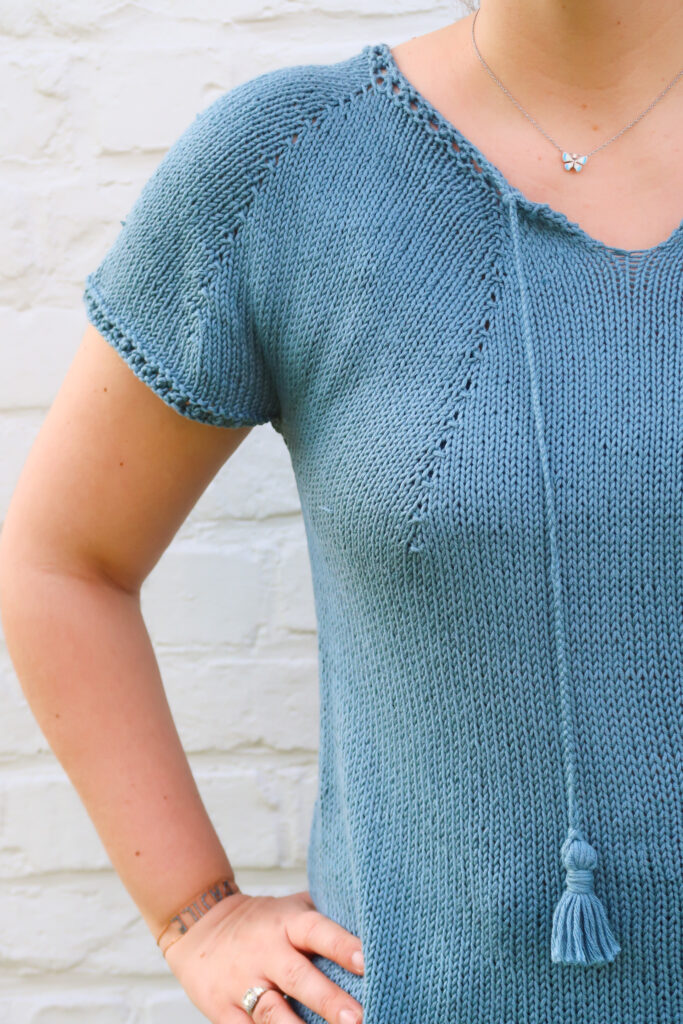
I realized recently all my favorite summer tops have some sort of tassels or cords hanging from the neckline. They’re not only decorative and fun, but they’re also Basile’s favorite toys. So handy to always baby distractions around.
I wanted a simple everyday top, something to wear with a pair of shorts and sandals or a jeans and open front cardigan on colder days.
The Yarn
My go-to yarn for summer garments is without a doubt LionBrand Coboo. I’ve used it for my Cache Coeur Dress and Peplum Top, and I couldn’t resist using it in a knit design this time.
The cotton bamboo blend is so nice and silky against your skin, you won’t ever want to take it off. It’s not only soft, it also has amazing drape and stitch definition. Perfect to highlight the lace details on this top and get the flowy feel I was going for. With 20 gorgeous colors to choose from, you’re sure to find something for you.
Summer Top Knitting Pattern Construction
The Juliet Top is knitted from the top-down starting at the collar. The first part is knit in rows back and forth to form the V-neck. You’ll then join in the round and increase until you reach the point to separate for the sleeves. Leaving the sleeve stitches on the side, you’ll work down the body before going back to finish off the sleeves.
I love top down constructions like these because you can try on your knit top at every step to check it fits properly + there’s only very minimal seaming.
Don’t panic, my detailed step by step instructions and photo tutorial will guide you every step of the way!
Perfect Fit Guide
Always guessing your size when knitting or crocheting garments?

Downloadable PDF
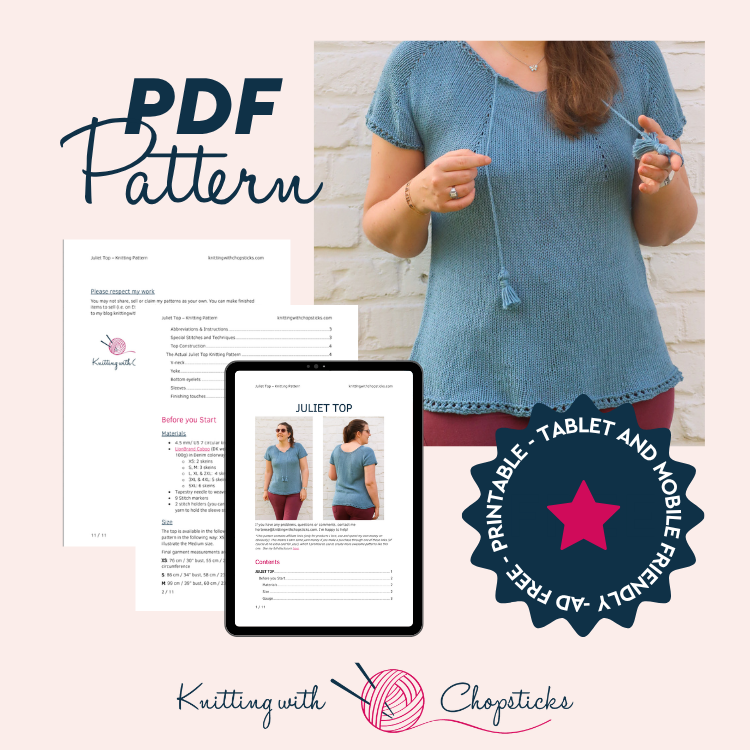
Grab the printable PDF of the Juliet knit summer top pattern now in my shop, on Etsy shop or on Ravelry:
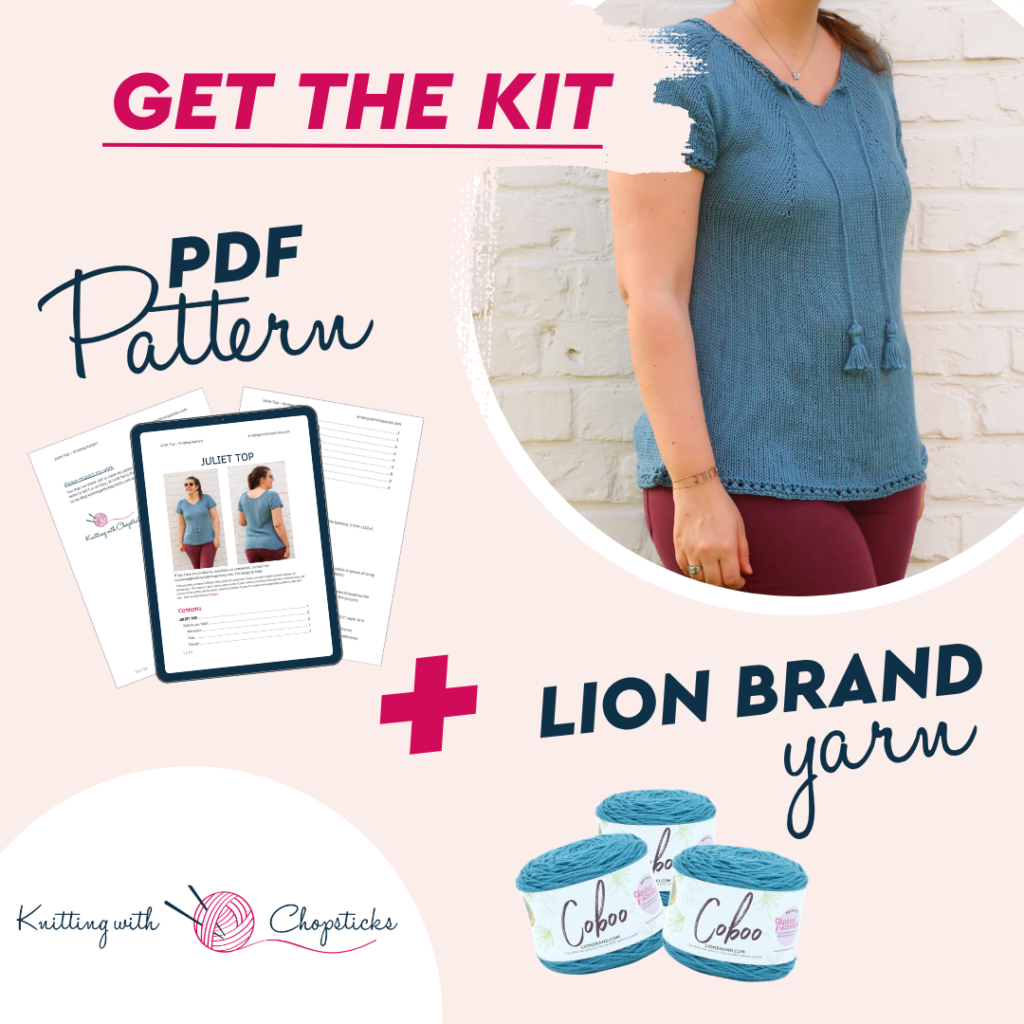
Juliet Top Knitting Pattern Lion Brand Kit
Light, breezy, and effortlessly wearable, the Juliet Top is the kind of knit you’ll want to reach for all summer long. With it’s relaxed fit, delicate eyelet details, and flattering V-neck, it’s the perfect lightweight layer for warm days and easy everyday styling.
This top-down knit keeps things simple and satisfying from start to finish. This kit includes everything you need to make this summer top knitting pattern you’ll love knitting and wearing again and again.
More Knitted Patterns you'll love


Wear It Proud: Beginner Garments You’ll Actually Love
If you’re ready to wear what you knit and actually love how it fits and feels, the Wear It Proud: Knitting Collection is for you.
The pattern you’re looking at is part of this special collection, along with 9 other beginner-friendly garment patterns (sizes XS–5XL) that guide you step by step from your first cast-on to your finished sweater, cardigan, or top.
Sick of all the yarn jargon and conversions?
US vs UK, abbreviations, imperial vs metric, yarn weights, etc?

Each design is simple, wearable, and confidence-building, perfect for knitters who want to move beyond accessories and start making clothes that fit their life and their style.
Grab the Wear It Proud: Knitting Collection here >>
Before you Start your Summer Top Knitting Pattern
Materials
- 4.5 mm/ US 7 circular knitting needles.
- LionBrand Coboo (DK weight, 50% cotton, 50% bamboo, 212m /232yd, 100g) in Denim colorway:
- XS: 2 skeins
- S, M: 3 skeins
- L, XL & 2XL: 4 skeins
- 3XL & 4XL: 5 skeins
- 5XL: 6 skeins
- Tapestry needle to weave in the ends. I love this set as it has different eye sizes for different yarn thicknesses and it comes in a small tube which is very convenient so I don’t lose them.
- 9 Stitch markers
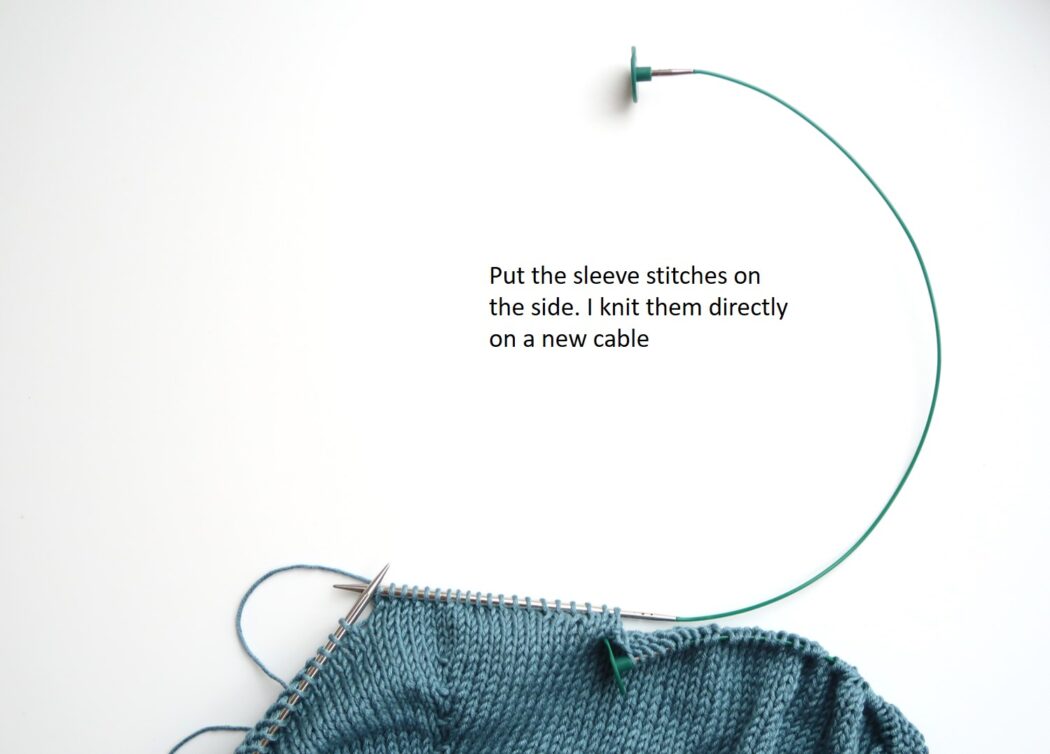
- 2 stitch holders (you can use interchangeable needle cables or pieces of scrap yarn to hold the sleeve stitches while you work on the body)
Size
The top is available in the following sizes: XS to 5XL. Sizes are noted throughout the pattern in the following way: XS (S, M, L, XL, 2XL, 3XL, 4XL, 5XL). The pictures illustrate the Medium size.
Final garment measurements are:
- XS: 76 cm / 30” bust, 55 cm / 21.5” long (from neckline), 34 cm / 13.5” upper arm circumference
- S: 86 cm / 34” bust, 58 cm / 23” long, 35 cm / 14” upper arm circumference
- M: 99 cm / 39” bust, 60 cm / 23.5” long, 37 cm / 14.5” upper arm circumference
- L: 112 cm / 44” bust, 61 cm / 24” long, 39 cm / 15.5” upper arm circumference
- XL: 120 cm / 47” bust, 63 cm / 25” long, 43 cm / 17” upper arm circumference
- 2XL: 131 cm / 51.5” bust, 64 cm / 25” long, 48 cm / 19” upper arm circumference
- 3XL: 141 cm / 55.5” bust, 65 cm / 25.5” long, 52 cm / 20.5” upper arm circumference
- 4XL: 150 cm / 59” bust, 67 cm / 26” long, 56 cm / 22” upper arm circumference
- 5XL: 166 cm / 65” bust, 70 cm / 27.5” long, 58 cm / 23” upper arm circumference
The top is designed with a classic fit 2 – 6 cm / 1” – 2.5” ease at the bust.
You can easily adjust the length to your desired length, just try on the top before the final eyelet border and add / remove rounds.
Gauge
The gauge for this pattern, in stockinette stitch, is 19 st by 23.5 rows for a 10 cm by 10 cm square (4” by 4”).
Abbreviations & Instructions
Sick of all the yarn jargon and conversions?
US vs UK, abbreviations, imperial vs metric, yarn weights, etc?
- st = stitch
- k = knit
- p = purl
- yo = yarn over
- M1R= make one right; single right-leaning knit increase
- M1L = make one left; single left-leaning knit increase
- k2tog = knit 2 stitches together
Repeat instructions between [] the indicated number of times or until the end of the round/row.
The final number of stitches is indicated at the end of the round/row between < >.
Special Stitches and Techniques
- M1R: Insert your left needle from back to front, under the bar between the stitches (thus lifting it onto the left needle). Knit this bar through the front loop (this twists it into a nice little tight loop)
- M1L: Insert the left needle from front to back, under the bar between the stitches (thus lifting it onto the left needle). Knit this bar through the back loop (this twists it into a nice little tight loop).
If you are not familiar with this increase technique, I find this videto tutorial very helpful.
- Stretchy cast off (on purl row): p1, [p1, purl 2 previous stitches through the back loop together] across until only 1 st remains on your needle. Bind off.
If you’re not familiar with this technique, I found this video very helpful.

The Actual Juliet Summer Top Knitting Pattern
- V-neck
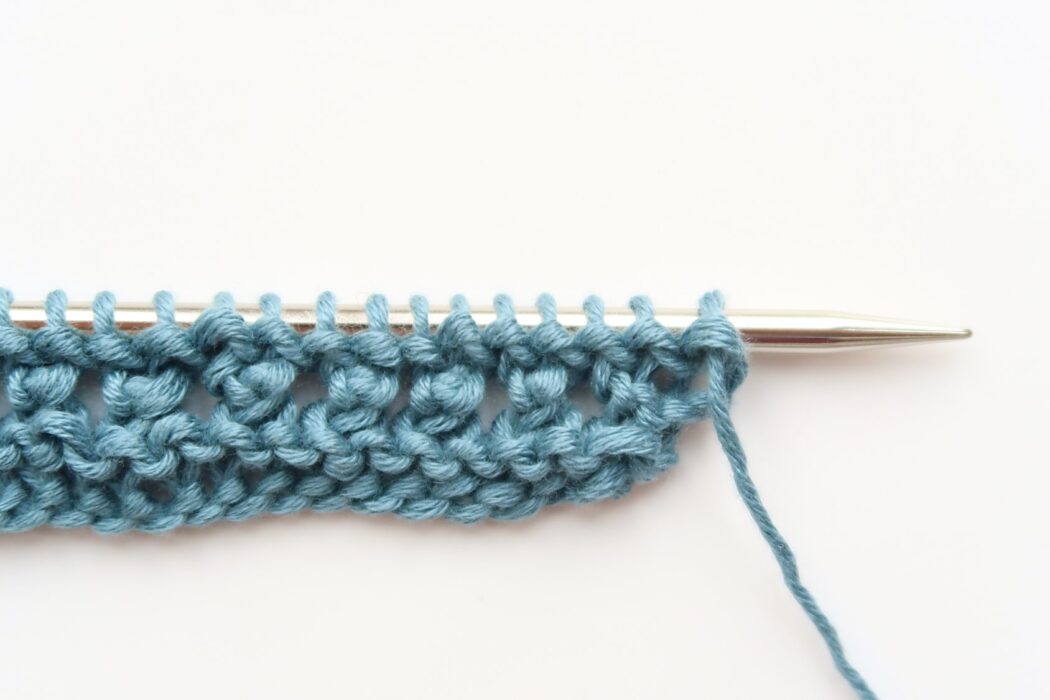
With your 4.5 mm / US 7 needles cast on 80 (88, 88, 88, 88, 96, 96, 96, 104) st. Work in rows back and forth.
Knit 2 rows.
Eyelets: k, [yo, k2tog] until last st, k.
Knit 2 rows.
-
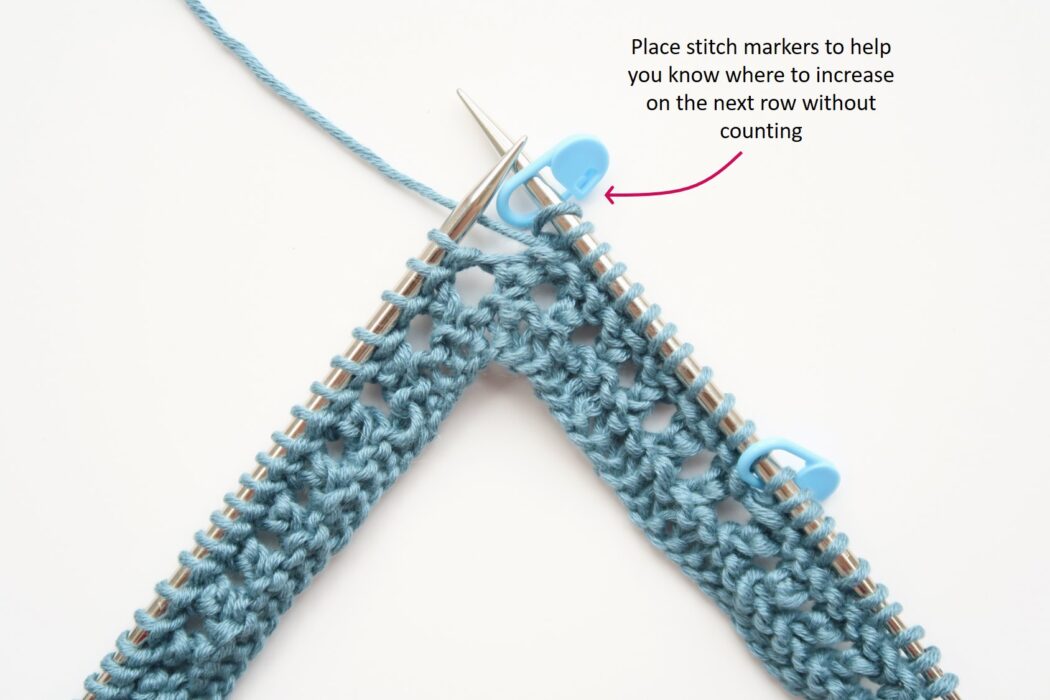
From now on you will start making increases to shape the shoulders of your knit summer top.
Tip: Place stitch markers to help you know where to increase on the next row without counting -
Place markers:
XS: P1, k4, M1R (place marker), M1L, [k10, M1R (place marker), M1L] until last 5 st, k5.
S, M, L, XL: P1, k5, M1R (place marker), M1L, [k11, M1R (place marker), M1L] until last 5 st, k5.
2XL, 3XL, 4XL: P1, k5, M1R (place marker), M1L, [k12, M1R (place marker), M1L] until last 6 st, k6.
5XL: P1, k6, M1R (place marker), M1L, [k13, M1R (place marker), M1L] until last 6 st, k6.
You now have 96 (104, 104, 104, 104, 112, 112, 112, 120) st and 8 st markers.
Plain row: k1, p across.
Increase row: P1, [k until st marker, M1L, M1R] until last marker, k until end of row.
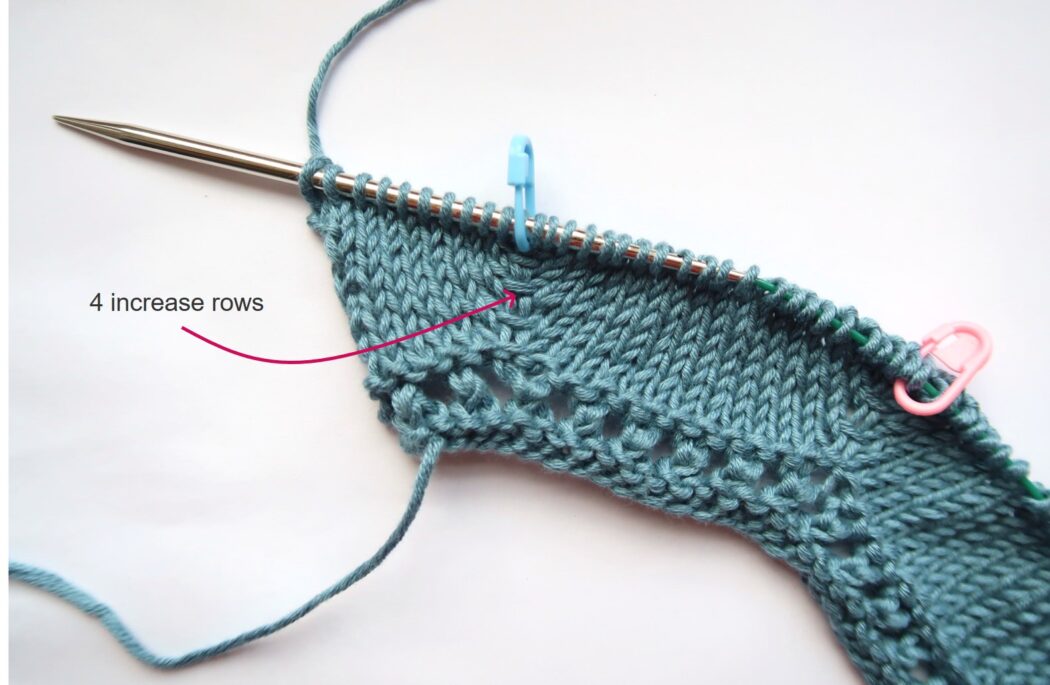
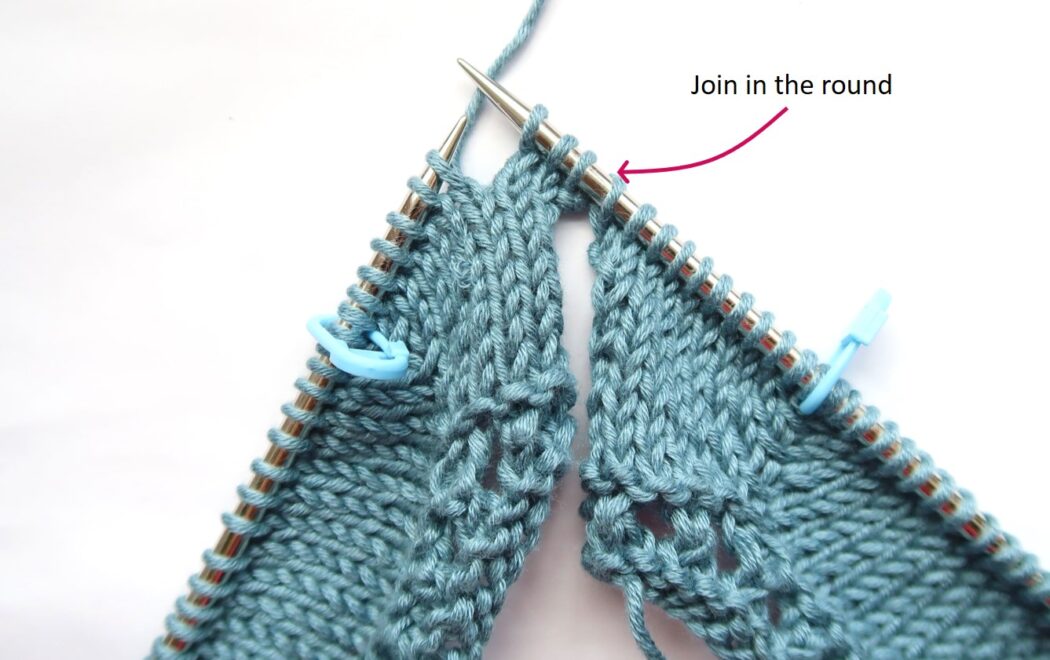
Work a plain row followed by an increase row 2 (3, 3, 4, 6, 7, 7, 7, 8) more times. - Yoke
Join in the round.
Optional: use a st marker to mark the beginning of the round. I use the V neck as reference instead. -
For sizes 2XL to 5XL only:
[Knit 1 round.
Increase round: [k until st marker, M1L, M1R] until last marker, k until end of round.]
Work a knit round followed by an increase round X (X, X, X, X, 1, 3, 5, 7) more times.
All sizes:
[Knit 3 rounds.
Increase round: [k until st marker, M1L, M1R] until last marker, k until end of round.]
Work 3 knit rounds followed by an increase round 6 (7, 9, 10, 10, 10, 10, 10, 10) more times.
Knit 10 (10, 7, 5, 5, 3, 3, 2, 2) rounds.
You have a total of 272 (296, 328, 360, 392, 432, 464, 496, 536) st. -
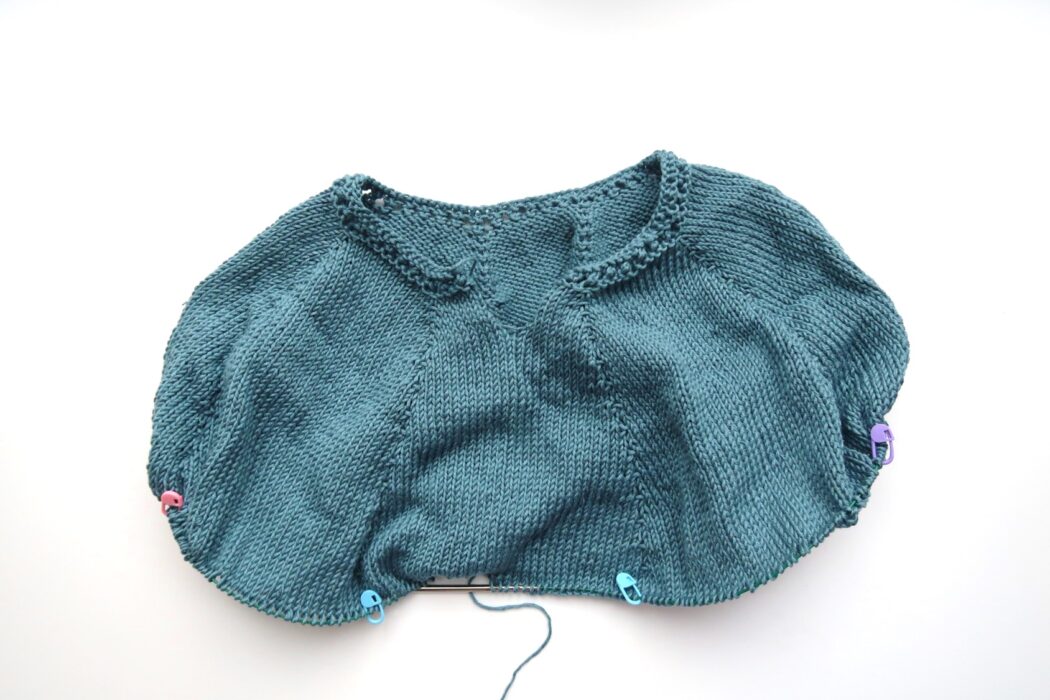
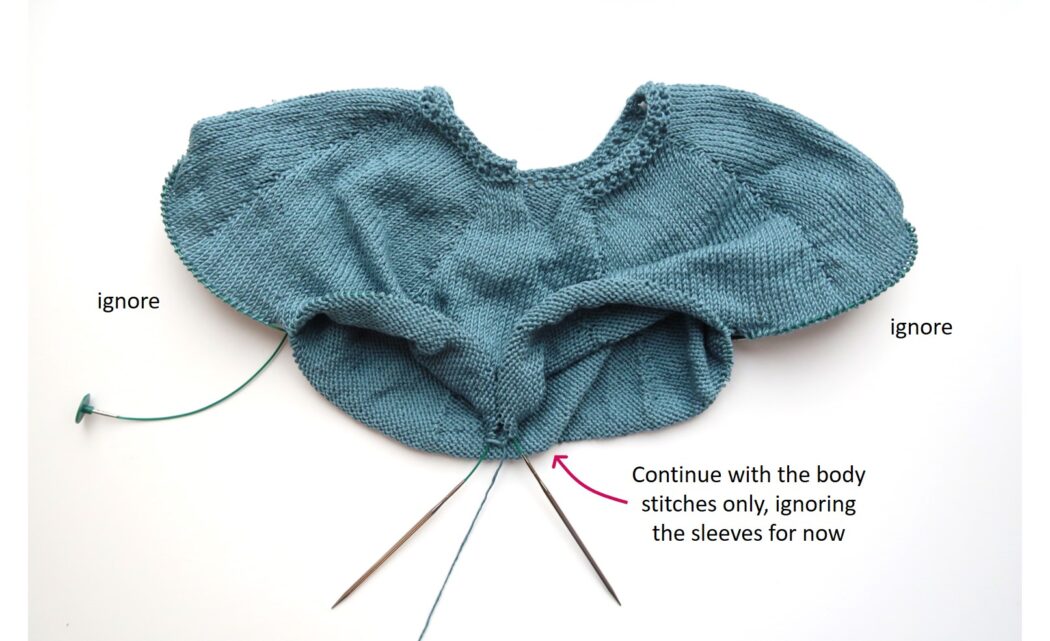
Split for sleeves:
XS: K36, k64 on st holder, k72, k64 on st holder, k36. <144 st>
S: K41, k66 on st holder, k82, k66 on st holder, k41. <164 st>
M: K47, k70 on st holder, k94, k70 on st holder, k47. <188 st>
L: K53, k74 on st holder, k106, k74 on st holder, k53. <212 st>
XL: K57, k82 on st holder, k114, k82 on st holder, k57. <228 st>
2XL: K62, k92 on st holder, k124, k92 on st holder, k62. <248 st>
3XL: K67, k98 on st holder, k134, k98 on st holder, k67. <268 st>
4XL: K71, k106 on st holder, k142, k106 on st holder, k71. <284 st>
5XL: K79, k110 on st holder, k158, k110 on st holder, k79. <316 st> -
-
Continue working with only the body st until you reach 37 cm / 14.5” from the armpits.
Tip: Try your top on and adjust the length if desired. - Bottom knit summer top eyelets
Purl 1 round
Knit 1 round
Eyelets: k1, [yo, k2tog] until last st, k1.
Purl 1 round
Knit 1 round
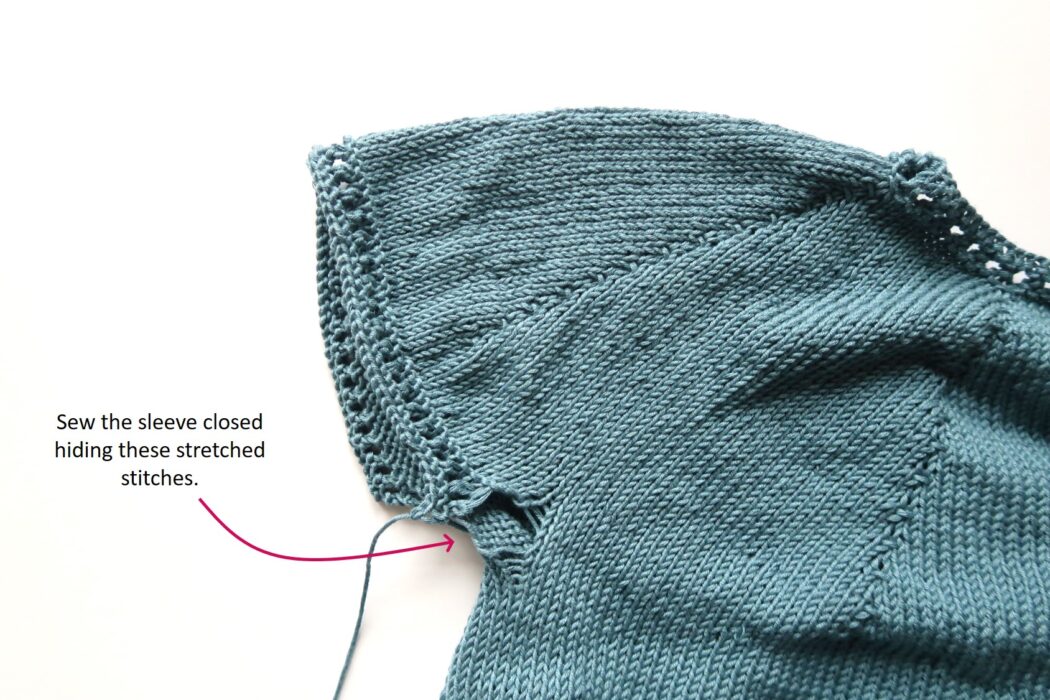
Cast off with a stretchy cast off technique and weave in the ends. - Top Sleeves
Repeat for both sleeves. Sleeves are worked in rows back and forth.
Go back to the stitches you left on the side. Join yarn at the armpit and start with a right side row.
Knit 3 rows.
Eyelets: k1, [yo, k2tog] until last st, k1.
Knit 2 rows.
Cast off (not with the stretchy bind off) and leave a tail for sewing. Sew up the sleeve. - Finishing touches – Add Tassels
Using 3 45 cm strands of yarn make a braid. Attach a small 5 cm / 2″ tassel at one end. Attach the other end to the corner of the V neck. My tassel hangs 32 cm from this corner.
Repeat for the other corner. - Blocking
You are done with the knitting part. Make sure to weave in all the ends.
To make your top even prettier, help even your stitches and open up your eyelets, wet block your project.
Don’t skip this step as it can make a huge difference. Read my detailed tutorial on why block, how-to, and all my tips and tricks if you need help.