Leaf Texture Crochet Blanket Pattern
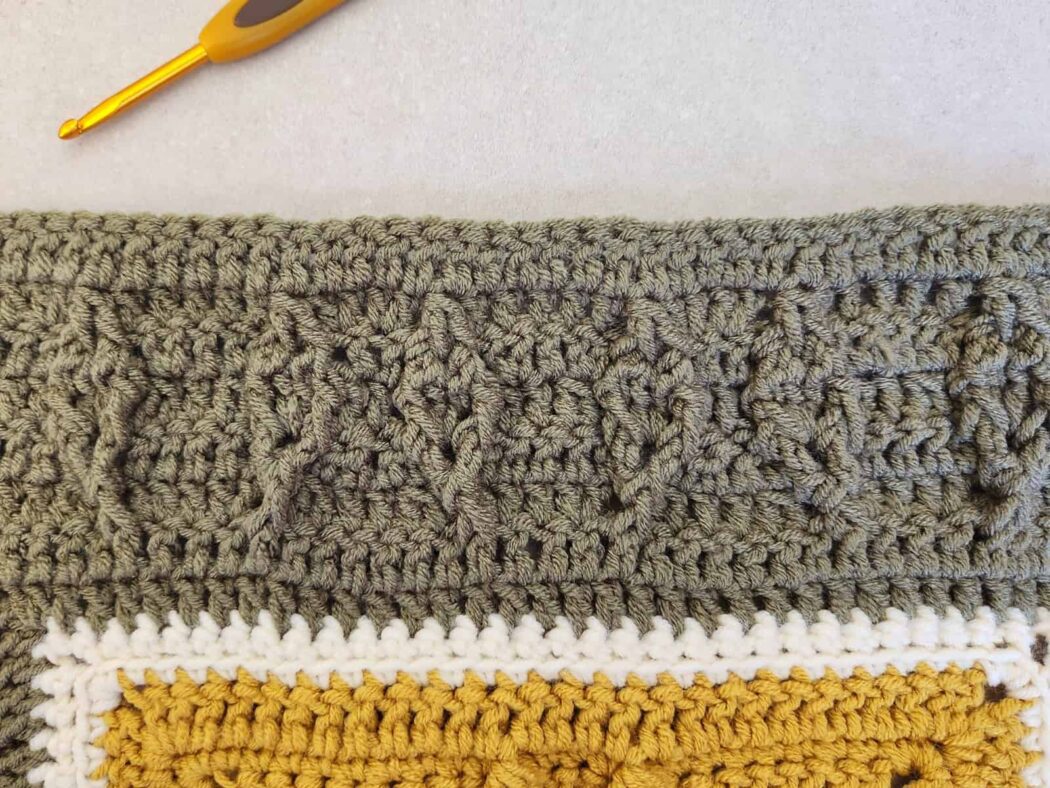
A new crochet blanket stripe pattern, the Crisp Canopy Blanket Stripe, is now a free crochet pattern here on the blog. This textured blanket stripe free pattern is part 2 of the Rustling Leaves Blanket CAL. Read all about the stripe design and crochet along it is a part off or scroll down for the free crochet blanket stripe pattern.
No time right now? Pin this textured crochet blanket stripe idea free pattern for later!

*This post contains affiliate links (only for products I love, use and spend my own money on obviously). This means I earn some yarn money if you make a purchase through one of these links (of course at no extra cost for you!), which I promise to use to create more awesome patterns like this one. All opinions are my own. See my full disclosure here.
If you’re looking to add a unique touch to your blanket project, this textured stripe pattern is perfect for you! Worked in rounds and turned at the end of each, this design combines front and back post stitches to create beautiful leaf-like shapes that stand out against the fabric. The result is a lovely raised texture that adds both visual interest and coziness, making your blanket feel extra special.
Sign Up to Join the CAL
If you haven’t done so already make sure you signup for the FREE CAL starting on October 1st, 2025 and join us in this FREE 6-week crochet-along blanket.
Join us to discover new techniques and craft this beautiful fall-inspired crochet blanket alongside crocheters around the world.

Upgrade Your Crochet-Along Experience
We know not everyone likes to jump around the website to follow the CAL, so I have put together an eBook for the Rustling Leaves Crochet Blanket which includes 45+ pages ad-free printable PDF pattern of all 6 blanket sections and divider instructions with step-by-step photos, charts & graphs as well as links to video tutorials on YouTube.
Plus you can choose to upgrade to the Journey Pass for the FULL Crochet-along experience with ad-free access to the videos in a convenient portal, a 30-day free trial to my Stitching Squad membership and 2 exclusive bonuses!
The Striking Stitches collection of 8 crochet stitch patterns so you experiment with even more stitches & techniques and 6 C2C Patterns eBook – 6 textured crochet stitch patterns, so that while you’re diving into the Rustling Leaves CAL, you’ve got matching, mindless rhythm stitches to unwind, experiment with, or switch to whenever you need a change of pace.
You can already get a head start and upgrade here.
Whether:
- You don’t want to wait until September 1st, ’25 to get started
- You don’t want to have to wait for each section to be released
- You don’t want to jump around the websites to follow the different section’s instructions
- You just want to get the patterns without ads
- You want to print the patterns and take notes
- You want the extra guidance and support
- Or you just want to get the entire pattern to make at a later date
The upgrade is for you!

Share Your Progress and Join the Community
The community for the Rustling Leaves Blanket Crochet Along (CAL) is held in the Make with Yarn Facebook Group. Join the group to share your progress and see everyone else’s blankets. This is also the perfect place to ask any questions and get advice. Don’t be shy, it’s a really lovely community of knitters.
More ways to share your progress:
- Use hashtag #RustlingLeavesCAL and tag me @knittingwithchopsticks or Made by Gootie @madebygootie
- Add your project to Ravelry
More Crochet-Along Blankets You'll Love


Before You Start Your Crisp Canopy Blanket Stripe Free Pattern
Materials
- 4 mm / US G – 6 hook.
- Worsted weight yarn: Lion Brand – Color Theory yarn (100% acrylic, 100g/3.5oz, 225m/246yd): Color B – Colorway Used: Caper – you will need about 80g/193m/211yd.
- Tapestry needle
Size
The Blanket section is approximately 9 cm / 3.5” tall.
The budding leaf stitch requires a stitch multiple of 11 st.
Gauge
The gauge for this pattern, in dc, is 14.5 st by 10 rows for a 10 cm by 10 cm / 4” by 4” square.
Abbreviations
This pattern uses US notations.
- st = stitch
- ch = chain
- dc = double crochet
- dc2tog = double crochet 2 stitches together
- flo= work into the front loop only
- fpdc = front post double crochet
- bpdc = back post double crochet
- fpdc2tog = front post double crochet 2 stitches together
- bpdc2tog = back post double crochet 2 stitches together
- ss = slip stitch
- STsc = stacked single crochet
- PM = place marker
Notes
Sick of all the yarn jargon and conversions?
US vs UK, abbreviations, imperial vs metric, yarn weights, etc?

The blanket is turned at the end of each round.
Work instructions between [] the indicated number of times or until the end of the row / round.
Work instructions between () in the same stitch.
The final number of stitches is indicated at the end of the row / round between < >.
The turning ch 1, ch 2 don’t count as stitches throughout the pattern, except if mentioned otherwise.
The pattern is written in crochet shorthand. For example:
- “dc 1” means to double crochet in the next stitch,
- “dc 2” means to double crochet in each of the next 2 stitches,
- and “2 dc” means to double crochet twice in the next st.
The leaves sections come with both written and chart instructions. If you are not familiar with crochet charts, my Conquer Charts & Graphs workshop is there to help you.
Special Stitches and Repeated Patterns
- Front post double crochet (fpdc):
- Yarn over, insert hook from front to back to front behind the double crochet post below (in this case the double crochet is 2 rows below), yarn over, and pull up a long loop (3 loops on hook).
- Yarn over and pull through 2 loops (2 loops on hook), yarn over, and pull through the remaining loops.

- Back post double crochet (bpdc):
- Yarn over, insert hook from back to front to back behind the double crochet post below, yarn over, and pull up a long loop (3 loops on hook).

- Yarn over and pull through 2 loops (2 loops on hook), yarn over, and pull through the remaining loops.

Video Tutorials
The Actual Crisp Canopy Blanket Section Free Crochet Pattern
For visual learners refer to the stitch chart after the written instructions.

Round 1 (RS): Remove marker and STsc in same st you ss into in the previous round, 1 dc in the same st, 1 dc in every stitch until corner-sc.
* (2 dc, ch 2, 2 dc) in next corner-sc, dc until next corner-sc; Repeat from * 2 more times. 2 dc in first st of the round you worked into (completing the corner), ch 1, ss to STsc, turn. <140 dc, 3 ch-2 sp, 1 ch-1 sp>
Round 2 (WS): Ss into the next ch-1 sp,STsc (or ch3) in same ch1-sp you ss into, *dc until next corner ch2-sp, (dc, ch 2, dc) in next corner-ch2; Repeat from * 3 more times omitting the last corner and working 1 dc, ch 1 and ss to STsc in starting ch-1 sp, turn. <148 dc, 3 ch-2 sp, 1 ch-1 sp>
Round 3 (RS): Ss into the next ch-1 sp, STsc (or ch3) in same ch1-sp you ss into, work another dc into the same ch1-sp, *dc 2, [dc, dc2tog, fpdc, 2 dc, dc, 2 dc, fpdc, dc2tog, dc] three times, dc 2, (2 dc, ch 2, 2 dc) in next corner-ch2; Repeat from * 3 more times omitting the last corner and working 2 dc, ch 1 and ss to STsc in starting ch-1 sp, turn. <116 dc, 24 dc2tog, 24 fpdc, 3 ch-2 sp, 1 ch-1 sp>
Round 4 (WS): Ss into the next ch-1 sp, STsc (or ch3) in same ch1-sp you ss into, *dc 4, [dc2tog, (bpdc, ch 1, bpdc), dc 5, (bpdc, ch 1, bpdc), dc2tog] three times, dc 4, (dc, ch 2, dc) in next corner-ch2; Repeat from * 3 more times omitting the last corner and working 1 dc, ch 1 and ss to STsc in starting ch-1 sp, turn. <100 dc, 24 dc2tog, 48 bpdc, 3 ch-2 sp, 25 ch-1 sp>
Round 5 (RS): Ss into the next ch-1 sp, STsc (or ch3) in same ch1-sp you ss into, work another dc into the same ch1-sp, *dc 5, [dc, fpdc, 2 dc in ch-sp, fpdc, dc2tog, dc, dc2tog, fpdc, 2 dc in ch-sp, fpdc, dc] three times, dc 5, (2 dc, ch 2, 2 dc) in next corner-ch2; Repeat from * 3 more times omitting the last corner and working 2 dc, ch 1 and ss to STsc in starting ch-1 sp, turn. <140 dc, 2’ dc2tog, 48 fpdc, 3 ch-2 sp, 1 ch-1 sp>
Round 6 (WS): Ss into the next ch-1 sp, STsc (or ch3) in same ch1-sp you ss into, *dc 7, [dc, bpdc2tog twice, 2 dc, dc, 2 dc, bpdc2tog twice, dc] three times, dc 7, (dc, ch 2, dc) in next corner-ch2; Repeat from * 3 more times omitting the last corner and working 1 dc, ch 1 and ss to STsc in starting ch-1 sp, turn. <148 dc, 48bpdc, 3 ch-2 sp, 1 ch-1 sp>
Round 7: Ss into the next ch-1 sp, STsc (or ch3) in same ch1-sp you ss into, work another dc into the same ch1-sp, *dc 8, [2 dc, fpdc2tog, dc 5, fpdc2tog, 2 dc] three times, dc 8, (2 dc, ch 2, 2 dc) in next corner-ch2; Repeat from * 3 more times omitting the last corner and working 2 dc, ch 1 and ss to STsc in starting ch-1 sp, turn. <188 dc, 24 fpdc, 3 ch-2 sp, 1 ch-1 sp>
Round 8: Ss into the next ch-1 sp,STsc (or ch3), *dc until next corner ch2-sp, (dc, ch 2, dc)] in next corner-ch2; Repeat from * 3 more times omitting the last corner and working 1 dc, ch 1 and ss to STsc in starting ch-1 sp, turn. <220 dc, 3 ch-2 sp, 1 ch-1 sp>

Fasten off and change to color E.

Transition Rounds for Section 2:
With a 5 mm / H – 8 crochet hook,
Round 1 (RS): Ss into the next ch-1 sp, ch 1 (doesn’t count as a st), [1 sc-PM, 1 sc] in same ch-1 sp, 1 sc in next 55 dc.
* 3 sc in next ch-2 sp (PM in 2nd sc), 1 sc in next 55 dc; Repeat from * 2 more times.
1 sc into first ch-1 sp, ss to 1st sc, turn. (232 sc)
Round 2 (WS): Ch 1 (doesn’t count as a st), [1 sc-PM, 1 sc] in flo of same sc you ss into in the previous round, 1 sc in flo of next 57 sc.
* 3 sc in flo of next corner-sc (PM in 2nd sc), 1 sc in flo of next 57 sc; Repeat from * 2 more times (in last repetition you will work into top pf ch-3). 1 sc into flo of first st of the round you worked into, ss to 1st sc, turn. (240 sc)
Fasten off and change to color C for the next section.
Blocking
You’re done with the crocheting part for this section. Once you’ve added all the sections you want, make sure to weave in all the ends (except for sewing).
To make your blanket even prettier and help even your stitches block your blanket
Don’t skip this step as it can make a huge difference. Read my detailed tutorial on why block, how-to, and all my tips and tricks if you need help.