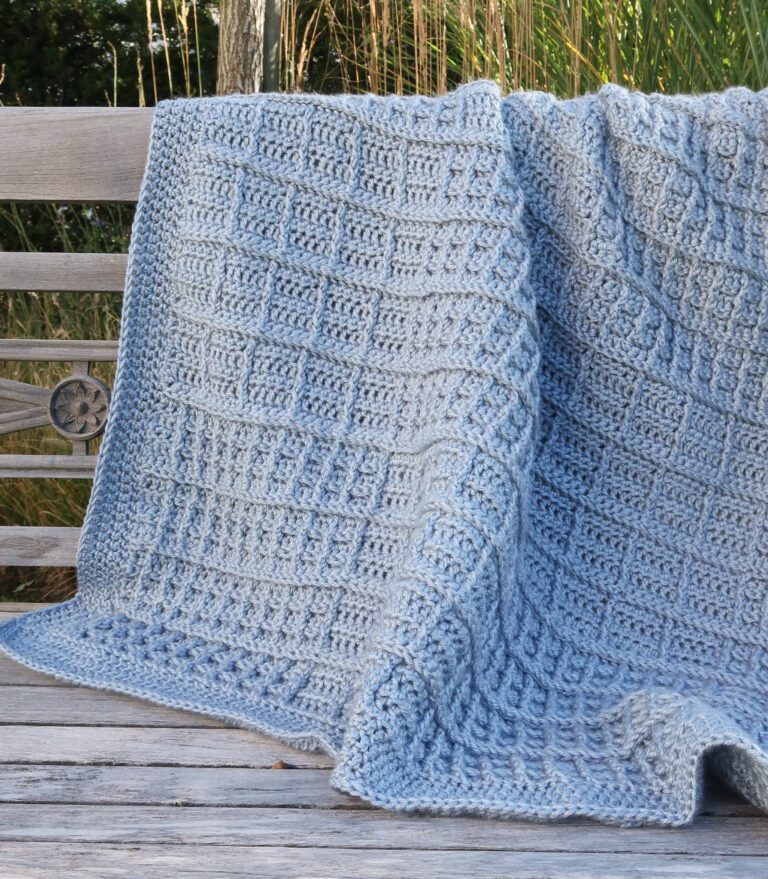
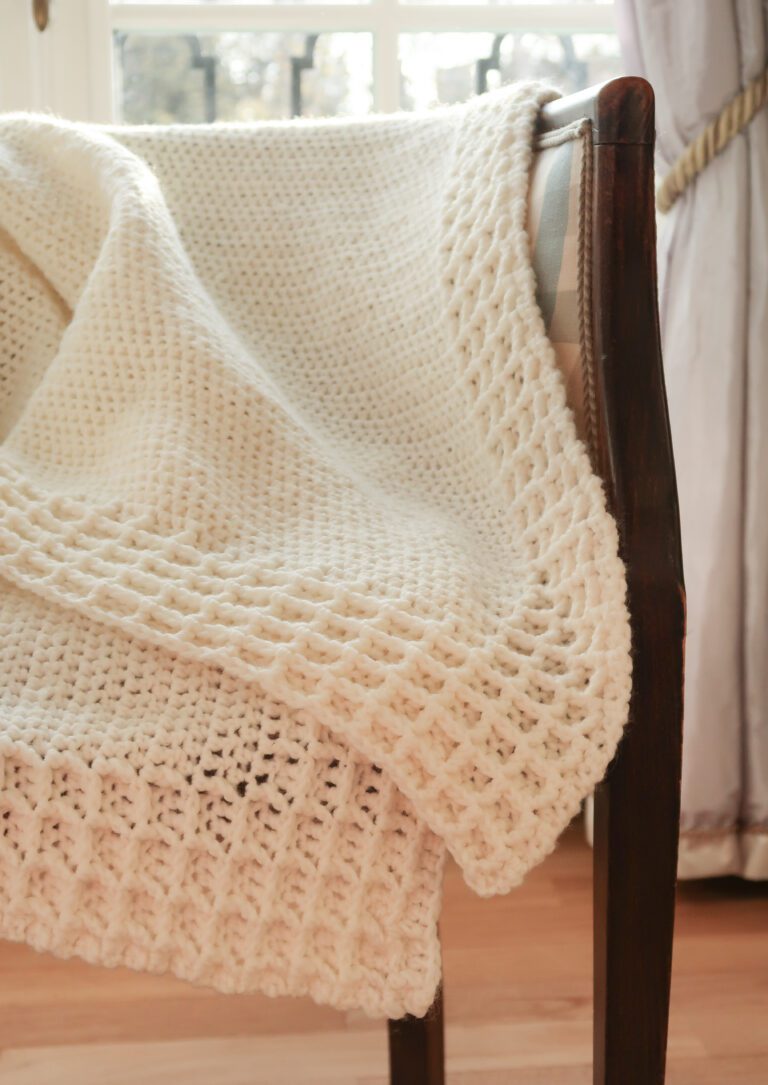
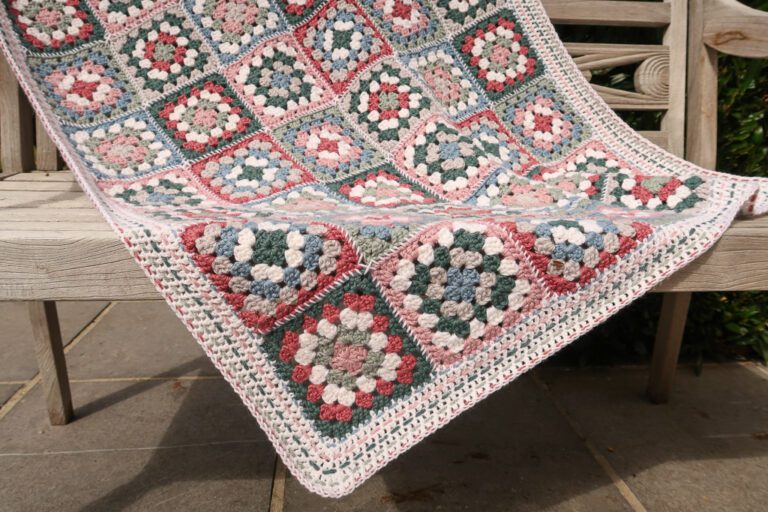
Tidal Textures Throw Crochet-Along Blanket

While it’s still cold outside we may start thinking of warmer days relaxing at seaside or at the pool. It’s time to get cozy with our new striped crochet blanket pattern, the Tidal Textures Throw Crochet-Along (CAL)!
Challenge yourself to move past basic stitches in this FREE crochet blanket pattern. Discover new techniques, crochet stitches and craft this beautiful sampler blanket.
Use as many colors you choose to create six gorgeous stripes to form your own stunning throw with stunning blanket border and contrasting divider in between stripes.
No time right now? Pin this free crochet blanket pattern for later!

*This post contains affiliate links (only for products I love, use and spend my own money on obviously). This means I earn some yarn money if you make a purchase through one of these links (of course at no extra cost for you!), which I promise to use to create more awesome patterns like this one. All opinions are my own. See my full disclosure here.

What is a Crochet-Along (aka CAL)?
A crochet-along is an event where crocheters from around the world work on the same pattern together. They can take a lot of forms and shapes but the common thread is always a community helping each other and learning together.
If you’re new to crochet-along, don’t worry! They might look intimidating but they are a great opportunity to learn and lots of fun!
Upgrade Your Crochet-Along Experience
We know not everyone likes to jump around the website to follow the CAL because of the ads, so I have put together an eBook for the Tidal Textures Throw Blanket which includes all the 6 different blanket stripe patterns, divider for in between stripes and a border pattern. With over 45 pages of detailed instructions, step-by-step photo tutorials for any special stitches (as well as charts and videos) the blanket eBook is very convenient to follow along.
In addition the ebook, you can choose to upgrade to the Journey Pass for the FULL Crochet-along experience with exclusive Sip & Stitch parties, ad-free access to the videos, a 30-day free trial to the Stitching Squad as well as 1 bonus stripe designs!
You can already get a head start and upgrade here.
Whether:
- You don’t want to jump around the website to follow the different section’s instructions
- You just want to get the patterns without ads
- You want the extra guidance and support
- You’d like more section options to make your blanket truly unique
- Or you just want to get the entire pattern to make at a later date
The upgrade is for you!

Share Your Progress
Share your progress in my Facebook group Make with Yarn Facebook Group.
Use hashtag #TidalTexturesThrowCAL and tag me @knittingwithchopstick
Size
The Blanket is designed to be approximately 135 cm / 53” wide by 160 cm / 63” long.
Each stripe section is approximately 23 cm / 9.5” high and 127 cm / 50” wide.
Lapghan size adjustments:
· Skip part 4
Sick of all the yarn jargon and conversions?
US vs UK, abbreviations, imperial vs metric, yarn weights, etc?

· Remove 30 stitches of your starting chain
Lapghan size will be approximately 110 cm / 43.25” wide by 137 cm / 54” long
Materials List
- Rosarios Amor-Perfeito (50% wool, 50% acrylic, 100g/3.5oz, 120m/131yd) in 4 colors:
- 7 skeins in Pink (21)
- 6 skeins in blue (07)
- 7 skeins in rust (30)
- 4 skeins in off-white (02)
- Crochet Hooks:
- 5.5 mm / US I-9
- 6 mm / US J-10
- 6.5 mm / US K-10.5
- Tapestry needle to weave in the ends
- Measuring tape
- Optional: Stitch markers to help you keep track of repeats
The Yarn
The Amor Perfeito yarn is unfortunately not as easy as I hoped to source. You can get it here: https://www.darteaslinhas.pt/products/amor-perfeito?srsltid=AfmBOopbAT-ZkYOjVSuRG8An3P5sy8taTR8rrEcBx9DtT0S4aE_rGE8r
However, you can easily substitute with another heavy worsted weight yarn (wool blend for the best match). Some more easily available options are:
- Lionbrand Wool Ease: https://lionbrand.sjv.io/55Lyx1
- WeCrochet Mighty Stitch: http://shrsl.com/4supo
- Hobbii Wool Blend: https://hobbii.com/daily-stitch-wool-blend
- Lionbrand Color Theory (100% acrylic): http://shrsl.com/4supq
More or Less Colors?
What if you want to make the Tidal Textures Throw with more or less colors? Great idea! As each stripe has a different stitch design, it will look great in one or more colors.
Here are the individual stripe yarn requirements (used for the sample blanket) so you can plan accordingly:
- Raindrops Part 1: 320g/384m/420yd
- Weaves Part 2: 290g/348m/380yd
- Pearl and Oysters Part 3: 290g/348m/380yd
- Nautical Shells Part 4: 250g/300m/325yd
- Sailboats Part 5: 230g/276m/301yd
- Seaweed Part 6: 230g/276m/301yd
- Border Part 7: 230g/276m/301yd in off-white (02), 25g/30m/33yd in blue (07), 25g/30m/33yd in Pink (21)
- Divider Part 0: 20g/24m/26yd
Note: Keep in mind that these are approximate yardages, make sure to have some extra.
Gauge
The gauge for this blanket is 12 st for a 10 cm by 10 cm / 4” by 4” square. The row height gauge is different for every section, refer to the individual pattern sections below.
The Blanket is designed with a 6 mm / US J – 10 crochet hook.
Since each stripe has a different stitch pattern, to meet gauge for each stripe and have even edges on your blanket we recommend you go down or up a hook size for some sections so you can get the same gauge for every section as some stitch patterns are tighter or looser than others.
Start by identifying which hook size you need to get 12 st / 10 cm or 4” in alternating rows of single and double crochet. This will be your base hook size. Refer to the blanket sample notes for any adjustments depending on the stripe stitch pattern.

Level
The crochet-a-long blanket is a beginner to intermediate level crochet blanket pattern inspired by the sea. Step-by-step photos as well as videos are provided for any special stitches featured. The CAL is a great opportunity to get extra support and improve your crochet skills!
Borders and Edges
The border stitch doesn’t require any specific stitch multiple.
It is worked in rounds and turned at the end of each round.
Overall Notes
- All pictures are taken with a left-handed crocheter. The pattern is perfectly reversible and when any difference is needed, instructions for both right and left-handed crocheters are given
- Start your blanket with Part 1: Raindrops. Once you finish part 1, work a divider section. After which you will more onto Part 2 followed by another divider sections and continue in this manner until your finish Part 6.
Blocking
You’re done with the crocheting part, make sure to weave in all the ends. To make your blanket even prettier, help even your stitches, block your project.
Don’t skip this step as it can make a huge difference. Read my detailed tutorial on why block, how-to, and all my tips and tricks if you need help.
Tidal Textures Throw Sections
Part 0: Divider
This section is to be worked after each of the blanket sections to separate it from the next one, starting after Part 1.
It’s a 3 row section which means each of the following sections will start on the wrong side. Find the detailed divider blanket section crochet pattern here (including step by step photo tutorial and both right and left handed video tutorial)

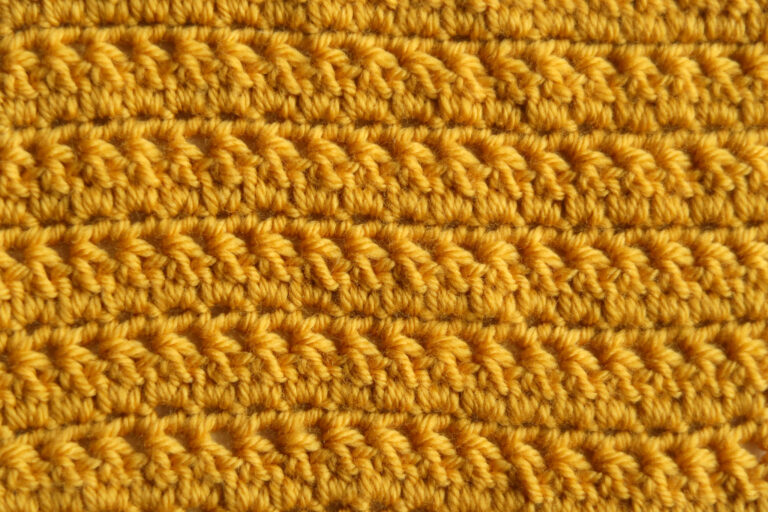
Part 1: Raindrops
This first section, the Raindrops Blanket Stripe plays with single crochet, double crochets and back post double crochets to create a beautiful texture imitating raindrops. Find the complete free crochet pattern for this sections here. In addition to the written instructions, it includes a right handed and left handed video tutorial.

Part 2: Weaves
This second section, the Weaves Blanket Stripe plays with single crochet, treble crochet, double crochets and half double crochets to create a beautiful texture imitating weaves. Find the complete free crochet pattern for this sections here. In addition to the written instructions, it includes a right handed and left handed video tutorial.

Part 3: Pearls & Oysters
This this section, the Pearls & Oysters Blanket Stripe plays with front post stitches and bobble stitches to create a beautiful pearl and oyster shell texture. Find the complete free crochet pattern for this sections here. In addition to the written instructions, it includes a right handed and left handed video tutorial.

Part 4: Nautical Shells
This this section, the Nautical Shells Blanket Stripe plays with front post stitches, half double crochet stitches, single crochet stitches and chains to create this beautiful shell look texture. Find the complete free crochet pattern for this sections here. In addition to the written instructions, it includes a right handed and left handed video tutorial.

Part 5: Sailboats
This section, the Sailboats Blanket Stripe uses filet crochet technique to make this pretty sailboat image. Find the complete free crochet pattern for this sections here. In addition to the written instructions, it includes a left handed video tutorial. Because the sails of the sailboats aren’t symmetrical, the instructions for right-handed and left-handed crocheters vary in this section.

Part 6: Seaweed
This section, the Seaweed Blanket Stripe plays around with puff stitches and with double crochet stitches and half double crochet stitches it makes a unique looking twirl texture in the middle. Find the complete free crochet pattern for this sections here. In addition to the written instructions, it includes a left handed video tutorial. In addition to the written instructions, it includes a right handed and left handed video tutorial.

Part 7: Border
This section, the Border Crochet Blanket Section plays around with basic crochet stitches to make this gorgeous textured look. Find the complete free crochet pattern for this sections here. In addition to the written instructions, it includes a left handed video tutorial. In addition to the written instructions, it includes a right handed and left handed video tutorial.