How to Knit Cables for Beginners?
One of the techniques that intimidated me the most when I started knitting was how to knit cables. Cables look very impressive, but they’re not as hard as they look!
No time right now? Pin this tutorial for later.

*This post contains affiliate links (only for products I love, use and spend my own money on obviously). This means I earn some yarn money if you make a purchase through one of these links (of course at no extra cost for you!), which I promise to use to create more awesome patterns like this one. All opinions are my own. See my full disclosure here.
What is a Cable Knit Stitch?
In knitting, a cable is formed by changing the order in which the stitches are knit. This is what gives the twisting effect. How (front or back), how often, and for how many stitches you change the order of the stitches is what makes knit cables look different. But basically, they all follow this same idea: knit until your cable, put some stitches on hold, knit a few stitches, go back to the ones on hold and knit those, keep knitting the rest of your project.
What do you Need to Cable Knit?
To knit cables you need the following tools:
- Knitting needles: you can make cables by working flat or in the round. This tutorial focusses on working back and forth in rows.
- Yarn: Well, it’s pretty hard to knit without yarn. You can make cables with any yarn and any thickness. Follow what your pattern recommends or what you decided to use for your project. To exercise, it’s always easier to use thicker yarn such as bulky weight and light colors so you can clearly see your stitches.
- Something to hold your stitches: usually a cable needle such as these but if you don’t have one, you can use an alternative. Anything that can hold your stitches while you work on a few other stitches will work. Try to avoid picking something too long as you’ll quickly notice it’s not convenient. Here are some ideas.

Ready? Let’s Learn How to Knit Cables!
1. How to Knit the Cable Stitch Video
Now that you have your materials ready, and you understand the concept behind knitting cables, let’s give it a try.
In this video, I show you how to make a right-leaning 4 stitches wide cable.
- Knit up to where you need to make your cable.
- Place the 2 next stitches on your cable holder and hold it at the back of your work.
- Knit the 2 next stitches.
- Put back the 2 stitches you placed on hold on your left needle and knit these as you normally would. Some people like to knit them right off the cable needle, that’s ok too.
- Congrats, you’ve made your first cable!
For the next rows, the cable section is simply worked in stockinette stitch (purl these stitches on the wrong side, knit them on the right side) until you need to make a cable again.
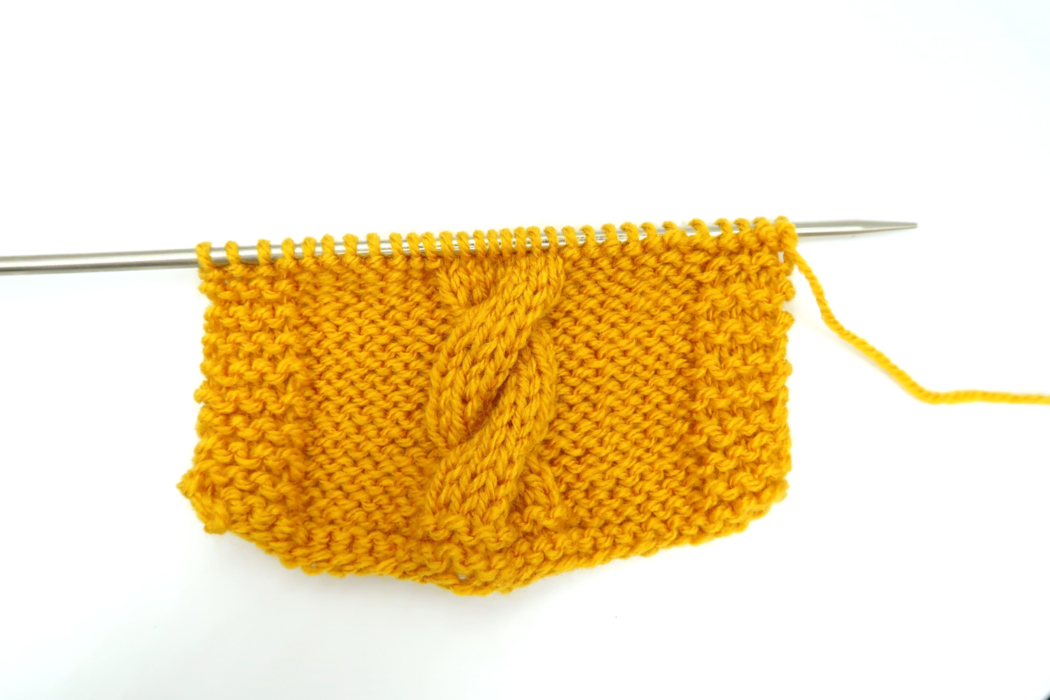
2. Cable Knit Step-by-Step Photo Tutorial
If you prefer to follow step by step pictures and take your time. Here’s how to make an 8 st right-leaning cable in detail.
Knit up a small swatch: I used worsted weight yarn with 4.5mm / US 7 knitting needles. Cast on 30 stitches. Work a couple of rows in garter stitch.
Repeat the next 2 rows twice
- Row 1: k4, p7, k8, p7,k4
- Row2: k11, p8, k11
Your swatch is now ready to make a cable.
Knit until where the cable starts (11 st in my swatch example)


It wasn’t that hard, was it?
How are Cable Stitches Written in Patterns?
The abbreviation for the cable knit stitch in patterns is CXF or CXB where:
- X is the width of the cable, i.e. the total number of stitches you use to form the cable. This cable will lean to the right. If X is 8, it means you will put 4 stitches on your cable needle. The total width of the cable will be 8 stitches.
- F stands for front, meaning you hold your cable needle in front of your project. This cable will lean to the left.
- B stands for back, meaning you hold your cable needle at the back of your project.
This is what a C2F looks like.
By knitting 2 cables next to each other you can get more complex looking cables.

This is the technique I used in the Braided Bridge Cable Scarf pattern.
Tips and Tricks to Knit the Cable Stitch
- On the row you knit the cable it can be quite tight, that’s normal, it will loosen up once you work a few more rows.
- When you knit cables, holes can form on the sides or in the middle when you make a double cable (like in the last video above). This is totally normal. If it bothers you, you can always sew the holes close after you are done knitting.
- Cables are often surrounded by purl stitches. This is not mandatory but will make the cable come out more.
- The wider the cable, the bigger the twist. This can greatly impact your gauge so be careful.
Sick of all the yarn jargon and conversions?
US vs UK, abbreviations, imperial vs metric, yarn weights, etc?

If you enjoyed this tutorial, share it with your yarn loving friends.


U knit differently than I was taught but I have the same look as yours. I learned from my 2 or 3rd grade teacher and this is the only way I know. All she taught us was knit and purl, cast on and cast off and how to sew seam together like doll clothes. I guess it really doesn’t matter as long as the end result is the same. My girlfriend also knitted like me so I never thought anything about it being wrong. But love the cables n will have to give them a try someday. Thanks for the tutorial that made a lot more sense to me
Merry
Hi Merry,
Please never think you’re knitting wrong. There is no right or wrong in crafts! As long as you enjoy the end result and the process, you’re right!
There are many different ways to hold your needles and yarn and make pretty things!
I learned to knit all because I love cables, 30 years ago! Thanks for your lessons.
Awesome post! Keep up the great work! 🙂