Winterlight Sleeveless Cardigan Crochet Pattern
A new beginner friendly sleeveless cardigan crochet pattern, the Winterlight Cardigan, is now a free crochet pattern here on the blog. Read all about the simple crochet vest pattern construction, scroll down for the free pattern or grab the printable PDF from my shop, Etsy shop, Ravelry shop.
No time right now? Pin this crochet ruana pattern free for later!

*This post contains affiliate links (only for products I love, use and spend my own money on obviously). This means I earn some yarn money if you make a purchase through one of these links (of course at no extra cost for you!), which I promise to use to create more awesome patterns like this one. All opinions are my own. See my full disclosure here.

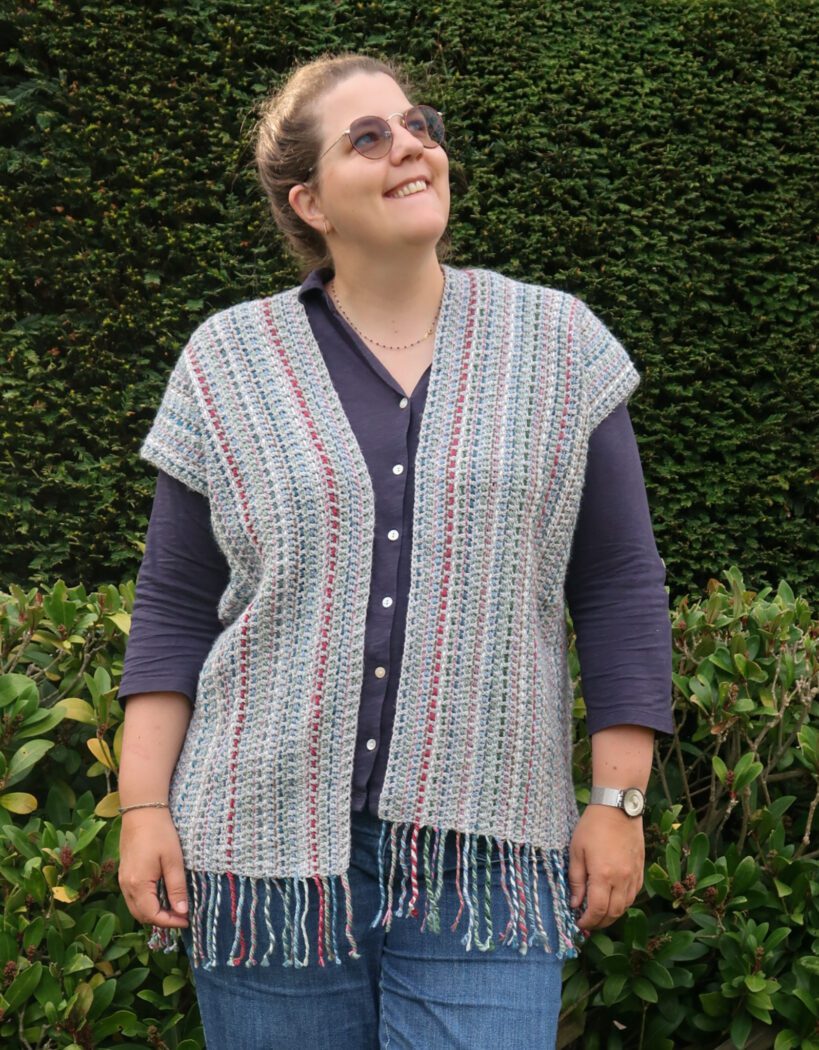
Looking for a super easy layering piece you can wear almost year-round? This sleeveless crochet cardigan has you covered! It’s made in sizes XS all the way up to 5XL, and the best part is that it’s worked in just two simple panels sewn together. The whole thing uses double crochet stitches only, so if you’re a beginner (or just want a relaxing, no-fuss project), this one’s for you. I also added a fun twist by weaving in little threads of scrap yarn—such a great way to use up leftovers and make your cardigan totally unique.
To finish it off, there’s a tassel fringe that gives the whole piece a cute, boho vibe. It’s lightweight and perfect for those in-between seasons when you just need something easy to throw on. Pair it with jeans, dresses, or even your comfiest leggings—it seriously works with everything. The best part? The pattern is completely free on the blog, so grab your yarn and hook and get ready to make your new favorite cardigan!
Crochet Pattern Construction
This sleeveless cardigan vest is worked up in two long panels, which are then sewn together to create the body. Once the main pieces are finished, you can have some fun by weaving scrap yarn through the fabric to make colorful lines and add extra personality. The final touch is a fringe along the bottom, giving the cardigan a relaxed, boho-inspired look.

Downloadable PDF for Winterlight Ruana Crochet Pattern

Grab the printable PDF of the Winterlight Sleeveless cardigan crochet pattern Pattern now in my shop, Etsy shop or on Ravelry shop:
More Ruana crochet pattern you'll love

Before You Start Your Winterlight Sleeveless Cardigan Crochet Pattern
Materials
- 4.5 mm / US 7 hook.
- DK weight yarn: Zeeman supersoft (100% acrylic, 50g/1.75 oz, 199m/217yd) :
4 (4, 5, 5, 5) (6, 6, 7, 7) skeins in light gray
- Scrap yarn: you will need threads of 2 m / 2.2 yd in DK up to chunky weight. Thicker yarns will deform the stitches too much.
- Tapestry needle to weave in the ends.
Scrap Yarn & Fringe Notes
- Color choices: This project is a great place to play with your scraps. You can stick to a single color family for a subtle look, or go bold with high contrast shades. If you’re unsure, lay out your scraps next to the main fabric to check how well they pop against the background.
- Thickness: Different yarn weights will give slightly different effects. Thinner yarns will blend into the fabric, while thicker ones will stand out more and add extra texture. Mixing different thicknesses gives it a beautiful modern vibe.
Fiber content: Any fiber can work here.
Size
The top is available in the following sizes: XS to 5XL. Sizes are noted throughout the pattern in the following way: XS (S, M, L, XL) (2XL, 3XL, 4XL, 5XL). The pictures illustrate the XL size.
Final Bust Cardigan sizes are:
- XS: 89 cm / 35”
- S: 99 cm / 39”
- M: 109 cm / 42.74”
- L: 119 cm / 46.75”
- XL: 129 cm / 50.75”
- 2XL: 139 cm / 54.75”
- 3XL: 149 cm / 58.5”
- 4XL: 159 cm / 62.5”
- 5XL: 174 cm / 68.5”
The cardigan length for all sizes is 67 cm / 26.5” not counting the 12 cm / 4.75” of fringe.
You can easily adjust the length to your desired length, notes are given in the pattern to show you where and how.
Gauge
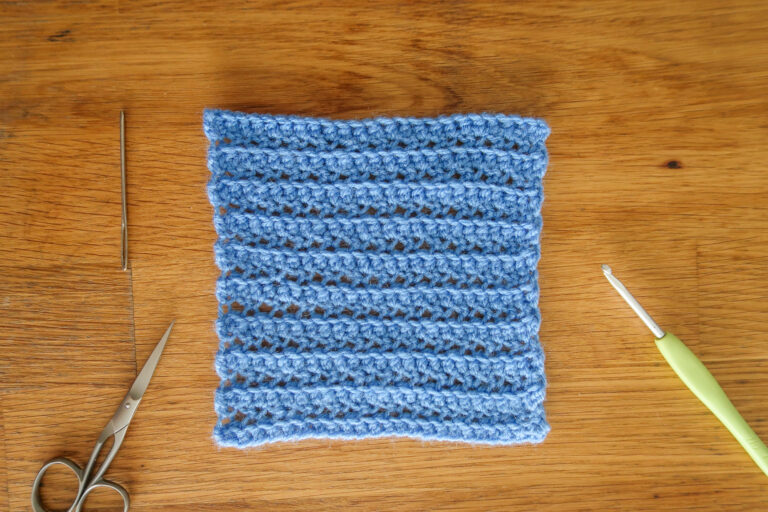
The gauge for this pattern, in dc, is 12.5 st by 8 rows for a 10 cm by 10 cm / 4” by 4” square.
This is a very loose gauge on purpose as threads of thicker yarn will be woven in between the stitch posts.
Note: the gauge is given before adding in the woven threads. Adding these is shortening the width of the panels by approximately 20%. The row height isn’t impacted significantly.
Abbreviations
This pattern uses US notations.
- st = stitch
- ch = chain
- sc = single crochet
- dc = double crochet
- sp = space
Notes
Work instructions between [] the indicated number of times or until the end of the row / round.
Sick of all the yarn jargon and conversions?
US vs UK, abbreviations, imperial vs metric, yarn weights, etc?

The final number of stitches is indicated at the end of the row / round between < >.
The turning ch 1, ch 2 and ch 3 don’t count as stitches throughout the pattern except if mentioned otherwise.
The pattern is written in crochet shorthand. For example:
- “sc 1” means to single crochet in the next stitch,
- “sc 2” means to single crochet in each of the next 2 stitches,
- and “2 sc” means to single crochet twice in the next st.
Special Stitches & Techniques
Twisted fringe. Here is a video tutorial showing you how to construct.
Construction
The cardigan crochet pattern is worked in 2 long panels sewed together. Each panel is worked lengthwise in rows back and forth working some shorter rows for under the armholes and at the back.
Threads of scrap yarn are then woven in between the stitches and finished in a twisted fringe.
Note: Adding the threads of scrap yarn is going to significantly shorten your panels (approx. 20%). Don’t panic when trying it on before weaving these in and it seems much longer than it should be!

The Actual Winterlight Crochet Ruana Pattern Free
Panel 1

With your 4.5 mm / US 7 hook chain 200 st + 2.
Note: If you want to make your cardigan longer or shorter, this is where you add or remove stitches (no multiple required)
Row 1: Dc in 3rd st from hook, dc across, turn. <200 st>
Row 2: Ch 2, dc across, turn.
Repeat Row 2 another 13 (15, 17, 19, 21) (23, 25, 27, 30) times.
Armhole row: Ch 2, dc 40, turn. < 40 st>
Note: If you chose to add/remove length, you will need to add/remove the same number of stitches to your armhole row here.
Repeat Armhole row three times.
Fasten off and leave a long tail for sewing
Panel 2

Repeat Panel 1.
On the chain side of the panel, starting at the same end of your panel as the last 4 rows are worked; work in the back of the starting chain:
Row 1: Ch 2, dc 65, turn.
Note: If you chose to add/remove length, you will need to add/remove the same number of stitches here.
Row 2: Ch 2, dc across, turn.
Repeat Row 2.
Bind off and weave in the ends.
Blocking
Make sure to weave in all the ends (except for assembly).
To make your cardigan even prettier and help even your stitches, carefully block your panels.
Don’t skip this step as it can make a huge difference. Read my detailed tutorial on why block, how-to, and all my tips and tricks if you need help.
Assembly
Place both panels next to each other and fold them in half.
Sew down the sides along the extra 4 rows of fabric.
Sew in the back along the extra 3 rows of 65 stitches.
Leave the front open.
Weave in all the ends.

Cut 41 (45, 49, 53, 57) (61, 65, 69, 75) strands of scrap yarn of 2 m / 2.2 yd long.
Note: If you chose to adjust the length of the cardigan, you will have to adjust the length of your strands of scrap accordingly. Please remember one strand is used for both the front and back fringe so you’ll need to double up on your adjustment.
You will need one strand per row.
With your tapestry needle, thread each strand over and under the dc posts.
Make sure you alternate from one row to the next going over or under so the fabric doesn’t pucker.

In groups of 2 make a twisted fringe (approx. 12 cm) on each side of the cardigan. You may need to have one fringe with 3 threads to finish.
Cut your ends and steam block your fringe for a tidy result.