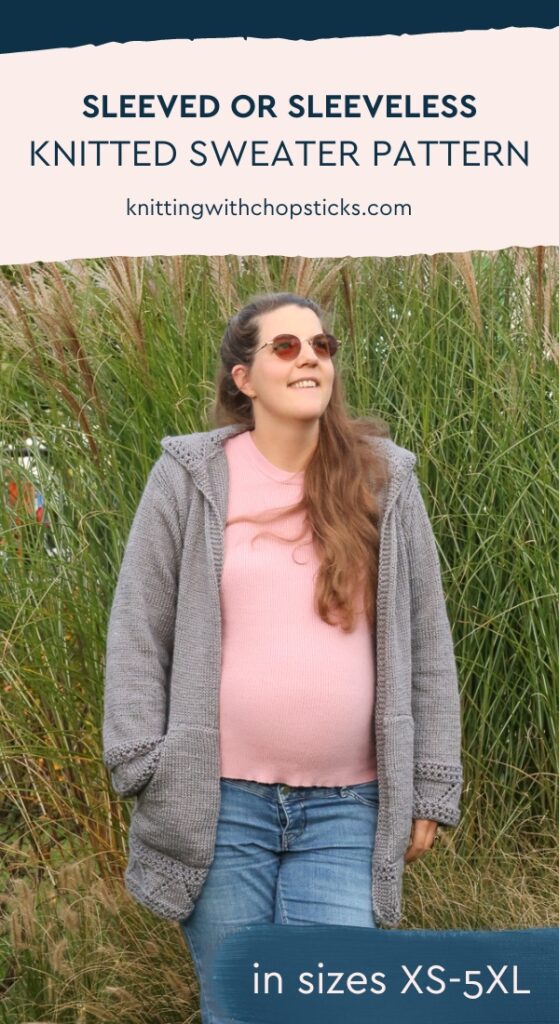
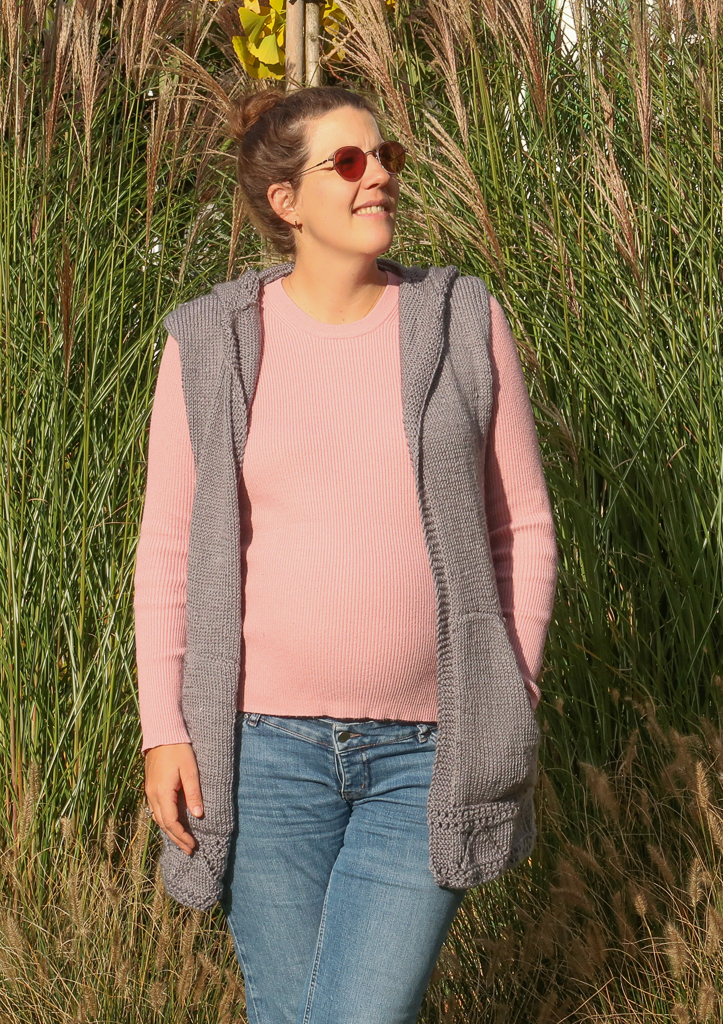
Anastasia Hoodie Light
A new free knit hoodie pattern, the Anastasia Hoodie Light, is now a free long knit cardigan pattern on the blog! Read all about the inspiration, delicious yarn it’s made out of or scroll down to view the full free pattern or purchase an ad free PDF from the links below.
No time right now? Pin this free knit hoodie pattern for later!
*This post contains affiliate links (only for products I love, use and spend my own money on obviously). This means I earn some yarn money if you make a purchase through one of these links (of course at no extra cost for you!), which I promise to use to create more awesome patterns like this one. All opinions are my own. See my full disclosure here.
The Inspiration
Last fall, I released the super bulky Anastasia Hoodie (find the free knit hoodie pattern here) and I’ve been wearing it non-stop in the fall and winter. It’s quickly become a blog favorite too. However, not everyone lives in a cold climate or is always cold like I am and I’ve had many requests for a lighter version.
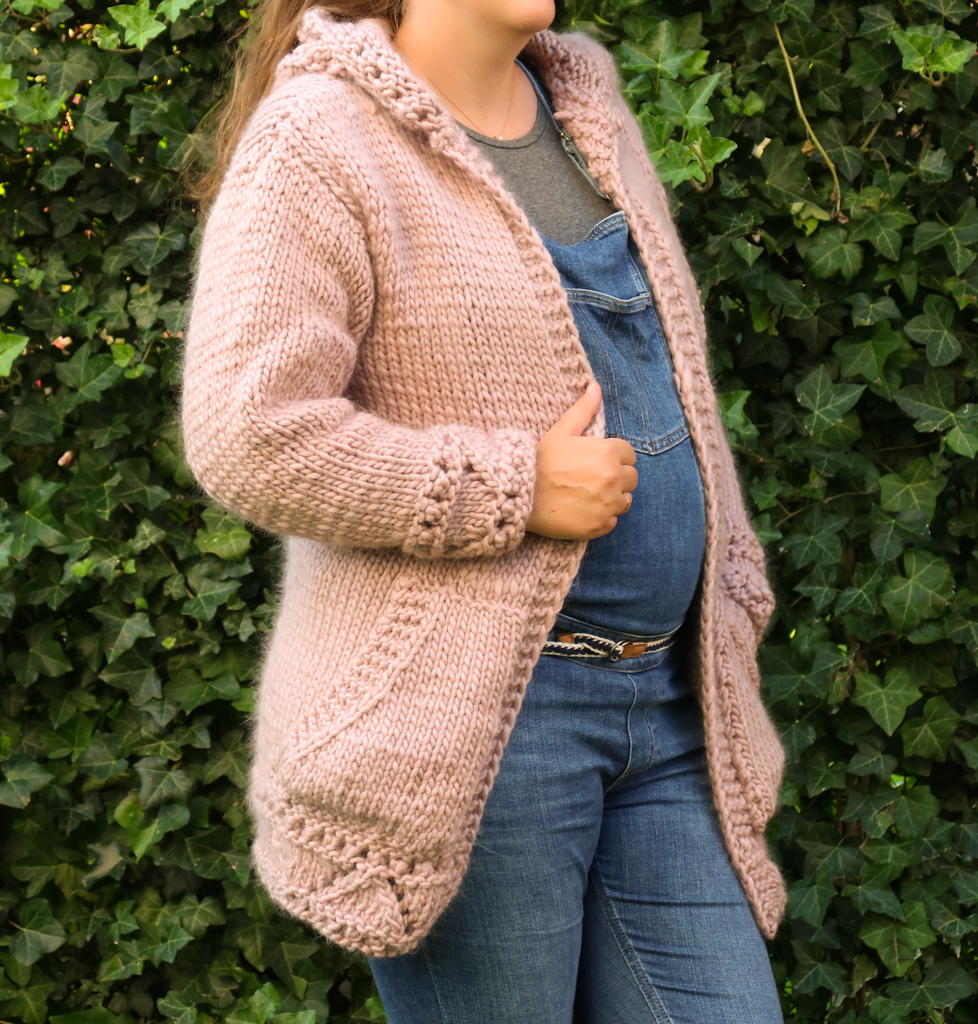
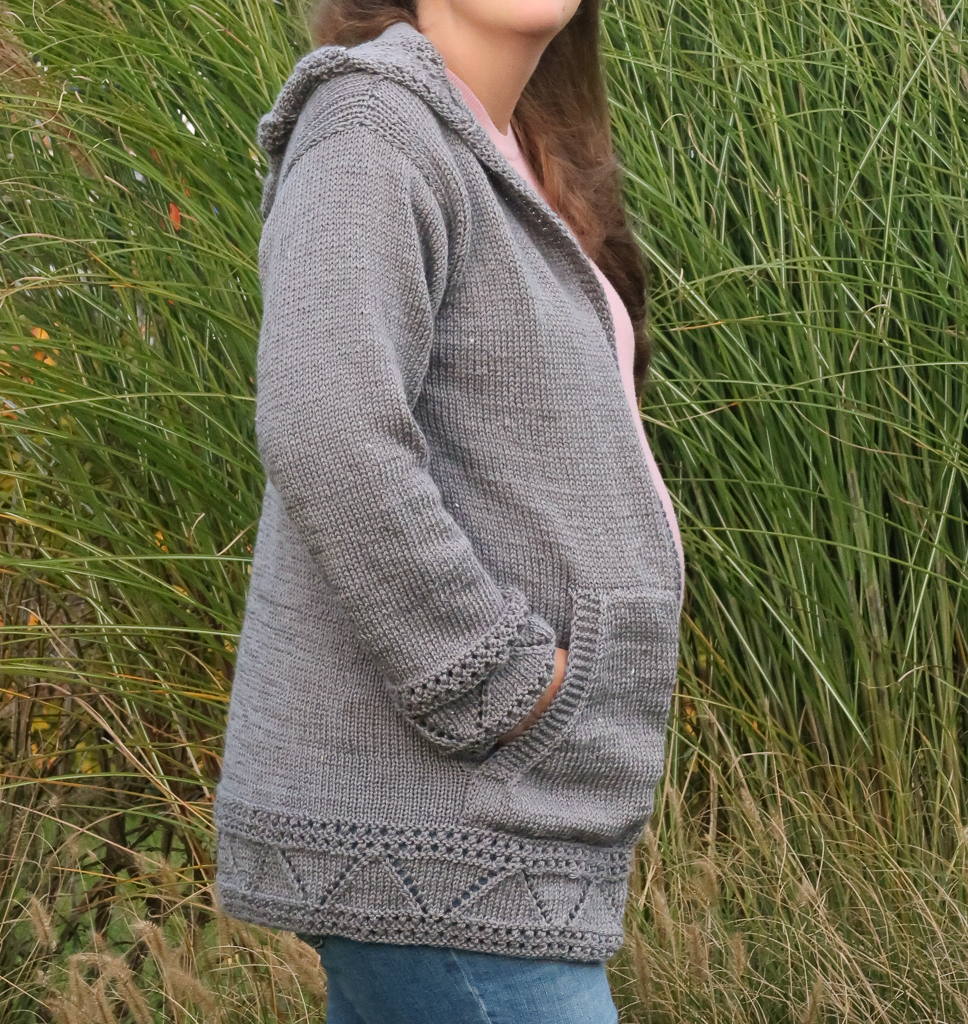
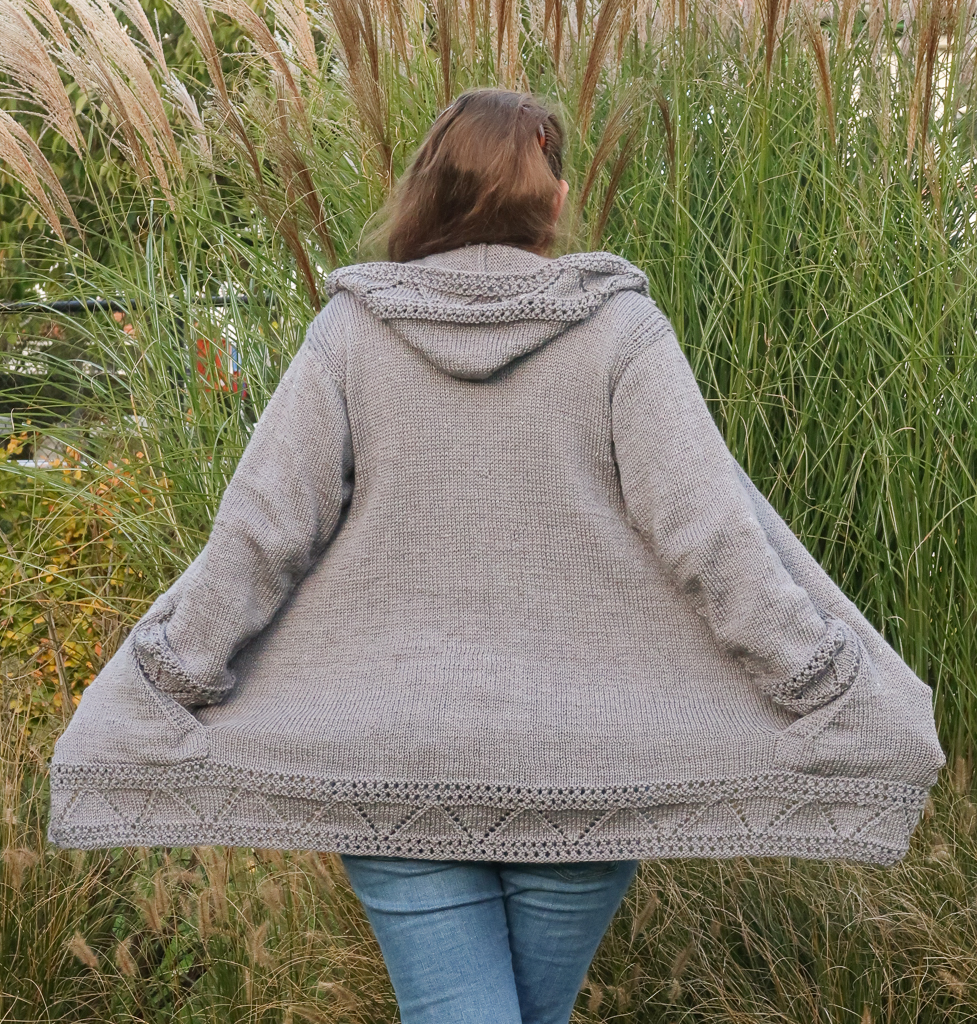
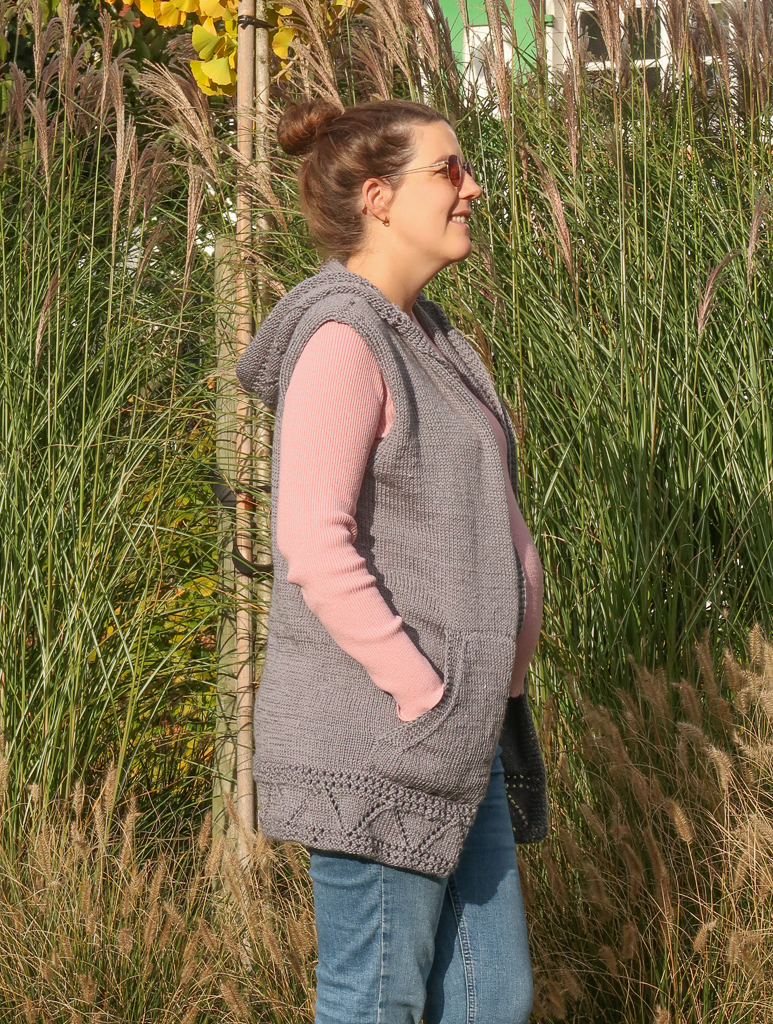
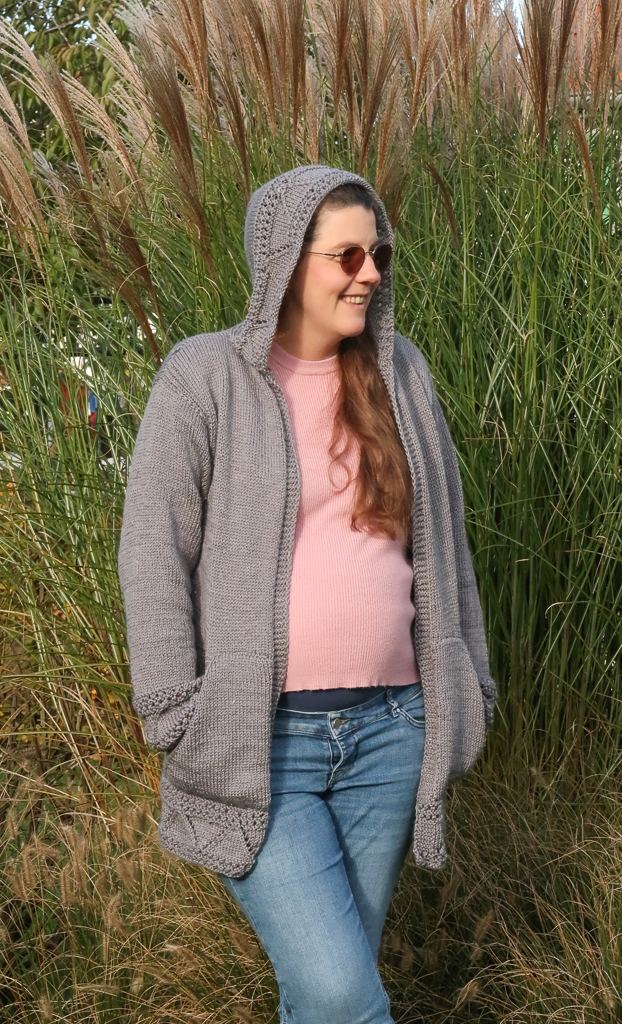
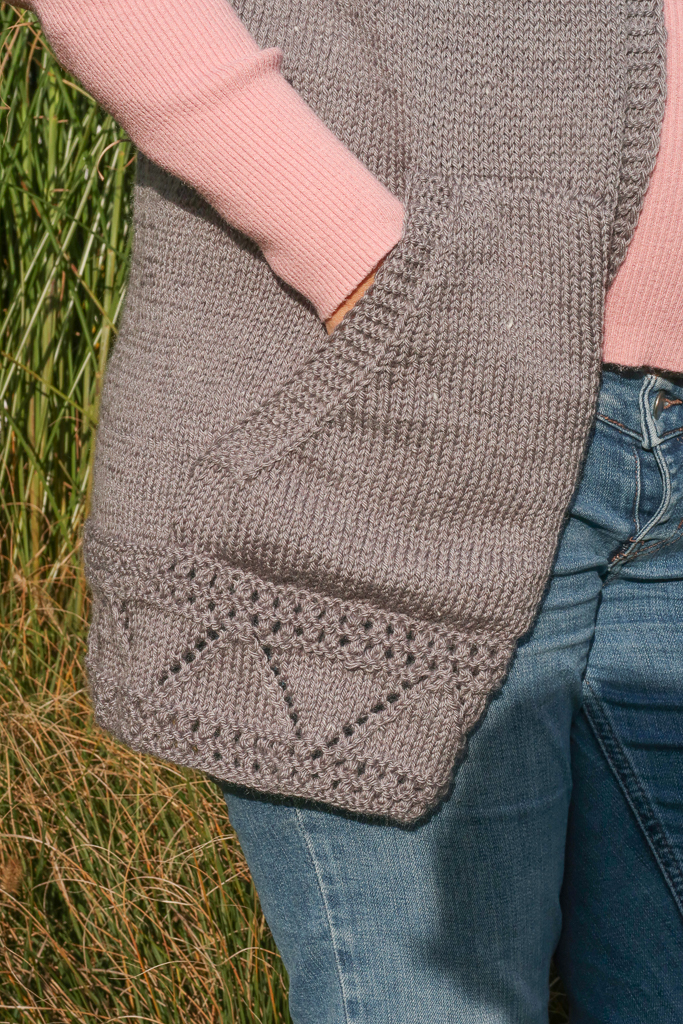
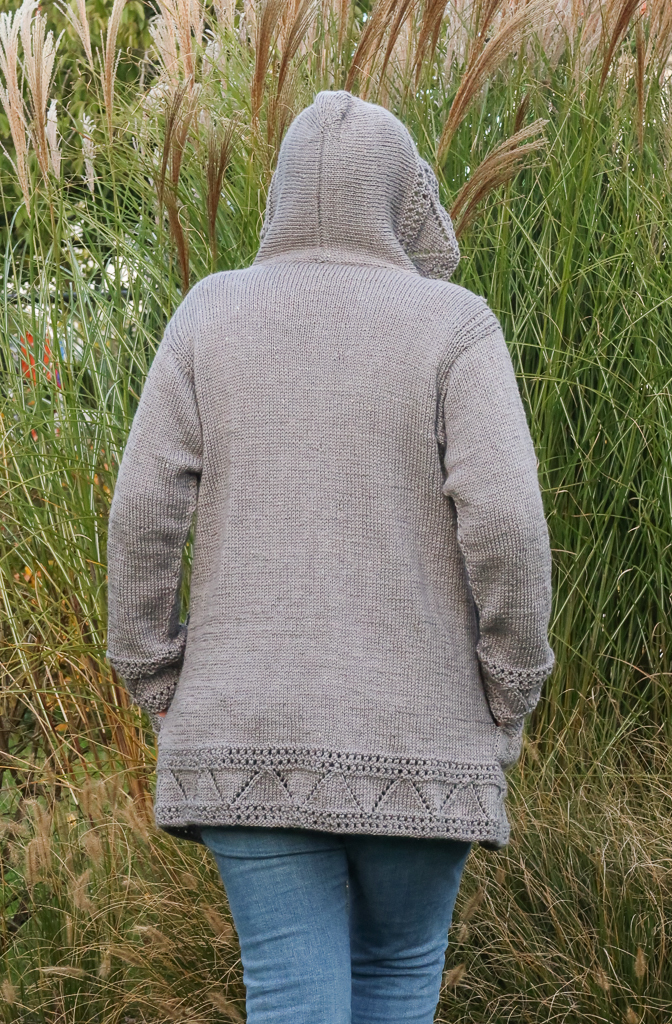
Here comes the Anastasia Hoodie Light! The same beautiful lace details, slanted pockets and cozy hood, but in a lighter yarn. The Anastasia knitted hoodie pattern features worsted weight yarn instead of the super bulky merino yarn of the original.
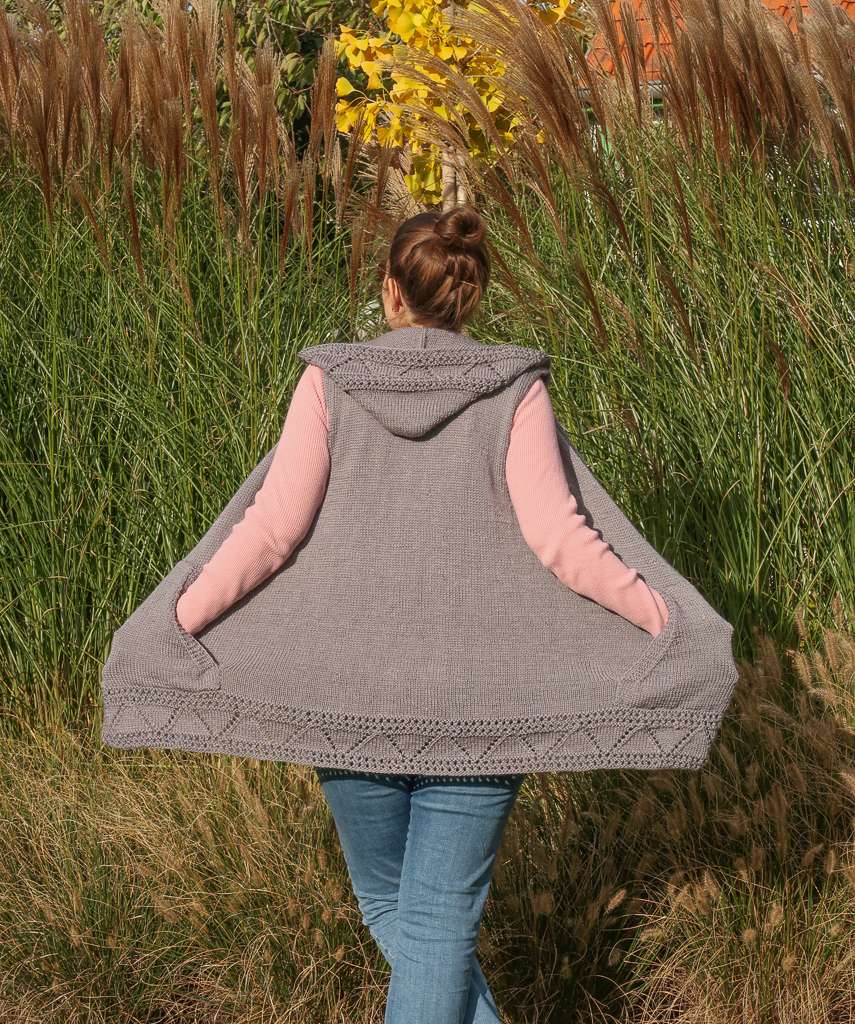
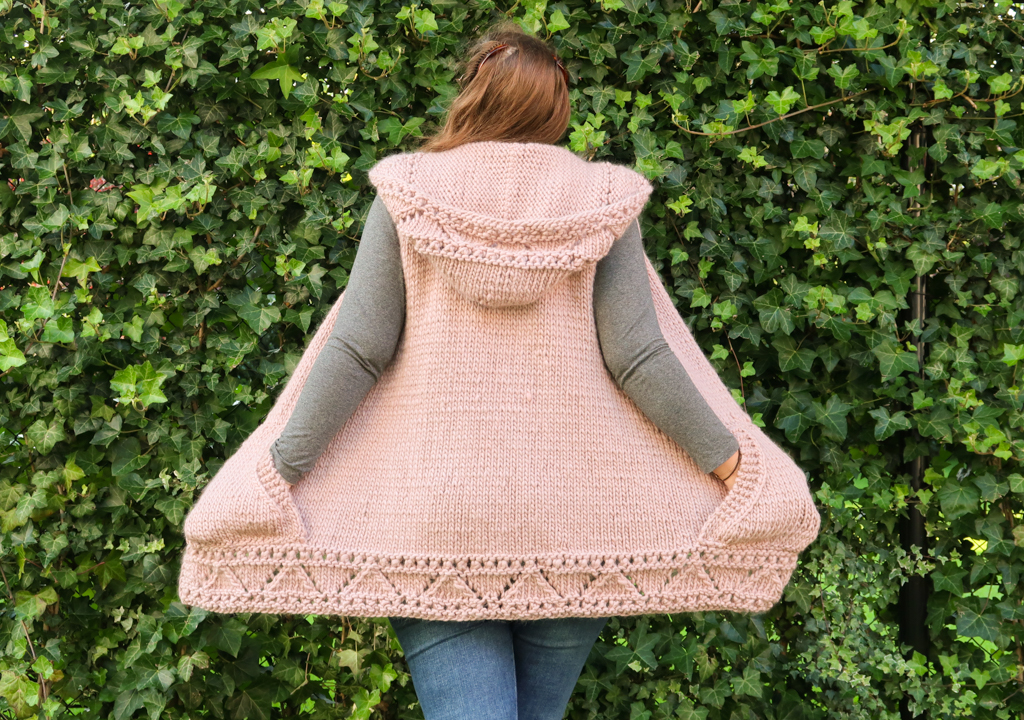
Just like the original, the Anastasia Light hoodie knit pattern comes with a sleeveless or sleeved option!
The Scrumptious Yarn and Kit
For the light version of the Anastasia hoodie knitting pattern, I teamed up with Claire from King and Eye again and her delicious Merisilk yarn.
It is a bit of a splurge but it’s so worth it! Her soft, warm high-end merino silk blend is a dream to knit with and even better to wear. The silk adds an unbelievable shine and smoothness to your sweater, without even mentioning the drape. It’s available in 7 gorgeous modern colors. Let me tell you, it’s hard to pick just one.
If you want to treat yourself (you deserve it!) or make the Anastasia knitted hoodie pattern for a special someone (Christmas is around the corner…), you can now grab the discounted kit.
The Anastasia knit hoodie pattern kit comes with everything you need to complete your sweater in one box and will be gift-wrapped to make you feel that bit more special! Your box includes:
- PDF Pattern
- 4.5 mm bamboo needles
- Enough Merisilk to complete your hoodie knitting pattern with sleeves
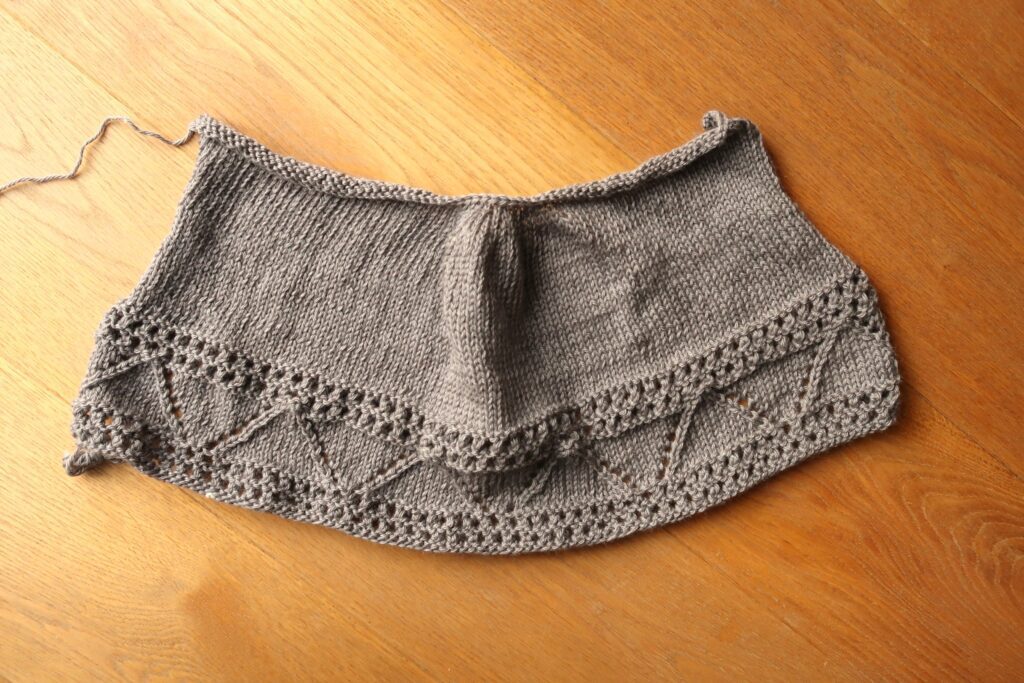
Knit Hoodie Pattern Construction
The body of vest knitting pattern is worked from the bottom up in one piece. When reaching the armholes, the panel is divided in 3 sections worked separately to form the 2 front panels and the back. The tops of the sections are then sewn together to form the shoulder seams.
The (optional) sleeves are worked separately and sewn to the body. So are the pockets and hood.
All pieces are worked flat.
Downloadable PDF

Grab the printable PDF of the Anastasia Knitted Hoodie Pattern now in my shop, Etsy shop or on Ravelry:
Wear It Proud: Beginner Garments You’ll Actually Love
If you’re ready to wear what you knit and actually love how it fits and feels, the Wear It Proud: Knitting Collection is for you.
The pattern you’re looking at is part of this special collection, along with 9 other beginner-friendly garment patterns (sizes XS–5XL) that guide you step by step from your first cast-on to your finished sweater, cardigan, or top.
Each design is simple, wearable, and confidence-building, perfect for knitters who want to move beyond accessories and start making clothes that fit their life and their style.
Grab the Wear It Proud: Knitting Collection here >>
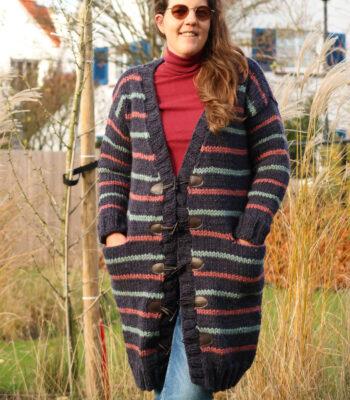
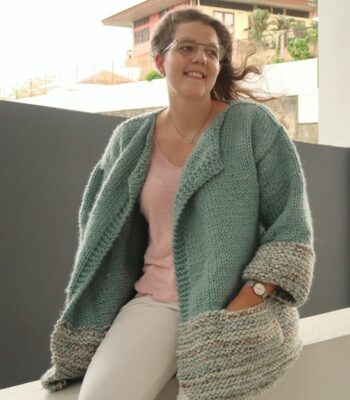
More Knit Sweaters You'll Love

Before you Start your Knitted Hoodie Pattern
Materials
- 4.5 mm / US 7 knitting needles
- King and Eye Worsted Merino Silk Yarn (Worsted weight 4, 80% merino 20% silk, 110m/120yd, 50/1.75oz) in granite grey:
- Sleeveless: 7 (8, 9, 10, 10, 11, 12, 13, 14) skeins
- With sleeves: 11 (12, 13, 14, 16, 17, 18, 20, 21) skeins
- Tapestry needle to weave in the ends
Size
Sick of all the yarn jargon and conversions?
US vs UK, abbreviations, imperial vs metric, yarn weights, etc?

The free hoodie knitting pattern is available in the following sizes: XS to 5XL. Sizes are noted throughout the pattern in the following way: XS (S, M, L, XL, 2XL, 3XL, 4XL, 5XL). The pictures illustrate the L size.
Final garment measurements are:
- XS: 81 cm / 32” bust, 22.5 cm / 8.75” armhole depth, 77 cm / 30.5” length.
- S: 92 cm / 36” bust, 23.5 cm / 9.25” armhole depth, 78 cm / 31” length.
- M: 102 cm / 40.25” bust, 24 cm / 9.5” armhole depth, 79 cm / 31.25” length.
- L: 113 cm / 44.5” bust, 25 cm / 10” armhole depth, 80 cm / 31.5” length.
- XL: 124 cm / 48.5” bust, 26.5 cm / 10.5” armhole depth, 81 cm / 32” length.
- 2XL: 134 cm / 52.75” bust, 28 cm / 11” armhole depth, 83 cm / 32.75” length.
- 3XL: 145 cm / 57” bust, 31 cm / 12” armhole depth, 86 cm / 33.75” length.
- 4XL: 155 cm / 61” bust, 32 cm / 12.5” armhole depth, 87 cm / 34” length.
- 5XL: 166 cm / 65.25” bust, 33 cm / 13” armhole depth, 88 cm / 34.5” length.
The cardigan is designed with a normal to loose fit 5 – 15 cm / 2” – 6” ease at the bust.
Gauge
The gauge for this pattern, in stockinette stitch, is 17 st by 22 rows for a 10 cm by 10 cm square (4” by 4”).
Need help figuring out your gauge and how to adjust it? Find out all you need to know about knitting gauge here.
Abbreviations & Instructions
- st = stitch
- k = knit
- p = purl
- k2tog = knit 2 stitches together, single right-leaning decrease
- ssk = slip 2 stitches knitwise, knit these 2 stitches together through back loops; single left-leaning decrease.
- M1R= make one right; single right-leaning knit increase
- M1L = make one left; single left-leaning knit increase
- Sl1p = slip 1 stitch purlwise
- Yo = yarn over
Repeat instructions between [] the indicated number of times or until the end of the round/row.
The final number of stitches is indicated at the end of the round/row between < >.
Special Stitches and Techniques
- Stockinette stitch: knit on the right side and purl on the wrong side of your project.
- M1R: Insert your left needle from back to front, under the bar between the stitches (thus lifting it onto the left needle). Knit this bar through the front loop (this twists it into a nice little tight loop)
- M1L: Insert the left needle from front to back, under the bar between the stitches (thus lifting it onto the left needle). Knit this bar through the back loop (this twists it into a nice little tight loop).
If you are not familiar with these increase techniques, I find this video tutorial very helpful.
The Actual Knitted Hoodie Pattern
Long Cardigan Knit Body
The main body panel is worked from the bottom up.
With your 4.5 mm / US 7 knitting needles, cast on 138 (156, 174, 192, 210, 228, 246, 264, 282) st.
To form a neat edge use a sl1p to start every row. Check out this video if you’re not sure how it’s done.
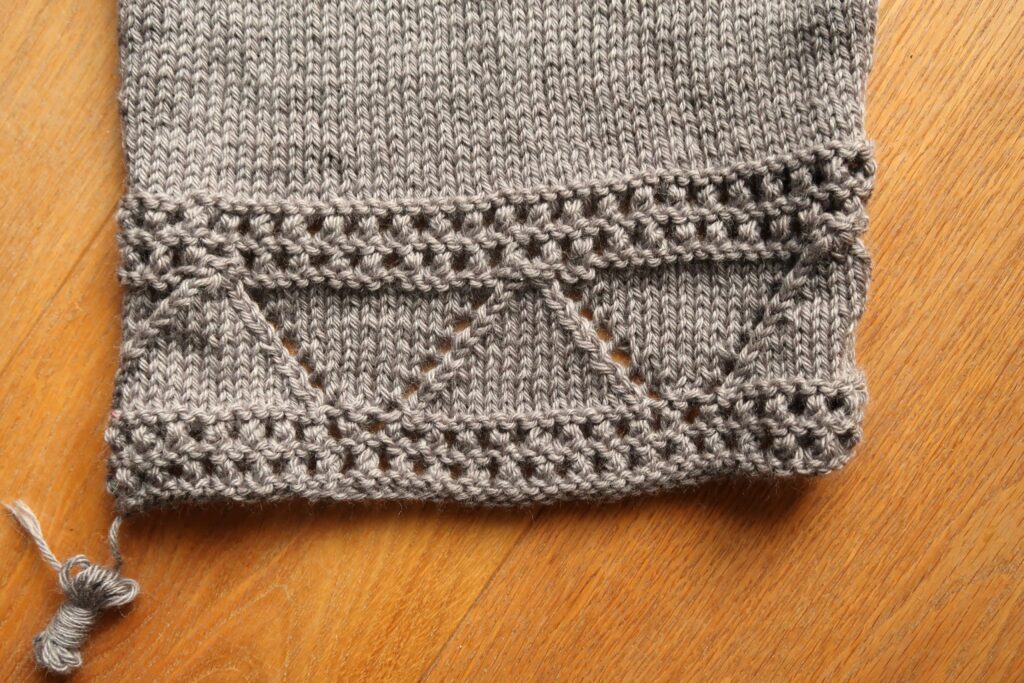
Lace Section
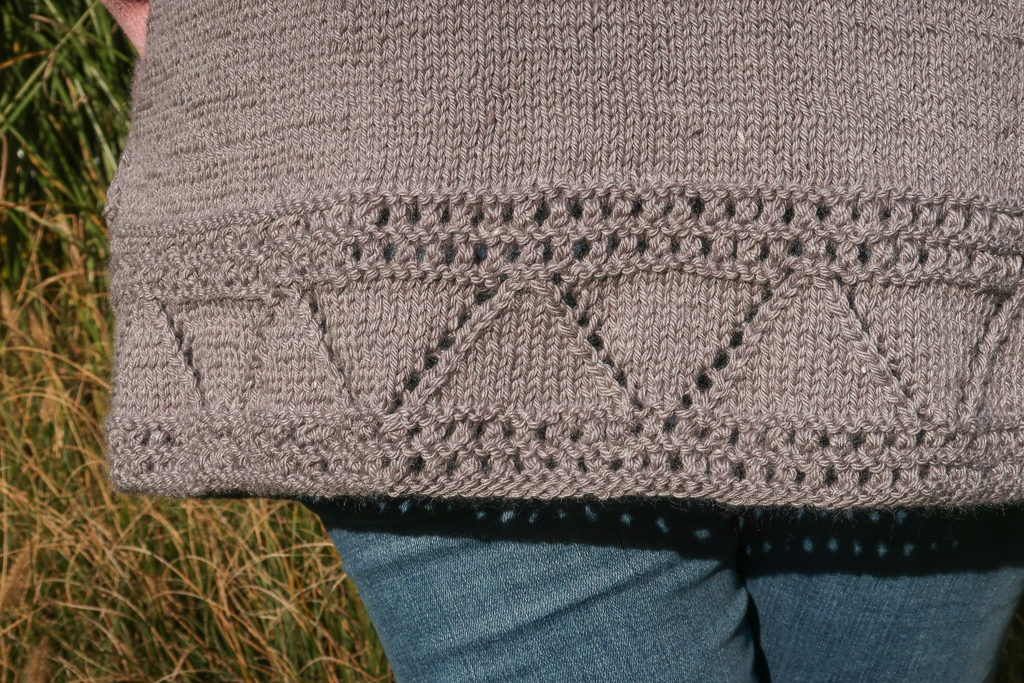
Row 1 – 2: Sl1p, knit across.
Row 3: Sl1p, [yo, k2tog], k1.
Row 4 – 6: Sl1p, knit across.
Row 7 – 9: Repeat Row 3 – 5
Row 10: Sl1p, k5, [k1, yo, ssk, k12, k2tog, yo, k1] until last 6 st, k6.
Row 11: Sl1p, k5, Purl across, k6.
Row 12: Sl1p, k5, [k2, yo, ssk, k10, k2tog, yo, k2] until last 6 st, k6.
Row 13: Repeat Row 11.
Row 14: Sl1p, k5, [k3, yo, ssk, k8, k2tog, yo, k3] until last 6 st, k6.
Row 15: Repeat Row 11.
Row 16: Sl1p, k5, [k4, yo, ssk, k6, k2tog, yo, k4] until last 6 st, k6.
Row 17: Repeat Row 11.
Row 18: Sl1p, k5, [k5, yo, ssk, k4, k2tog, yo, k5] until last 6 st, k6.
Row 19: Repeat Row 11.
Row 20: Sl1p, k5, [k6, yo, ssk, k2, k2tog, yo, k6] until last 6 st, k6.
Row 21: Repeat Row 11.
Row 22: Sl1p, k5, [k7, yo, ssk, k2tog, yo, k7] until last 6 st, k6.
Row 23 – 31: Repeat Rows 1 to 9.
Plain body
Row 32: Sl1p, knit across.
Row 33: Sl1p, k5, Purl across, k6.
Repeat Rows 32 – 33 until you reach 55 cm / 21.5”.
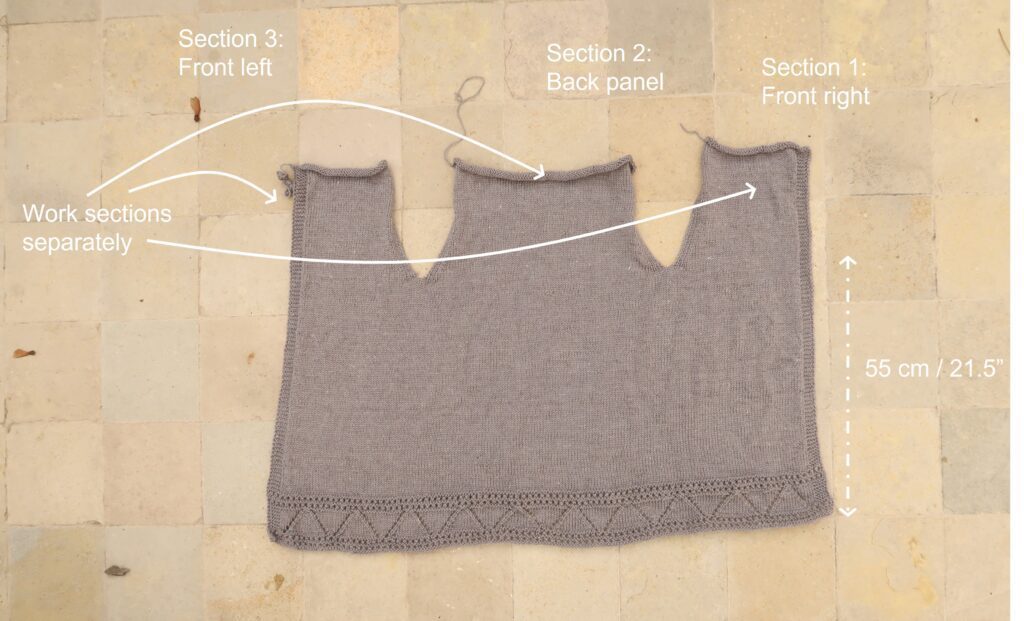
Now you need to split your work in 3 sections: both front panels and the back panel. This way you create the armholes.
Divide your stitches as follows:
- XS: 36 st, 66 st, 36 st
- S: 41 st, 74 st, 41 st
- M: 46 st, 82 st, 46 st
- L: 51 st, 90 st, 51 st
- XL: 55 st, 100 st, 55 st
- 2XL: 60 st, 108 st, 60 st
- 3XL: 64 st, 118 st, 64 st
- 4XL: 69 st, 126 st, 69 st
- 5XL: 74 st, 134 st, 74 st
Work each part separately.
Section 1 (front right panel)
Row 1: Sl1p, k29 (34, 39, 44, 48, 53, 57, 62, 67), [p1, k1] three times. <36 (41, 46, 51, 55, 60, 64, 69, 74) st>
Row 2: [p1, k1] three times, p until last 6 st, k6.
Row 3 – 4: Repeat Row 1 and 2.
Row 5: Sl1p, k until last 8 st, k2tog, [p1, k1] three times. <35 (40, 45, 50, 54, 59, 63, 68, 73) st>
Row 6: Repeat Row 2.
Row 7: Sl1p, k until last 6 st, [p1, k1] three times.
Row 8: Repeat Row 2.
Row 9 – 20: Repeat Row 5 – 8 three times. <32 (37, 42, 47, 51, 56, 60, 65, 70) st>
Repeat Row 7 & 8 until you reach 22.5 (23.5, 24, 25, 26.5, 28, 30.5, 32, 33) cm /8.75 (9.25, 9.5, 10, 10.5, 11, 12, 12.5, 13)”.
Cast off and leave a long tail for sewing.
Section 2 (back panel)
Row 1: [p1, k1] three times, k54 (62, 70, 78, 88, 96, 106, 114, 122), [p1, k1] three times, turn. <66 (74, 82, 90, 100, 108, 118, 126, 134) st>
Row 2: [p1, k1] three times, p until last 6 st, [p1, k1] three times.
Row 3 – 4: Repeat Row 1 and 2.
Row 5: [p1, k1] three times, ssk, k until last 8 st, k2tog, [p1, k1] three times. <64 (72, 80, 88, 98, 106, 116, 124, 132) st>
Row 6: Repeat Row 2.
Row 7: [p, k1] three times, k until last 6 st, [p1, k1] three times.
Row 8: Repeat Row 2.
Row 9 – 20: Repeat Row 5 – 8 three times. <58 (66, 74, 82, 92, 100, 110, 118, 126) st>
Repeat Row 7 & 8 until you reach 22.5 (23.5, 24, 25, 26.5, 28, 30.5, 32, 33) cm /8.75 (9.25, 9.5, 10, 10.5, 11, 12, 12.5, 13)”.
Cast off and leave a long tail for sewing.
Section 3 (front left panel)
Row 1: [p1, k1] three times, k until end of the row. <36 (41, 46, 51, 55, 60, 64, 69, 74) st>
Row 2: Sl1p, k5, p until last 6 st, [p1, k1] three times.
Row 3 – 4: Repeat Row 1 and 2.
Row 5: [p1, k1] three times, ssk, k until end of row. <35 (40, 45, 50, 54, 59, 63, 68, 73) st>
Row 6: Repeat Row 2.
Row 7 – 8: Repeat Row 1 and 2.
Row 9 – 20: Repeat Row 5 – 8 three times. <32 (37, 42, 47, 51, 56, 60, 65, 70) st>
Repeat Row 1 & 2 until you reach 22.5 (23.5, 24, 25, 26.5, 28, 30.5, 32, 33) cm /8.75 (9.25, 9.5, 10, 10.5, 11, 12, 12.5, 13)”.
Cast off and leave a long tail for sewing.
Sleeves
Make 2.
Sleeves are worked from the cuff upwards.
Cast on 54 st.
Lace Cuff
Row 1 – 2: Knit across.
Row 3: K1, [yo, k2tog], k1.
Row 4 – 6: Knit across.
Row 7 – 9: Repeat Row 3 – 5
Row 10: [k1, yo, ssk, k12, k2tog, yo, k1] across.
Row 11: Purl across.
Row 12: [k2, yo, ssk, k10, k2tog, yo, k2] across.
Row 13: Purl across.
Row 14: [k3, yo, ssk, k8, k2tog, yo, k3] across.
Row 15: Purl across.
Row 16: [k4, yo, ssk, k6, k2tog, yo, k4] across.
Row 17: Purl across.
Row 18: [k5, yo, ssk, k4, k2tog, yo, k5] across.
Row 19: Purl across.
Row 20: [k6, yo, ssk, k2, k2tog, yo, k6] across.
Row 21: Purl across.
Row 22: [k4, yo, ssk, k2tog, yo, k4] across.
Row 23 – 31: Repeat Rows 1 to 9.
Plain sleeve
Row 32: Sl1k, knit across.
Row 33: Sl1p, purl across.
Row 34 – 35: Repeat Row 32 – 33.
Row 36 (increase row): Sl1k, k1, M1L, knit until last 2 st, M1R, k2. <56 st>
Row 37: Sl1p, purl across.
Work Row 32 to 37 (increase row followed by 5 rows in stockinette st) another 10 (12, 12, 10, 9, 6, 2, 0, 0) times. <76 (80, 80, 76, 74, 68, 64, 60, 56) st>
Work Row 34 to 37 (increase row followed by 3 rows in stockinette) another 0 (0, 1, 5, 8, 14, 22, 24, 26) times. <76 (80, 82, 86, 90, 96, 104, 108, 112) st>
Work Row 36 to 37 (increase row followed by 1 in stockinette) another 0 (0, 0, 0, 0, 0, 0, 2, 4) times. <76 (80, 82, 86, 90, 96, 104, 108, 112) st>
Repeat Row 32 and 33 until sleeve has a total length of 56 (57, 58, 59, 60, 61, 63, 64, 65) cm / 22 (22.5, 22.75, 23, 23.5, 24, 24.75, 25, 25.5)”.
Cast off and leave a long tail for sewing.
Hood (common to all sizes)
Cast on 108 st.
Lace Edge
Row 1 – 2: Knit across.
Row 3: K1, [yo, k2tog], k1.
Row 4 – 6: Knit across.
Row 7 – 9: Repeat Row 3 – 5
Row 10: [k1, yo, ssk, k12, k2tog, yo, k1] across.
Row 11: Purl across.
Row 12: [k2, yo, ssk, k10, k2tog, yo, k2] across.
Row 13: Purl across.
Row 14: [k3, yo, ssk, k8, k2tog, yo, k3] across.
Row 15: Purl across.
Row 16: [k4, yo, ssk, k6, k2tog, yo, k4] across.
Row 17: Purl across.
Row 18: [k5, yo, ssk, k4, k2tog, yo, k5] across.
Row 19: Purl across.
Row 20: [k6, yo, ssk, k2, k2tog, yo, k6] across.
Row 21: Purl across.
Row 22: [k4, yo, ssk, k2tog, yo, k4] across.
Row 23 – 31: Repeat Rows 1 to 9.
Plain Hood Section
Row 32: Sl1k, knit across.
Row 33: Sl1p, purl across.
Row 34 – 61: Repeat Rows 32 and 33 fourteen times.
Row 62: Sl1k, k33, k2tog 20 times, k34. <88 st>
Row 63: Sl1p, purl across.
Row 64 – 65: Repeat Rows 32 and 33.
Row 66: Sl1k, k35, k2tog 8 times, k36. <80 st>
Row 67: Sl1p, purl across.
Cast off and leave a long tail for sewing.
Pocket 1 (common to all sizes)
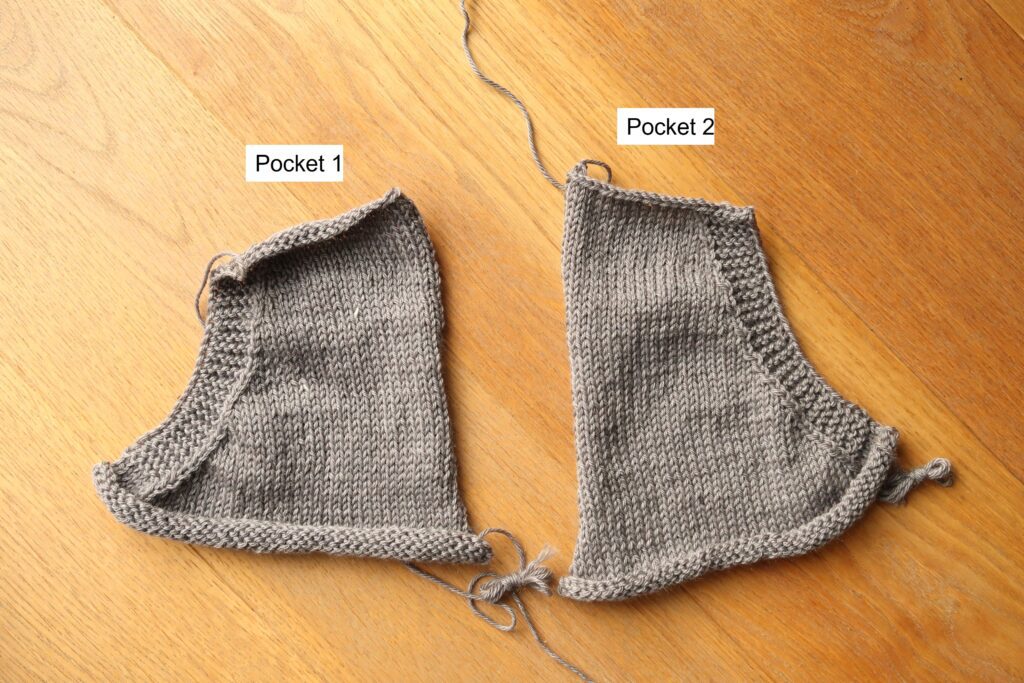
Cast on 42 st.
Row 1 – 11: Knit in stockinette st.
Row 12: K6, purl across.
Row 13: K until last 8 st, k2tog, k6. <41 st>
Row 14: K6, purl across.
Row 15 – 36: Repeat Row 13 – 14 eleven times. <30 st>
Row 37: Knit across
Row 38: K6, purl across.
Row 39: K until last 8 st, k2tog, k6. <29 st>
Row 40: K6, purl across.
Row 41 – 60: Repeat Row 37 – 40 five times. <24 st>
Cast off and leave a long tail for sewing.
Pocket 2 (common to all sizes)
Cast on 42 st.
Row 1 – 11: Knit in stockinette st.
Row 12: Purl until last 6 st, k6.
Row 13: K6, ssk, k until end of row. <41 st>
Row 14: Purl until last 6 st, k6.
Row 15 – 36: Repeat Row 13 – 14 eleven times. <30 st>
Row 37: Knit across
Row 38: Purl until last 6 st, k6.
Row 39: K6, ssk, k until end of row. <29 st>
Row 40: Purl until last 6 st, k6.
Row 41 – 60: Repeat Row 37 – 40 five times. <24 st>
Cast off and leave a long tail for sewing.
Assembly
Start by assembling the cardigan body. Sew the shoulder seams, leave 14cm/5.5” unsewn.
Then add the pockets. Attach them in the bottom corner, against the end of the lace section and the garter stitch edge. Make sure you have the slant opening opposite the bottom corner.
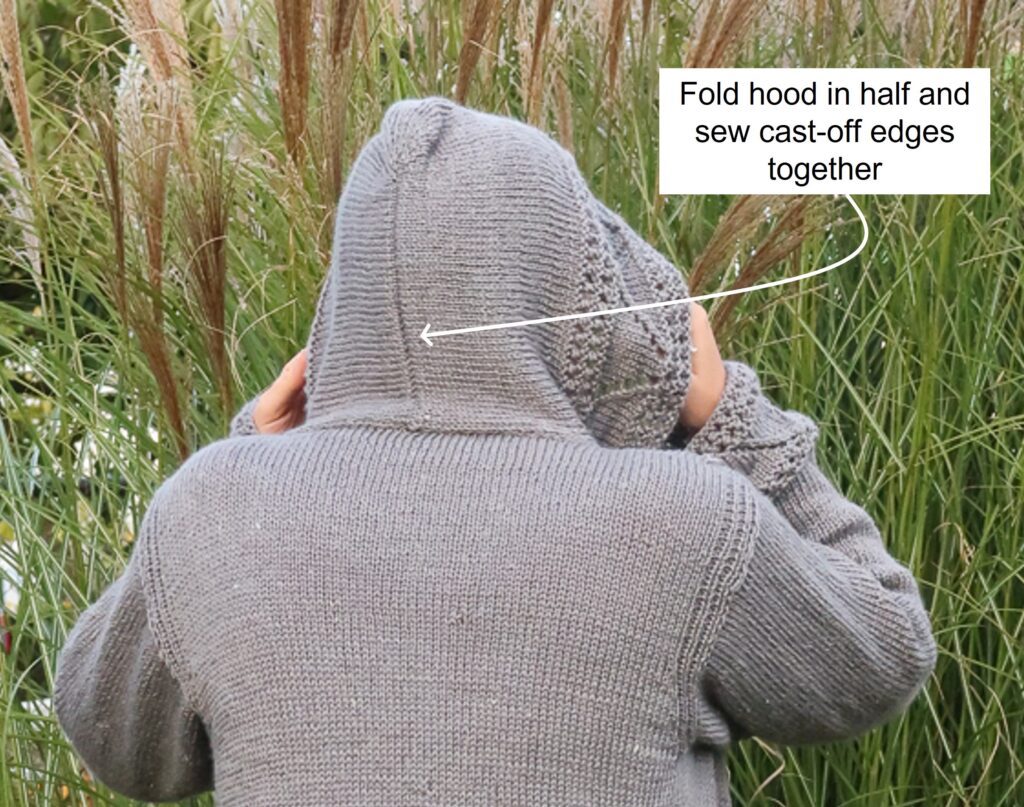
Then attach the hood. To do so, fold it in half and sew the cast-off edges together to form the hood.
Then close the cardigan and sew the non-lace edge of the hood to the cardigan neck edges (front flaps and back panel).
Finally, if working the sleeved cardigan version, attach the sleeves to the armholes. Fold the sleeve in half and attach the top to the shoulder seam. Sew it to the armhole and close the sleeve.
Weave in all the ends.
Blocking
You are done with the knitting part. Make sure to weave in all the ends.
To make hooded vest even prettier, help even your stitches, open up the lace sections and flatten your seams, steam block your project.
Don’t skip this step as it can make a huge difference. Read my detailed tutorial on why block, how-to, and all my tips and tricks if you need help.