A new beginner friendly raglan sweater knitting pattern, the Threaded Raglan Sweater, is now a free knitting pattern here on the blog. Read all about the top down seamless raglan sweater pattern construction, scroll down for the free pattern or grab the printable PDF from my shop, Etsy shop, Ravelry shop or get your Lion Brand Kit (pattern and yarn).
No time right now? Pin this top down seamless raglan sweater pattern free for later!

*This post contains affiliate links (only for products I love, use and spend my own money on obviously). This means I earn some yarn money if you make a purchase through one of these links (of course at no extra cost for you!), which I promise to use to create more awesome patterns like this one. All opinions are my own. See my full disclosure here.
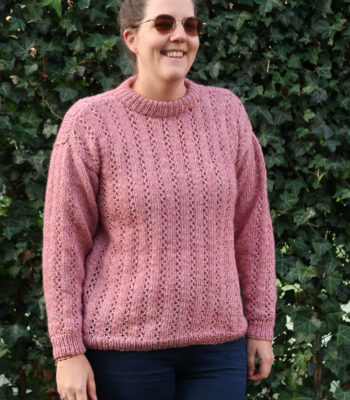
If you’ve been wanting to knit an everyday sweater that feels modern but still cozy, the Threaded Raglan Sweater is a great pick. This free pattern is worked top-down with raglan shaping, so there’s no seaming at the end—just a smooth, relaxing knit from start to finish. The little 2×2 cable detail runs right along the raglan increases and then keeps going down the sides of the sweater, adding just the right amount of texture without being too fussy. The fit is oversized and comfy, making it the kind of sweater you’ll want to throw on with jeans or leggings all season long.
The pattern is written for sizes XS through 5XL, so it’s easy to find your perfect fit. It uses DK weight yarn (#3), which gives the sweater nice drape and warmth without feeling heavy. Whether you’re new to knitting sweaters or just want a project that’s relaxing and wearable, this seamless raglan sweater is a fun one to cast on. And since you can view full pattern free on the blog, you can grab your yarn and get started right away!

Threaded Raglan Sweater Construction
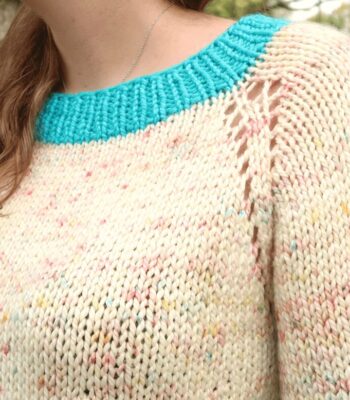
The Threaded Raglan Sweater is a classic top-down raglan sweater knitting pattern. You’ll begin by casting on at the top of the yoke and working increases along four raglan lines. The first few increases are worked on the body sections only. A simple decorative 2×2 cable is worked between the increase points, in the raglan line. To split for the sleeves, you’ll place the sleeve stitches on holders and continue knitting the body. The raglan cable continues down the sides of the sweater and into the ribbing for a delicate finish. Once the body is complete, you’ll pick up stitches to work the folded collar, then return to the sleeve stitches to finish the sleeves.

Downloadable PDF for Threaded Raglan Sweater Knitting Pattern

Grab the printable PDF of the Threaded Raglan Knit Sweater Pattern now in my shop, Etsy shop or on Ravelry shop or get the Lion Brand Kit:
Threaded Raglan Sweater Knitting Pattern Lion Brand Kit
Knit your own cozy oversized sweater! This sweater uses Lion Brand Wool-Ease DK (Light #3), a soft and durable blend of 80% acrylic and 20% wool that’s perfect for everyday wear. Pick your yarn color for this pattern kit, and you’ll need 4 (4, 5, 5, 6) (6, 7, 8, 8) skeins depending on your size (XS–5XL). With its seamless top-down raglan construction and simple cable detail along the raglan lines, this sweater is modern, comfy, and easy to knit—perfect for adding a handmade essential to your wardrobe.

More Easy Oversized Sweater Knitting Pattern you'll love

Before You Start Your Threaded Raglan Sweater Knitting Pattern
Materials
- 3.5 mm/ US 4 circular knitting needles
- 4 mm/ US 6 circular knitting needles
- Lion Brand Wool-Ease DK (DK/Light weight 3, 85g, 80% acrylic, 20% wool,
232 yds / 212 m): you will need 4 (4, 5, 5, 6) (6, 7, 8, 8) skeins in Bluegrass
color SKU636-109AR. - Tapestry needle to weave in the ends
- 8 stitch markers
- Stitch holders*
*You can use a thread of unused yarn, an interchangeable cable or other substitute.
Size
The sweater is available in the following sizes: XS to 5XL. Sizes are noted throughout the pattern in the following way: XS (S, M, L, XL) (2XL, 3XL, 4XL, 5XL). The pictures illustrate the XL size.

The final sweater measurements are:
| Sweater Sizes | XS | S | M | L | XL | |
| a | Bust (cm) | 80 | 90 | 102 | 112 | 121 |
| a | Bust (inch) | 31.5 | 35.5 | 40 | 44 | 47.75 |
| b | Upperarm Circumference (cm) | 31 | 32 | 34 | 36 | 40 |
| b | Upperarm Circumference (inch) | 12 | 12.5 | 13.25 | 14 | 15.75 |
| c | Yoke Depth (cm) | 25 | 26 | 27 | 28 | 34 |
| c | Yoke Depth (inch) | 9.75 | 10.25 | 10.75 | 11.25 | 12.75 |
| d | Sleeve Length (cm) | 30 | 31 | 31 | 32 | 32 |
| d | Sleeve Length (inch) | 11.75 | 12 | 12 | 12.75 | 12.75 |
| e | Sweater Total Length (cm) | 53 | 54 | 55 | 56 | 60 |
| e | Sweater Total Length (inch) | 20.75 | 21.25 | 21.75 | 22.25 | 23.5 |
| Top Sizes | 2XL | 3XL | 4XL | 5XL | |
| a | Bust (cm) | 132 | 144 | 154 | 164 |
| a | Bust (inch) | 52 | 56.5 | 60.5 | 64.75 |
| b | Upperarm Circumference (cm) | 51 | 51 | 52 | 52 |
| b | Upperarm Circumference (inch) | 20.25 | 20.25 | 20.5 | 20.5 |
| c | Yoke Depth (cm) | 32 | 35 | 36 | 38 |
| c | Yoke Depth (inch) | 12.5 | 14.5 | 14.5 | 15.0 |
| d | Sleeve Length (cm) | 33 | 33 | 35 | 35 |
| d | Sleeve Length (inch) | 13 | 13 | 13.75 | 13.75 |
| e | Sweater Total Length (cm) | 60 | 53 | 64 | 66 |
| e | Sweater Total Length (inch) | 23.5 | 24.5 | 25.00 | 26.25 |
The sweater is designed with a loose oversized fit 6 – 12 cm / 2.5- 5” ease at the bust.
You can easily adjust the length to your desired length, just add/remove length before the final. This will modify your required yarn quantity.
Gauge
The gauge for this pattern, in stockinette stitch, is 19.5 st by 26 rows for a 10 cm by 10 cm square (4” by 4”).
Abbreviations & Instructions
- st = stitch
- k = knit
- M1R
- wyif = with yarn in front
- sl3p = slip 3 stitches purlwise
Repeat instructions between [] the indicated number of times or until the end of the
round/row.
The final number of stitches is indicated at the end of the round/row between < >.
Special Stitches and Techniques
- M1R (knitwise): Insert your left needle from back to front, under the bar between the stitches (thus lifting it onto the left needle). Knit this bar through the front loop (this twists it into a nice little tight loop).
- M1L (knitwise): Insert the left needle from front to back, under the bar between the stitches (thus lifting it onto the left needle). Knit this bar through the back loop (this twists it into a nice little tight loop). If you are not familiar with this increase technique, I find this tutorial very helpful.
- C4F: left-leaning 4-stitch cable
o You slip 2 stitches to a cable needle and hold them in front
o Knit the next 2 stitches from the left needle
o Then knit the 2 stitches from the cable needle - Folded collar: This video tutorial shows you how to cast off the folded collar while attaching it to the picked-up stitches in an invisible seamless manner.
- Italian Tubular Bind Off: For a neat polished finish and stretchy cuffs and bottom ribbing, I recommend using the tubular cast off. If you’re not familiar with this technique you’ll find a detailed video tutorial here. Alternatively you can substitute with a different bind off method if you prefer.
- The Threaded sweater knitting pattern features folded collar. Find the detailed video tutorial here.
Sweater Construction
The Threaded Raglan Sweater is a classic top-down raglan sweater knitting pattern. You’ll begin by casting on at the top of the yoke and working increases along four raglan lines. The first few increases are worked on the body sections only. A simple decorative 2×2 cable is worked between the increase points, in the raglan line. To split for the sleeves, you’ll place the sleeve stitches on holders and continue knitting the body. The raglan cable continues down the sides of the sweater and into the ribbing for a delicate finish.
Once the body is complete, you’ll pick up stitches to work the folded collar, then return to the sleeve stitches to finish the sleeves.

Repeated Patterns
Along the raglan lines a C4F cable is worked throughout every 6 rounds. 2 purl stitches on each side of the cable separate it from the stockinette of the sweater.
This cable is continued along the body of the sweater on each side and throughout the bottom ribbing.
The Actual Free Threaded Raglan Sweater Knitting Pattern
Yoke
With your 4 mm / US 6 needles cast on 96 (96, 98, 102, 104) (106, 108, 116, 116)st and join in the round.
Place markers at each comma below (without working the stitches):
- XS: 30 st, 18 st, 30 st, 18 st
- S: 34 st, 14 st, 34 st, 14 st
- M: 33 st, 16 st, 33 st, 16 st
- L: 35 st, 16 st, 35 st, 16 st
- XL: 34 st, 18 st, 34 st, 18 st
- 2XL: 37 st, 16 st, 37 st, 16 st
- 3XL: 40 st, 14 st, 40 st, 14 st
- 4XL: 44 st, 14 st, 44 st, 14 st
- 5XL: 44 st, 14 st, 44 st, 14 st
Note: You now have 4 st markers. Each markers marks the middle of the raglan line and cable.
Body Only Increases
Round 1: [k2, p2, k until 4 st before marker, p2, k2, slip marker] 4 times.

Round 2 (increase body only): [k2, p2, M1L, k until 4 st before marker, M1R, p2, k2, slip marker, k2, p2, k until 4 st before marker, p2, k2] twice. <100 (100, 102, 106, 108) (110, 112, 120, 120) st>
Round 3-4: Repeat Round 1 and 2. <104 (104, 106, 110, 112) (114, 116, 124, 124) st>
Round 5: Repeat Round 1 until last 2 st.
Note: Keep the markers in the middle of the C4F in the next round
Round 6 (increase body + cable): C4F with last 2 st of previous round, p2, M1L, k until 4 st before marker, M1R, p2, C4F, p2, k until 4 st before marker, p2, C4F, p2, M1L, k until 4 st before marker, M1R, p2, C4F, p2, k until 4 st before marker, p2, k2. <108 (108, 110, 114, 116) (118, 120, 128, 128) st>
Increase Body and Sleeves
Round 1: [k2, p2, k until 4 st before marker, p2, k2, slip marker] 4 times.
Round 2: [k2, p2, M1L, k until 4 st before marker, M1R, p2, k2, slip marker] four times. <116 (116, 118, 122, 124) (126, 128, 136, 136) st>
Round 3 – 4: Repeat Round 1 and 2. <124 (124, 126, 130, 132) (134, 136, 144, 144) st>
Round 5: Repeat Round 1
Round 6: C4F with last 2 st of previous round, p2, M1L, k until 4 st before marker, [M1R, p2, C4F, p2, M1L, k until 4 st before marker] three times, M1R, p2, k2. <132 (132, 134, 138, 140) (142, 144, 152, 152) st>
Repeat Round 1 to 6 for a total of 21 (24, 25, 27, 30) (32, 33, 31, 28) increase rounds. <276 (300, 310, 330, 356) (374, 384, 376, 352) st>
For sizes 2XL to 5XL only
Continue working the cable repeat and increase every round for X (X, X, X, X)(10, 10, 13, 16) rounds. <X (X, X, X, X) (454, 464, 480, 480) st>
Increase Body Only
Work 0 (0, 5, 7, 9) (1, 4, 6, 11) increases following body only increase rounds 1 – 6 continuing the cable repeat. <276 (300, 330, 358, 392) (458, 480, 504, 524) st>
No Increases
Continue working in stockinette and cable pattern without increase for 18 (14, 5, 0, 0) (0, 0, 0, 0) rounds: [k2, p2, k until 4 st before marker, p2, k2, slip marker] 4 times
Body
Split for sleeves by placing stitches for the sleeves on holders in the next round:
- XS: k78, place 60 on holder, k78, place 60 on holder
- S: k88, place 62 on holder, k88, place 62 on holder
- M: k99, place 66 on holder, k99, place 66 on holder
- L: k109, place 70 on holder, k109, place 70 on holder
- XL: k118, place 78 on holder, k118, place 78 on holder
- 2XL: k129, place 100 on holder, k129, place 100 on holder
- 3XL: k140, place 100 on holder, k140, place 100 on holder
- 4XL: k150, place 102 on holder, k150, place 102 on holder
- 5XL: k160, place 102 on holder, k160, place 102 on holder
Continue working in the round working in stockinette and cable pattern repeating Body Round below until length from arm split is 23 cm / 9”.
Body Round: [k2, p2, k until 4 st before marker, p2, k2, slip marker] twice
Switch to 3.5 mm / US 4 knitting needles and work 5 cm / 2” in ribbing (keeping the cable pattern):
Ribbing Round: *k2, p2, [k1, p1] until 4 st before marker, p2, k2, slip marker, repeat from *.
Bind off using the Italian Tubular bind off and weave in the end.
Collar
Note: Before working the sleeves, I like to work the folded collar but this step can also be done before working the body or after the sleeves. It will have a big impact on any work in progress fit and length checks you make.

With your 4 mm / US 6 knitting needles, pick up 96 (96, 98, 102, 104) (106, 108, 116, 116).
[k1, p1] around for 10 cm / 4”.
Using the folded collar technique, bind off your collar to the inside of the picked-up stitches and weave in the end.
Sleeves
Note: Before working the sleeves, I like to work the folded collar but this step can also be done before working the body or after the sleeves. It will have a big impact on any work in progress fit and length checks you make.

Go back to the stitches you left aside for the sleeves. You’ll pick up some extra stitches and then decrease to avoid the classic gap at the underarm.
Round 1: Pick up 2 st, knit around, pick up 2 st. <64 (66, 70, 74, 82) (104, 104, 106, 106) st>
Round 2: Ssk, knit until last 2 st, k2tog. <62 (64, 68, 72, 80) (102, 102, 104, 104) st>
Round 3: Repeat Round 2. <60 (62, 66, 70, 78) (100, 100, 102, 102) st>
Work 22 (22, 22, 22, 22) (0, 0, 0, 0) rounds without decrease.
[Decrease: K1, ssk, knit until last 3 st, k2tog, k1
Knit 10 (8, 7, 6, 5) (3, 3, 3, 3) rounds] 2 (2, 3, 4, 7) (17, 16, 16, 15) times.
Work in the round until length from underarm is 25 (26, 26, 27, 27) (28, 28, 30, 30) cm / 9.75 (10, 10, 10.75, 10.75) (11, 11, 11.75, 11.75)”.
[k1, p1] around for 5 cm / 2”.
Bind off using the Italian Tubular bind off and weave in the end.
Blocking
You are done with the knitting part. Make sure to weave in all the ends.
To make your sweater prettier, help the cables pop and even out your stitches, carefully block your project to final dimensions.
Don’t skip this step as it can make a huge difference. Read my detailed tutorial on why block, how-to, and all my tips and tricks if you need help.
Please Respect My Work
You may not share, sell or claim my patterns as your own. You can make finished items to sell (i.e. on Etsy, at craft fairs) from my patterns but I ask that you link back to my blog knittingwithchopsticks.com and provide credit for the pattern. Copyright 2025
I love to see your projects, tag them #knittingwithchopsticks so I can see and share what you make.
Thank you!